Key Points and Important Steps
The Pipeline Builder helps you create intelligent workflows with AI capabilities. It enables you to build powerful generative AI applications by connecting various components that handle data retrieval, processing, and response generation. This documentation guides you through key concepts, best practices, and troubleshooting.
Core Concepts
1. Pipeline ID
Every pipeline in the system has a unique Pipeline ID (also called Resource ID) that serves as its identifier throughout the platform. This ID is displayed as ResourceID when you open a pipeline and is used for various operations.
Key Points About Pipeline IDs
Pipeline IDs are displayed as "ResourceID" in the pipeline configuration dialog.
They are automatically generated when a new pipeline is created but can be customized.
Pipeline IDs use lowercase letters, numbers, and hyphens (no spaces or special characters).
Example format: "myfirstgenaipipeline"
They can be found in the pipeline settings dialog as shown in the image below:
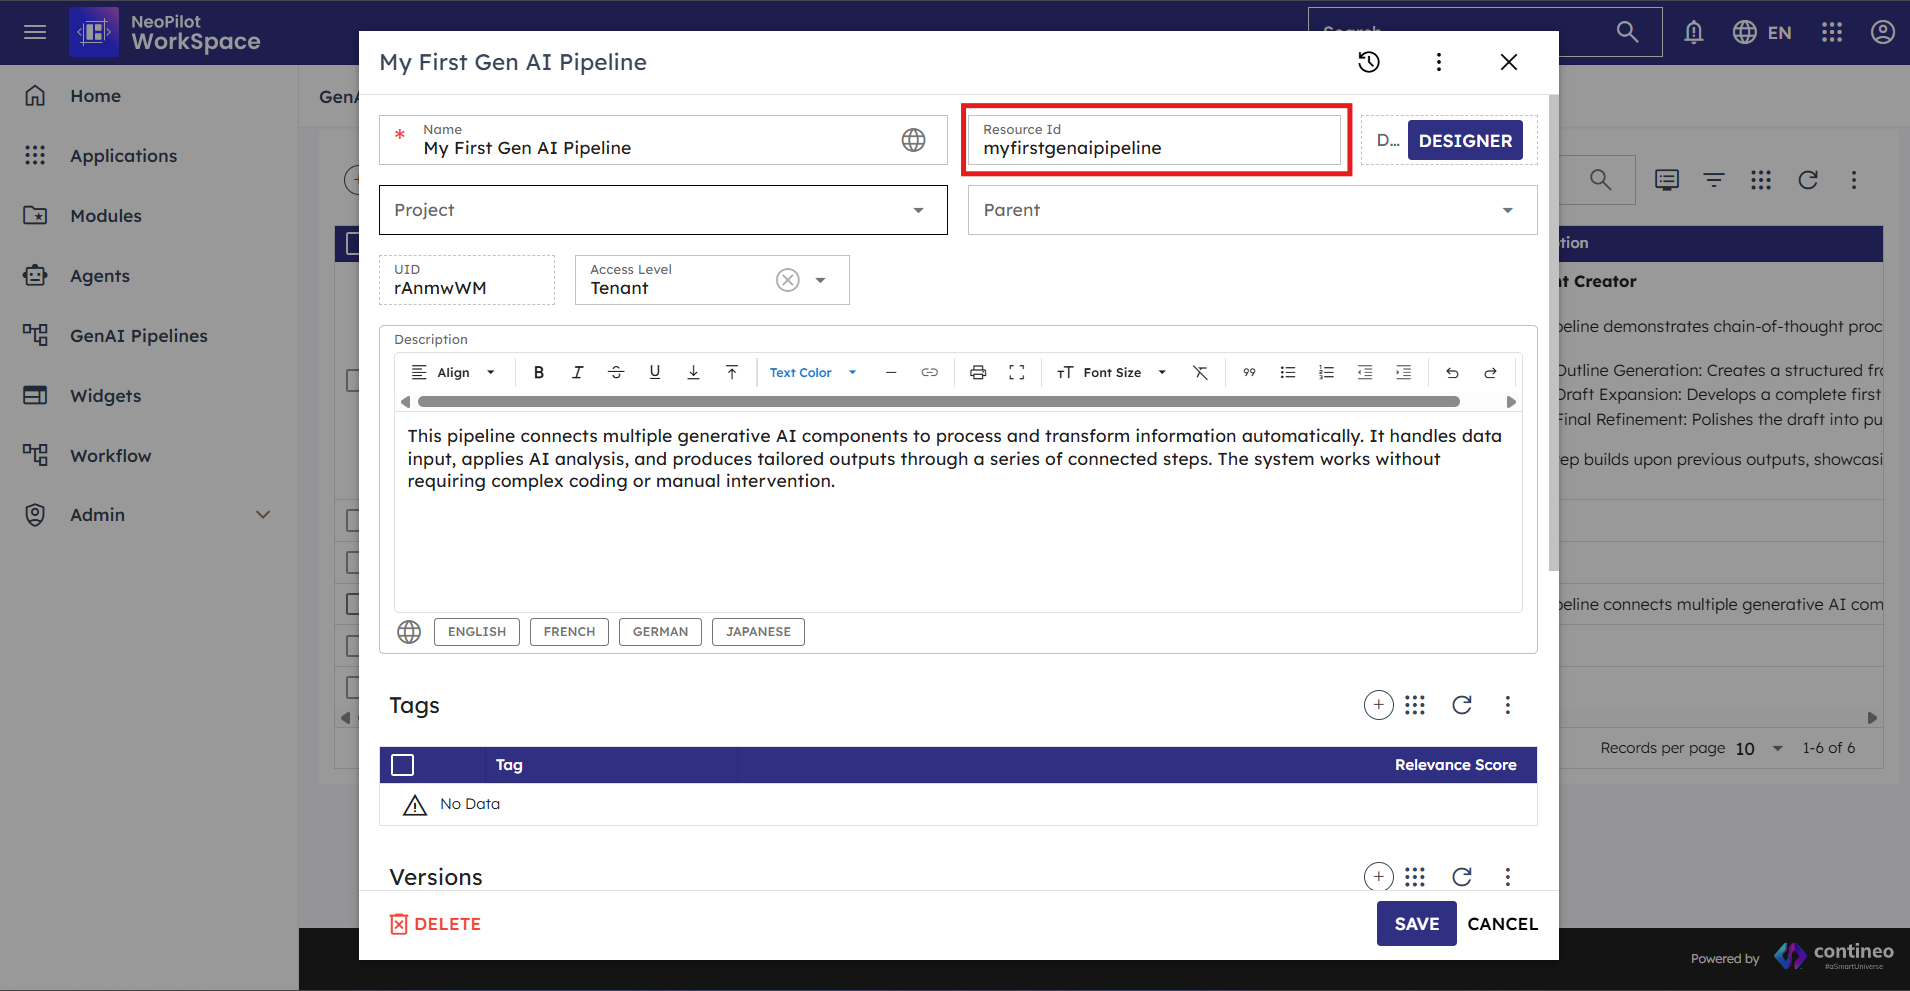 Figure 1.1: Pipeline Resource ID field in the pipeline configuration dialog
Using Pipeline IDs
Use Pipeline IDs when sharing pipelines with team members.
Reference Pipeline IDs in documentation to identify specific workflows.
Pipeline IDs are needed when programmatically interacting with pipelines via APIs.
2. Step ID
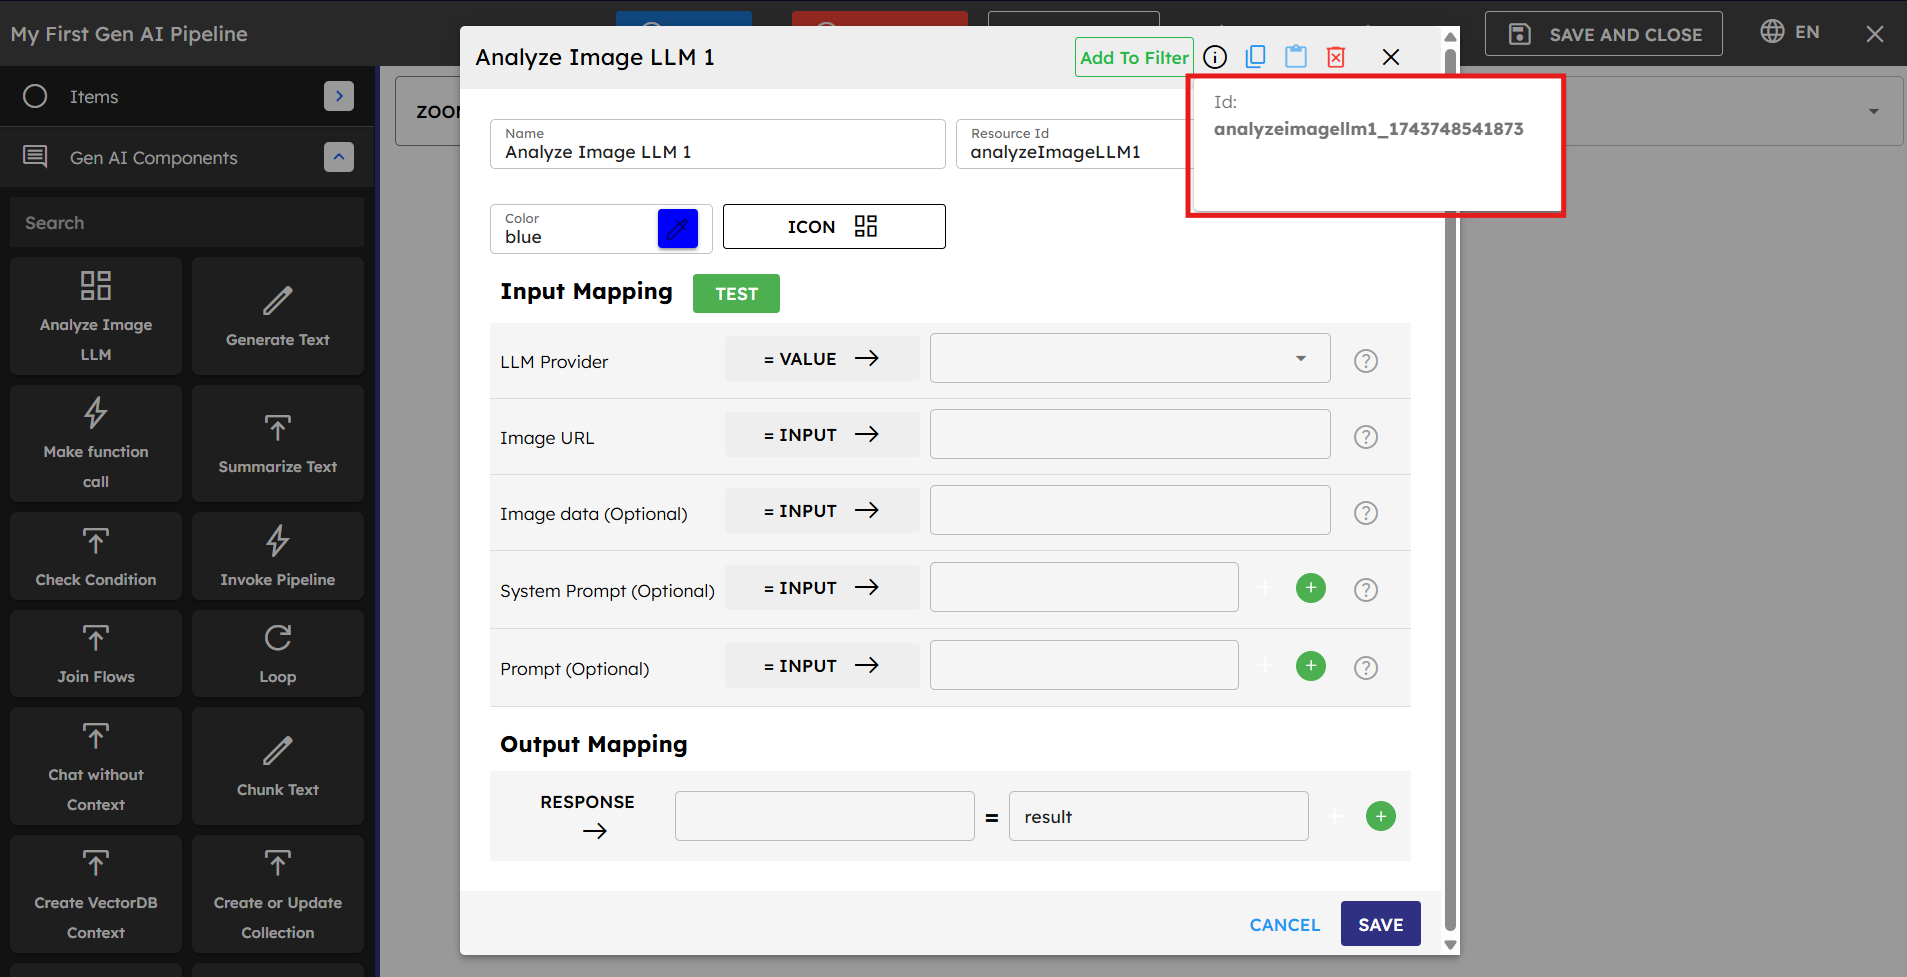
Each component within a pipeline has a unique Step ID that identifies it within that pipeline. The Step ID is displayed as "ID:" in the component configuration dialog, as shown in the image below.
Understanding Step IDs
Step IDs are automatically assigned when components are added to a pipeline.
They typically follow a format that includes the component type and a unique identifier (such as "analyzeImagellm1_174374854187")
They are used to reference specific components within the pipeline structure.
Step IDs help with debugging and tracing the execution flow.
They remain consistent even if the component's position in the pipeline changes.
Working with Step IDs
Use Step IDs to map outputs from specific components.
Step IDs are especially important in Loop Components, where they are used to reference components that should be executed within the loop.
Reference Step IDs in error messages to identify problematic components.
Step IDs appear in logs to help track pipeline execution.
When troubleshooting, check which Step ID is causing the issue.
3. Input/Output Mapping and Data Flow
Input/Output mapping is how components share data in a pipeline. Understanding this system is essential for building effective workflows.
How Data Flows Between Components
Each component has inputs it needs to work and outputs it produces.
You can map data from one component's output to another component's input.
Data can flow between individual components but they can also be accessed in another pipeline if it is invoked.
Session variables serve as storage locations for data throughout the pipeline execution.
Session Variables
Session variables are temporary storage locations that exist for the duration of a pipeline execution. They are a critical part of input/output mapping and allow you to:
Save results from one component to use in later components.
Accumulate data throughout the pipeline process.
Share information between pipelines using Invoke Pipeline Component.
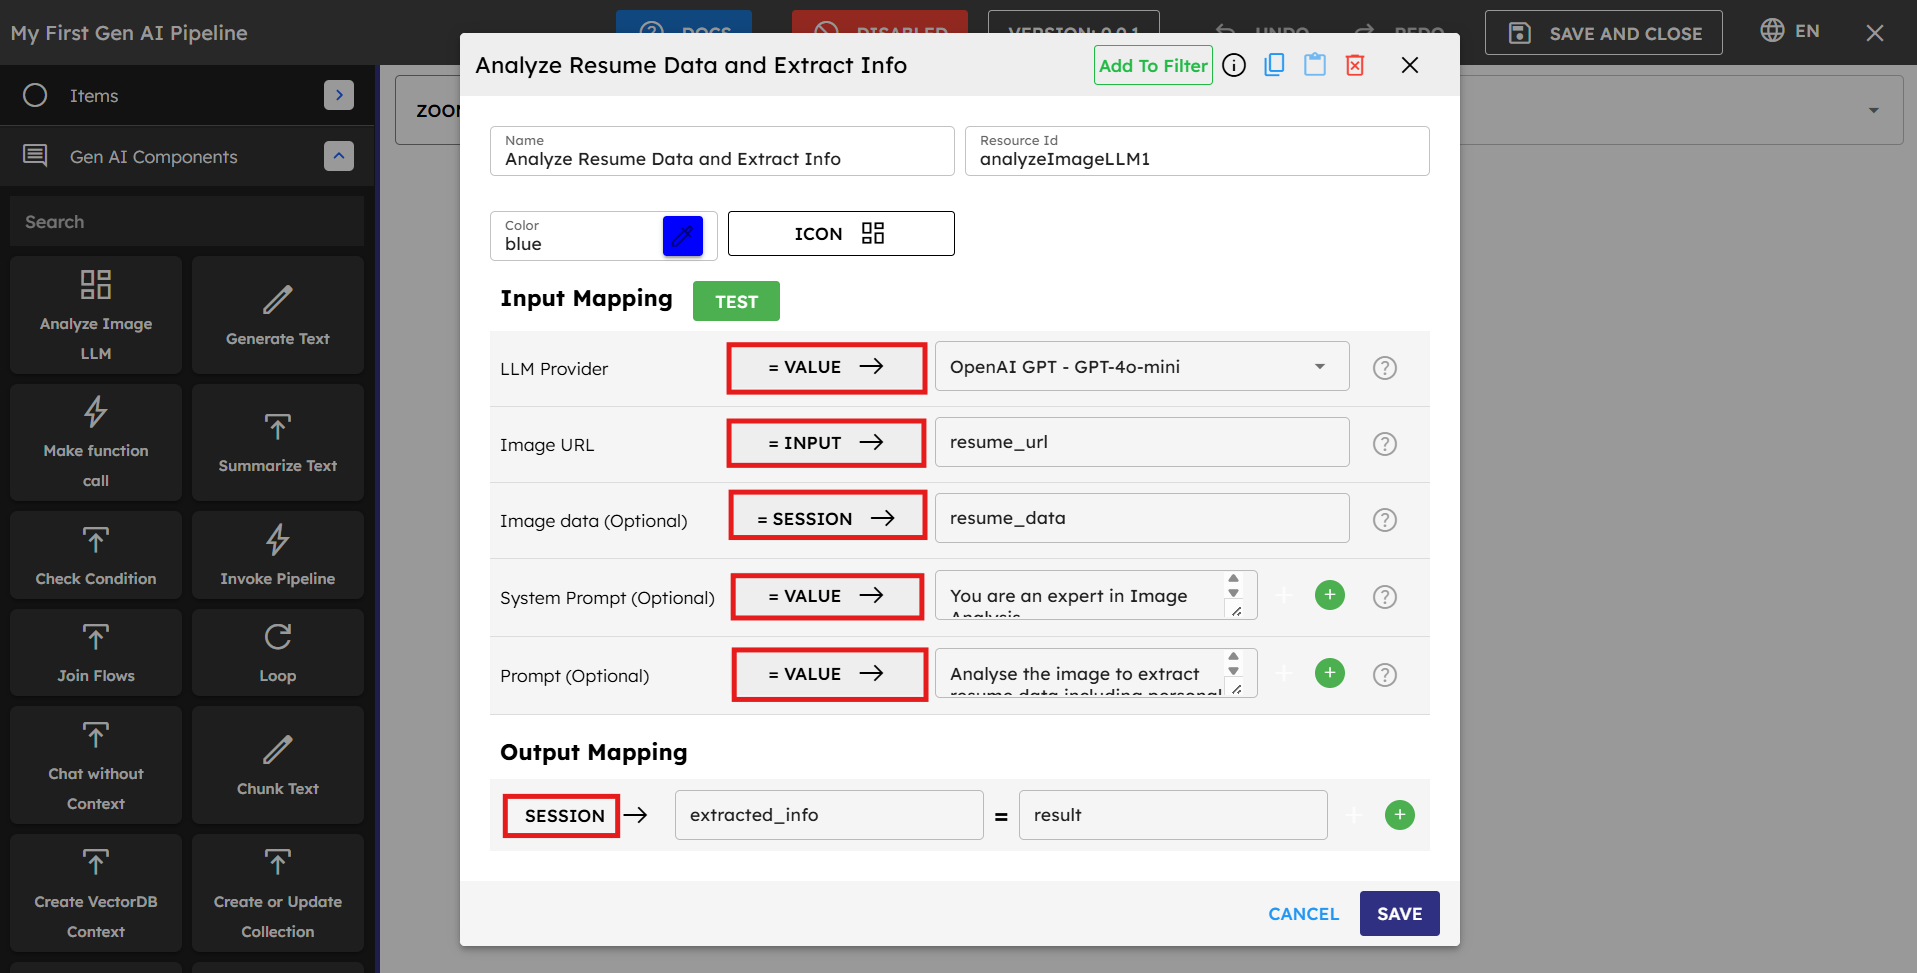 Figure 3.1: Session variable configuration interface
Session variables are created and managed through the mapping process:
Creating Variables: You need to manually create session variables by naming them when mapping component outputs. Choose logical names related to the process or data they store.
Accessing Variables: Use existing variables as inputs for components by selecting the Session option.
Updating Variables: Change variable values by mapping new outputs to them.
Sample session variable names:
userInput: For storing initial user queries.
generatedText: For text generated by AI models.
analysisResults: For data analysis outputs.
contextData: For information retrieved from databases.
processState: For tracking the current state of processes.
Component Input Options
When configuring any component in a pipeline, you have three distinct options for each input field:
Input: Select this option to access external data that comes into the pipeline from outside sources, such as user queries or agent data. You need to specify the exact variable name containing the incoming data.
Value: Choose this option to manually enter fixed data directly into the field. This can include text, numbers, code snippets, prompts, JSON objects, or any other static content that does not change during execution.
Session: Use this option to access data that is stored within the pipeline's session. This is how you utilize outputs from previous components—simply enter the session variable name where the data was stored, and the component retrieves that value during execution.
Component Output Options
After a component processes its inputs, you need to define where the results should go:
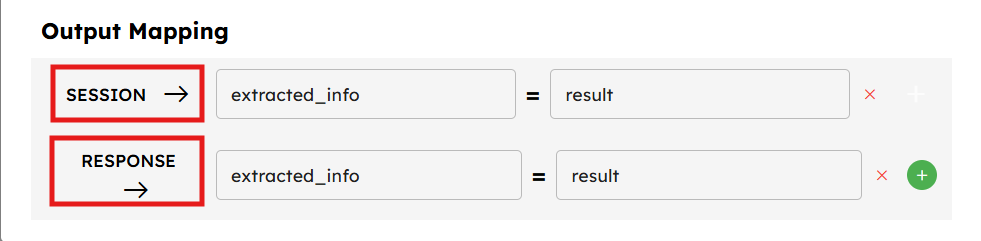
There are two main ways to handle component outputs:
To Session Variables: Map the component's output to a session variable to make it available to other components. If you keep the output of a component in a session variable, then it can be accessible to the next or any other component in the pipeline.
As Response: If you map the output as a response, then the output of the component is shown or becomes visible to the user after the whole pipeline execution is complete.
Output mapping ensures that data flows smoothly through your pipeline and each component has access to the information it needs from previous steps.
Best Practices for Input/Output Mapping
Use clear, descriptive names for session variables.
Check that data types match between outputs and inputs.
Validate data at key points in the pipeline.
Document expected input formats and required fields.
Keep output structures consistent across pipeline versions.
Include status information in pipeline outputs for monitoring.
Example: Image Analysis Pipeline
Let's examine a practical example of input/output mapping in a pipeline that analyzes an image and then generates text based on that analysis.
Step 1: Analyze Image LLM Component
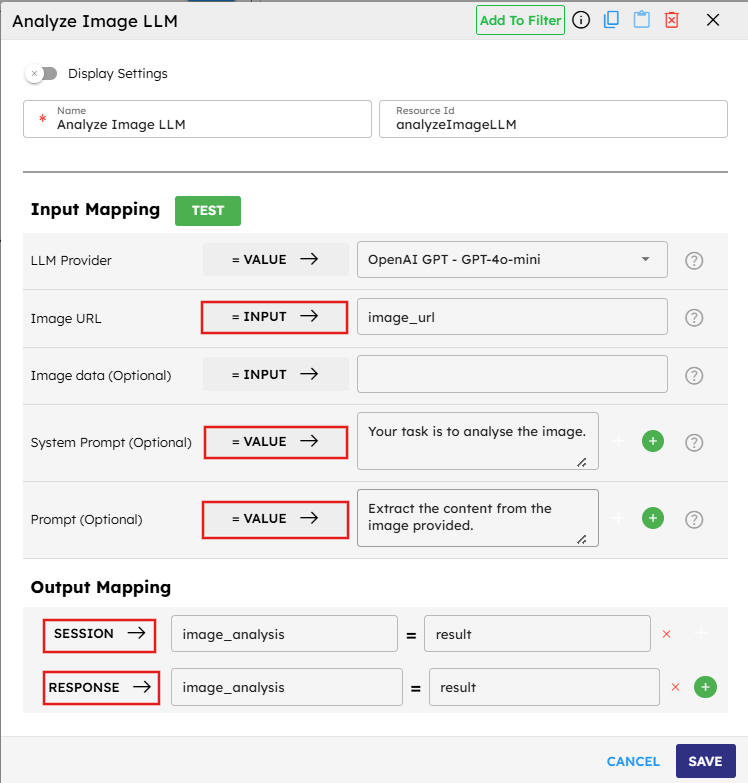
In this first component, configure inputs and outputs as follows:
LLM Provider is set to
= VALUEbecause there is a fixed LLM service (OpenAI GPT-4o-mini) that does not change during execution.Image URL is set to
= INPUTbecause the image URL must come from outside the pipeline (such as from a user or another system).System Prompt is set to
= VALUEbecause fixed instruction is provided to the AI model ("Your task is to analyze the image.").Prompt is set to
= VALUEwith specific instructions on what to extract from the image.
For the output mapping:
Map the result to
SESSION → image_analysisto store the analysis in a session variable that can be used by subsequent components.Map it to
RESPONSE → image_analysiswhich means the image analysis is available in the final pipeline response to the user.
Step 2: Generate Text Component
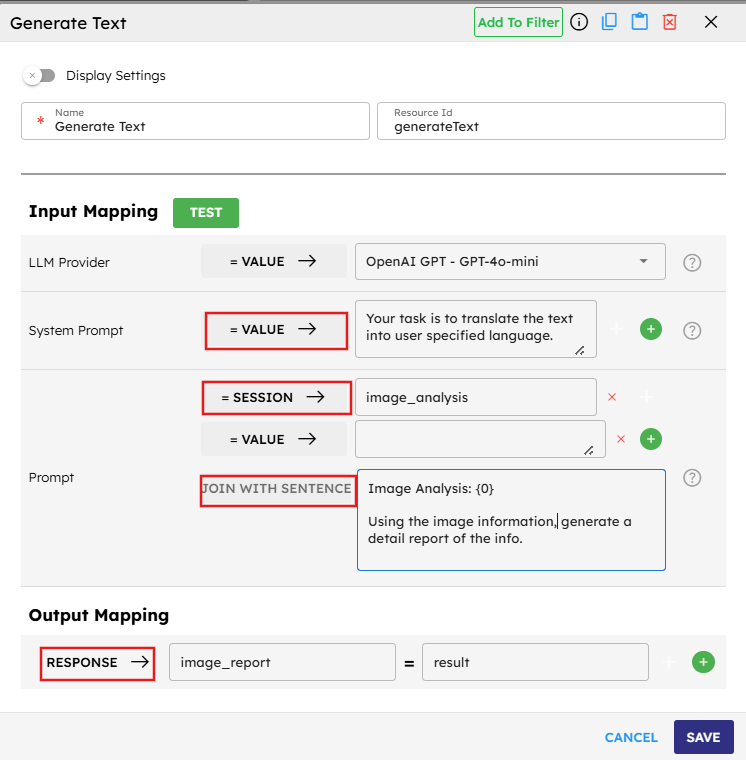
In the second component, use the results from the first component:
LLM Provider is set to
= VALUEagain with OpenAI GPT-4o-mini specified.System Prompt is set to
= VALUEwith instructions for translation.Image Analysis field is set to
= SESSIONand references theimage_analysisvariable created by the previous component. This demonstrates how session variables act as bridges between components.Prompt includes a
JOIN WITH SENTENCEoption which combines the specified text with the input to form a complete instruction. This allows us to create context-specific prompts that include details from previous steps.
For the output mapping:
Map the result to
RESPONSE → image_reportwhich means this is the final output shown to the user.
Key Takeaways from this Example
VALUE is used for static content that does not change during execution (LLM provider selection, system prompts).
INPUT is used for data coming from outside the pipeline (the image URL).
SESSION is used for passing data between components (image analysis results).
The pipeline has a clear data flow: external image URL → image analysis → text generation.
Session variables act as "memory" for the pipeline, allowing information to be shared between steps.
RESPONSE mapping determines what the user sees when the pipeline completes execution.
This example illustrates how the different input and output options work together to create a cohesive data flow through the pipeline, allowing complex operations to be broken down into manageable steps that build on each other's results.
4. Connection Types and Connecting Components
This section, explains how to connect various components to construct a pipeline. Making the right connections between components is essential for creating effective workflows.
Basic Connection Types
onState: Used for connecting the first component to the Start node. This is applied automatically when you connect a component to Start.
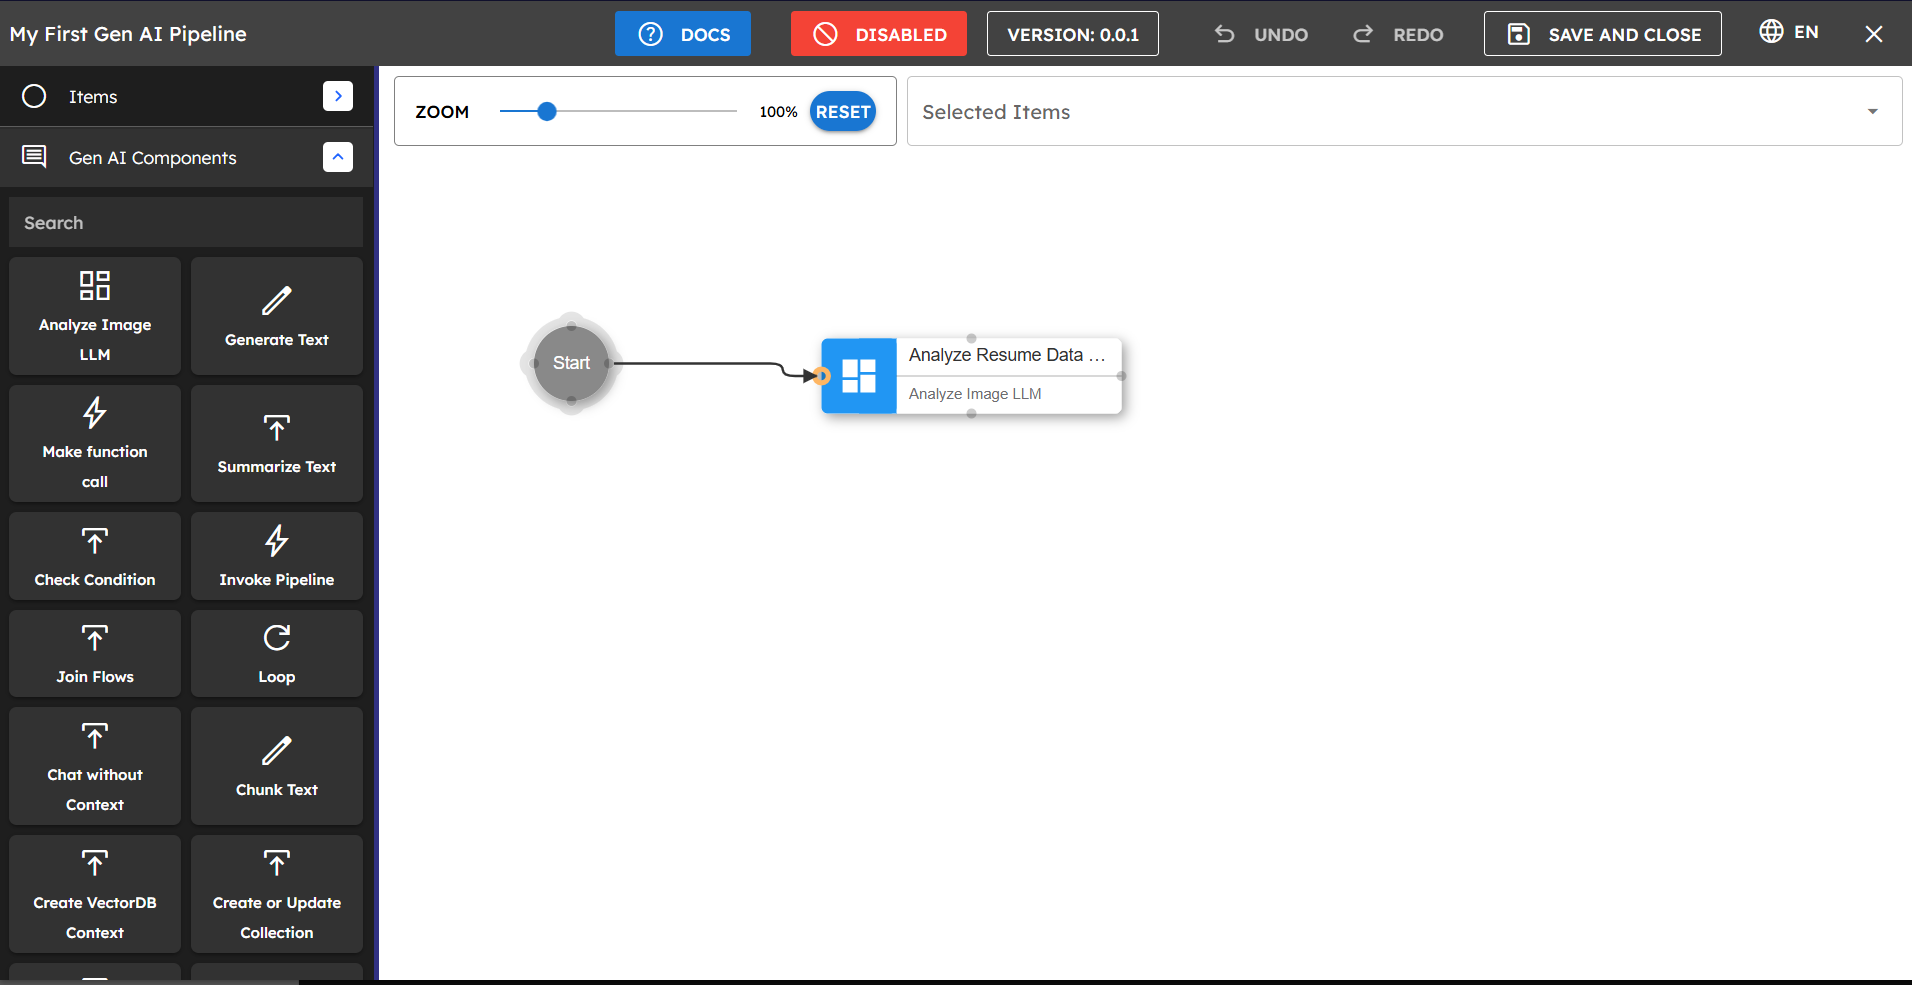 Figure 4.1: Creating a connection from Start to a component

onSuccess: The default connection type between components. It means the next component is executed when the current component completes successfully.
onError: Used to create alternative paths if a component encounters an error. The connected component only executes if an error occurs.
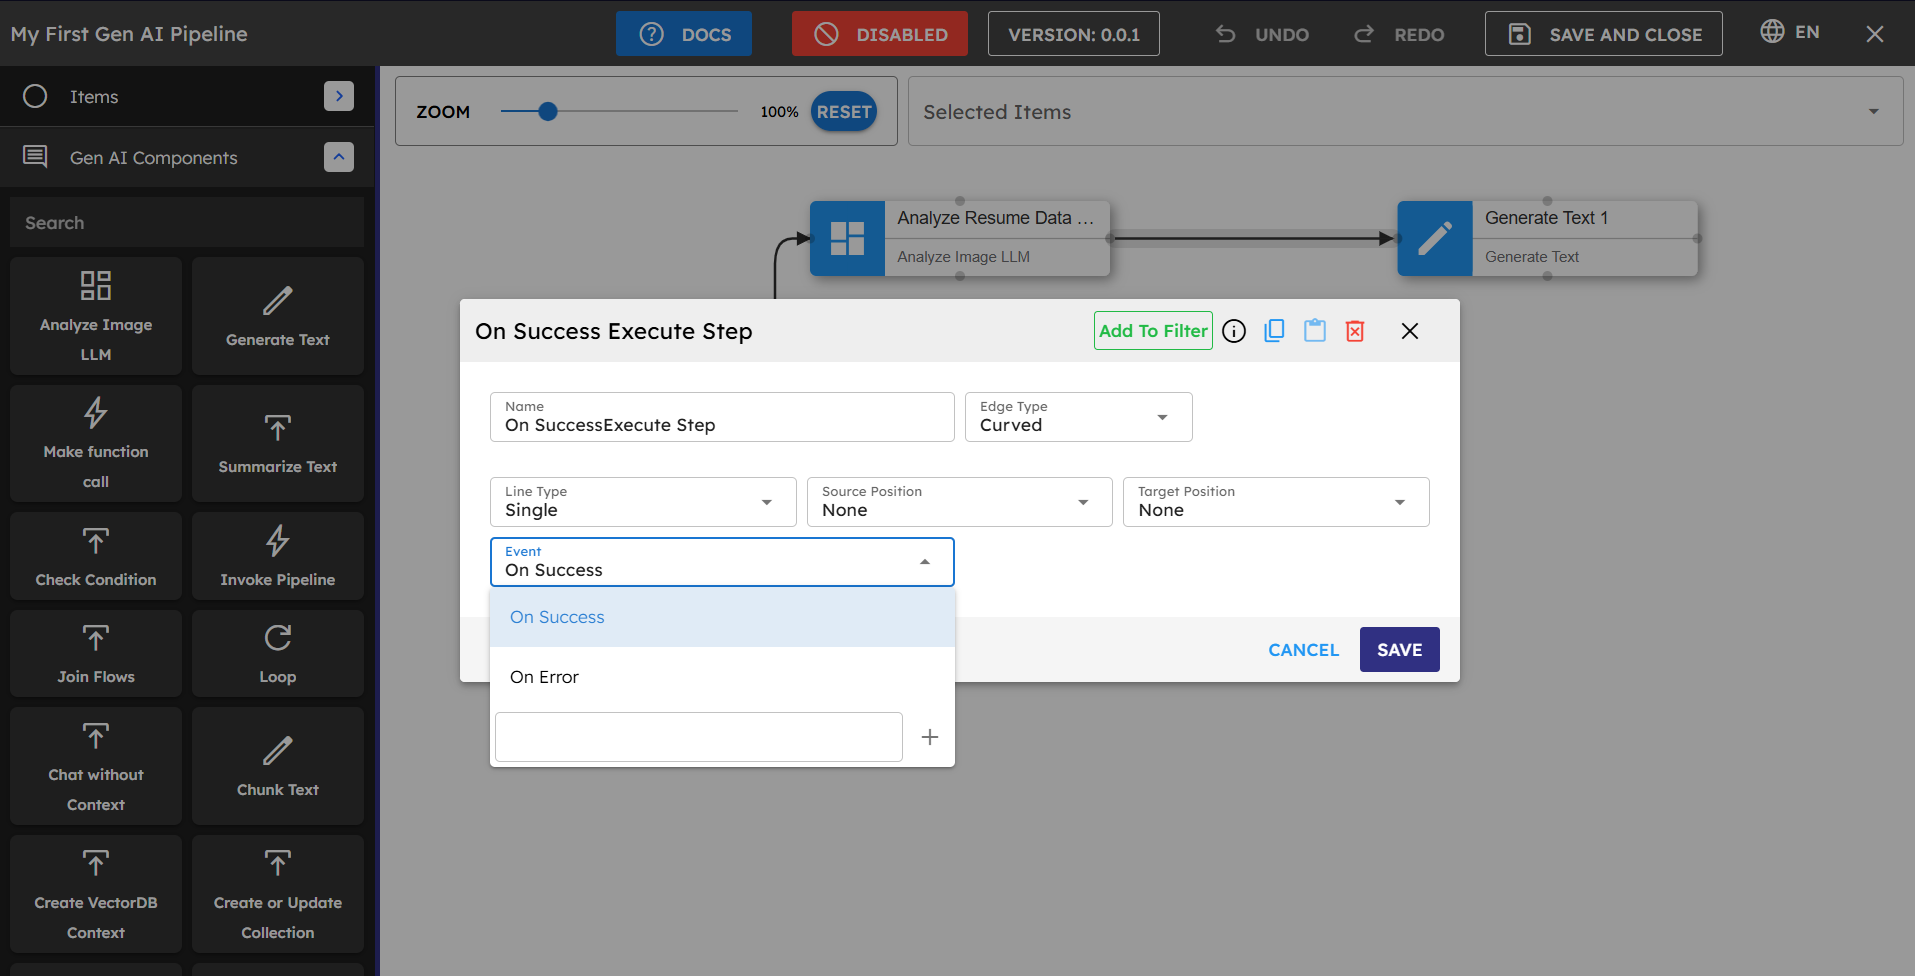 Figure 4.3: onSuccess and onError connection options in the dropdown
Component-Specific Connection Types
Loop Component:
forEach: When this connection type is used, each element from the loop is processed by the connected components until the end of the loop for that particular item.
onSuccess: This connection is followed after the entire loop has finished processing all elements. Use this to continue the pipeline after loop completion.
onError: Connected components execute if an error occurs in any iteration of the loop.
Check Condition Component:
ifTrue: If the condition is satisfied, components connected with this connection type execute.
ifFalse: If the condition is not satisfied, components connected with this connection type execute.
onSuccess: Components with this connection execute after the completion of the check condition block (regardless of whether the condition was true or false).
onError: Used to handle any errors that occur during condition evaluation.
How to Connect Components
Always connect your first component to the Start node to establish the pipeline's entry point.
Select the source component (or Start), then click and drag to the target component.
After releasing the drag, a connection configuration window appears.
Select the appropriate connection type based on your workflow needs.
Click Save to create the connection.
Connection Best Practices
Use clear, logical flows with minimal crossing lines for better readability.
Always include error-handling connections for critical components.
Test each connection path to ensure the pipeline behaves as expected in all scenarios.
When connecting loops or conditions, carefully consider which connection type best suits your process flow.
Complex workflows may benefit from being broken into multiple smaller pipelines that can be connected using the Invoke Pipeline component.
5. Copy a Block
The Copy a Block feature allows you to duplicate and reuse components or groups of components within your pipeline or across different pipelines.
How to Copy a Block
Select one or multiple components you want to copy.
Use the Copy option from the context menu or keyboard shortcut.
Navigate to the desired location in the same or different pipeline.
Paste the copied components using the Paste option or keyboard shortcut.
What Gets Copied
Component configurations and settings.
Internal connections between copied components.
Component properties and custom settings.
Visual layout and arrangement (within the pipeline canvas).
What Does Not Get Copied
Connections to components outside the selected block.
Runtime data or execution state.
Pipeline-specific configurations.
Step IDs (new IDs are assigned to copied components).
Best Practices for Copying Blocks
Create reusable component patterns that can be copied across pipelines.
After copying, verify and update any broken connections.
Adjust variable references to match the new pipeline context.
Document commonly copied blocks for team reference.
Test Step
The Test Step functionality allows you to validate and debug individual components within your pipeline before running the entire workflow.
How to Use Test Step
Select any component in your pipeline to test it independently.
Configure test inputs to simulate real data the component would receive.
Run the test to see how the component processes the inputs.
Examine outputs to verify the component behaves as expected.
Benefits of Test Step
Isolate and debug specific components without running the entire pipeline.
Verify component behavior with different input configurations.
Quickly iterate on component settings to optimize performance.
Identify issues early in the pipeline development process.
Test Step Best Practices
Test critical components individually before connecting them in a pipeline.
Use realistic sample data that represents actual use cases.
Test edge cases and unexpected inputs to ensure robust handling.
Save successful test configurations for future reference.
Best Practices
Category | Best Practice |
|---|---|
Pipeline Design | Break complex workflows into smaller, focused pipelines. |
Include error handling for critical components. | |
Keep pipelines modular for easier maintenance. | |
Add comments to document the purpose of each section. | |
Data Management | Use descriptive session variable names. |
Validate data at key points in the pipeline. | |
Clean up temporary variables when no longer needed. | |
AI Components | Write clear, specific system prompts. |
Use appropriate temperature settings for the task. | |
Include relevant context for better AI responses. | |
Performance | Minimize database calls when possible. |
Batch process items when working with large datasets. | |
Cache results for repeated operations. | |
Testing | Test with sample data before deploying. |
Verify each component works as expected. | |
Monitor pipeline performance in production. |
Troubleshooting
Issue | Possible Cause | Solution |
|---|---|---|
Component fails to execute | Missing or incorrect input values | Check input mappings and verify data is in the expected format. |
Pipeline stops unexpectedly | Error in a component without error handling | Add error handling paths and check component logs. |
Database components not retrieving data | Incorrect collection ID or query parameters | Verify database connection details and query format. |
LLM components returning unexpected results | System prompt or context issues | Refine system prompts and check context relevance. |
Session variables not available | Output mapping not configured correctly | Verify that outputs are mapped to session variables. |
Performance issues with large datasets | Inefficient processing or resource limitations | Implement batch processing and optimize database queries. |
Limitations and Considerations
API Rate Limits - Be aware of any rate limits on AI model APIs used in your pipelines.
Model Context Windows - Consider the maximum context length of AI models when providing inputs.
Performance Considerations - Complex pipelines with many components may have longer execution times.
Data Security - Ensure sensitive data is handled appropriately throughout the pipeline.
Error Propagation - Errors in early components can affect downstream components.