Event Handling in the NeoPilot Framework
1. Introduction
1.1 Overview
Event handling is the cornerstone of the NeoPilot Framework. It creates dynamic, responsive conversational flows that adapt to user inputs. The framework uses an event-driven architecture where components communicate through events. This allows for complex interactions without tightly coupled code.
1.2 Core Principles
Event-Driven Communication: Components interact by emitting and responding to events.
Decentralized Logic: The system Business distributes business logic across specialized handlers.
State-Based Flow Control: Conversation state determines event routing.
Visual Programming Model: You configure the event connection visually through the interface.
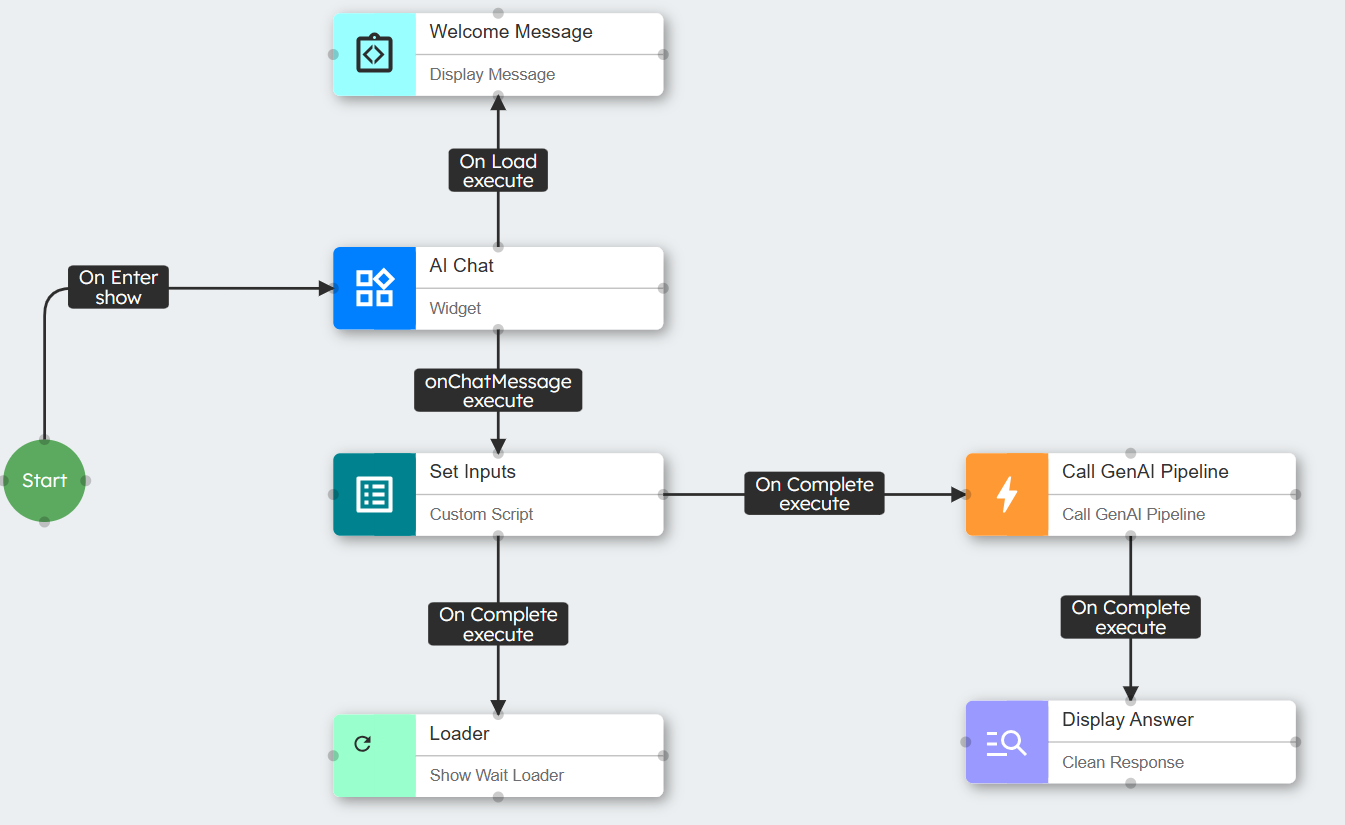
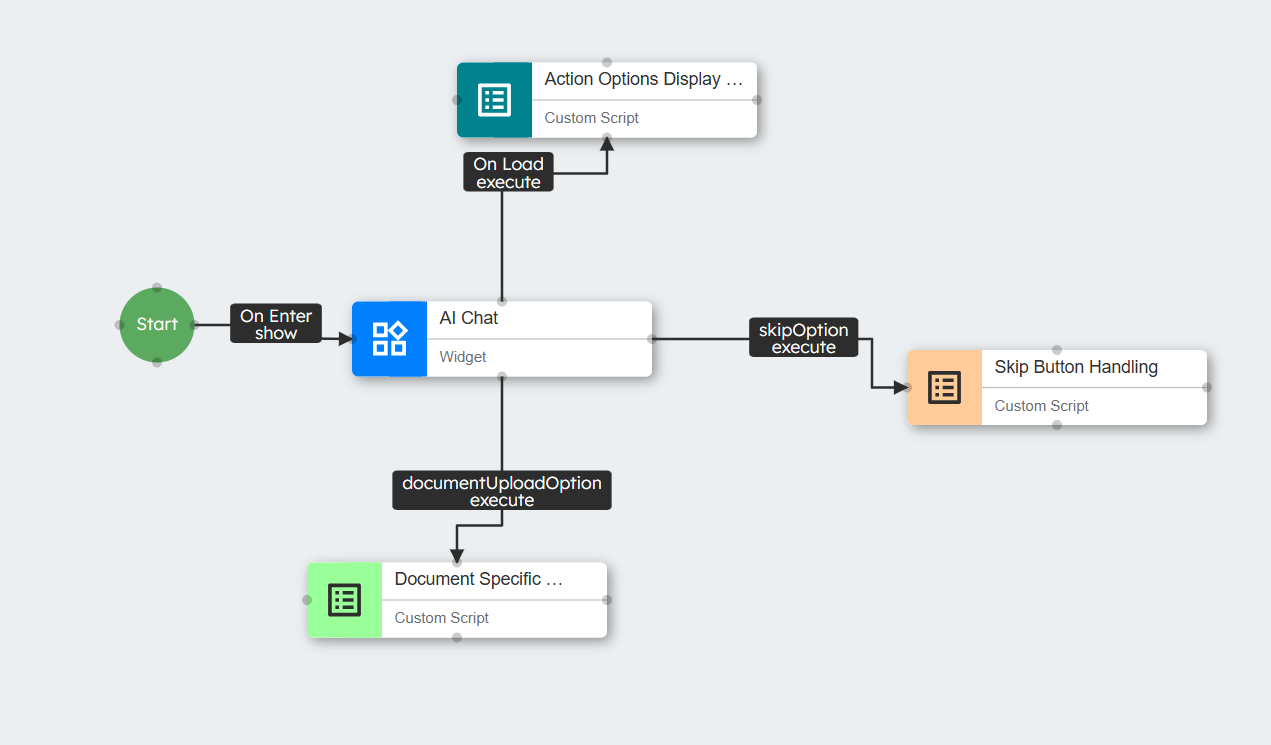
2. AI Chat Widget as Central Hub
2.1 Role in the Framework
The AI Chat Widget serves as the central hub of the event system. It performs three critical roles:
User Interface: Displays messages and interactive options to users.
Input Processor: Captures text inputs, file uploads, and button clicks.
Event Dispatcher: Emits events that drive the conversation flow.
2.2 Key Capabilities
Renders messages with formatted text, buttons, and other UI elements.
Captures user inputs through the
onChatMessageevent.Enables interaction through button-based action options.
Manages conversation history and display state.
2.3 Integration Points
The AI Chat Widget connects to the broader system through:
Start Node Connection: The system initializes via
onEnter → showevent.Input Capture: Routes all user messages via
onChatMessageevent.Action Options: Defines clickable buttons that emit custom events.
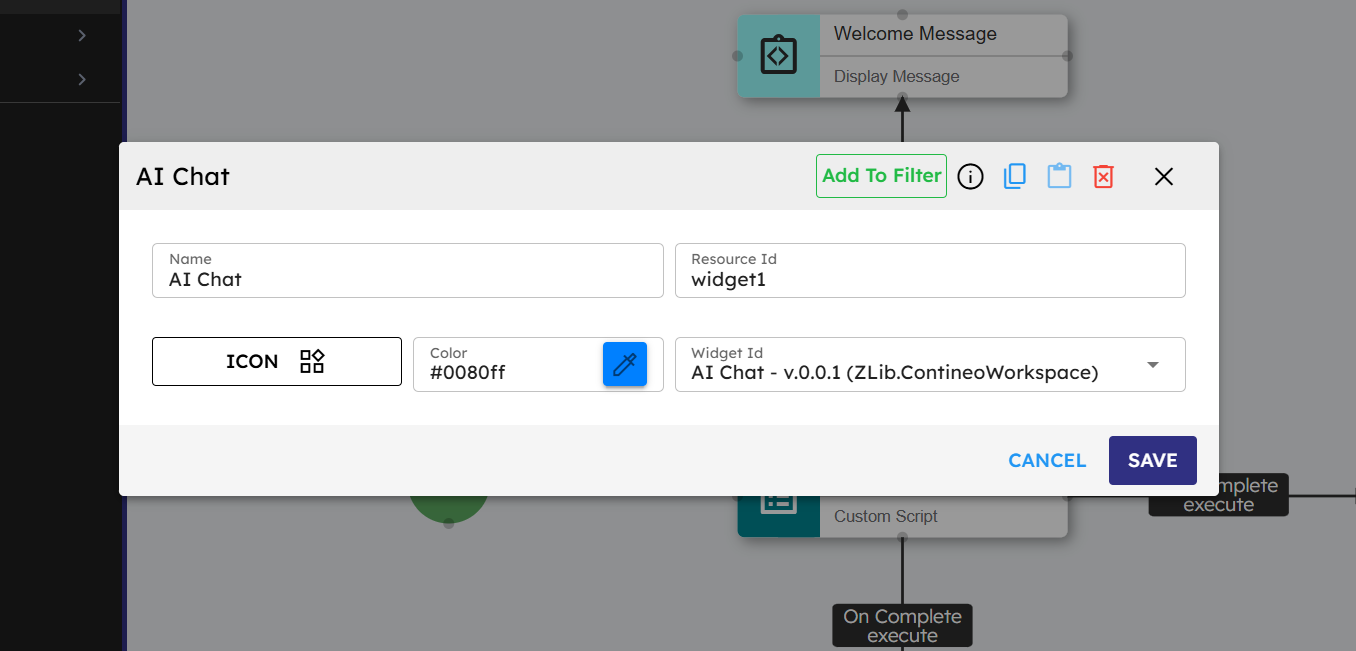
Widget Call GenAI Pipeline: Exposes methods like
addMessage()for programmatic control.
3. Core Event Types
3.1 Framework Standard Events
These built-in events are associated with specific component types:
Event | Component | Description |
|---|---|---|
| Widget | The system triggers when a widget is loaded and ready. |
| State | The system triggers this when the workflow enters a state. |
| State | The system triggers this when the workflow exits a state. |
| Custom Script, Call GenAI Pipeline | The system triggers this when a script or a Call GenAI Pipeline call completes successfully. |
| Custom Script, Call GenAI Pipeline, Condition Check | The system triggers this when an error occurs. |
| Condition Check | The system triggers this when a condition evaluates to true. |
| Condition Check | The system triggers this when a condition evaluates to false. |
3.2 Fixed Input Events
The onChatMessage event is the primary gateway for all user inputs:
// This event automatically triggers whenever:// - A user types and sends a text message// - A user uploads a document// The event data includes:
{
  message: "User typed message",  // The text message if provideduploadedFiles: [...],           // Array of file references if uploaded
}
You must connect this event to a handler (typically the state management component) to process user inputs.
3.3 Custom Events
Custom events are defined by developers to create specialized conversation flows:
Naming Convention: Use camelCase for custom events (for example,
onMessageProcessed).Creation Process: Define through the link configuration UI by typing the name and clicking +.
Usage: Connect from a source component to a target component to establish the event flow.
Examples of custom events:
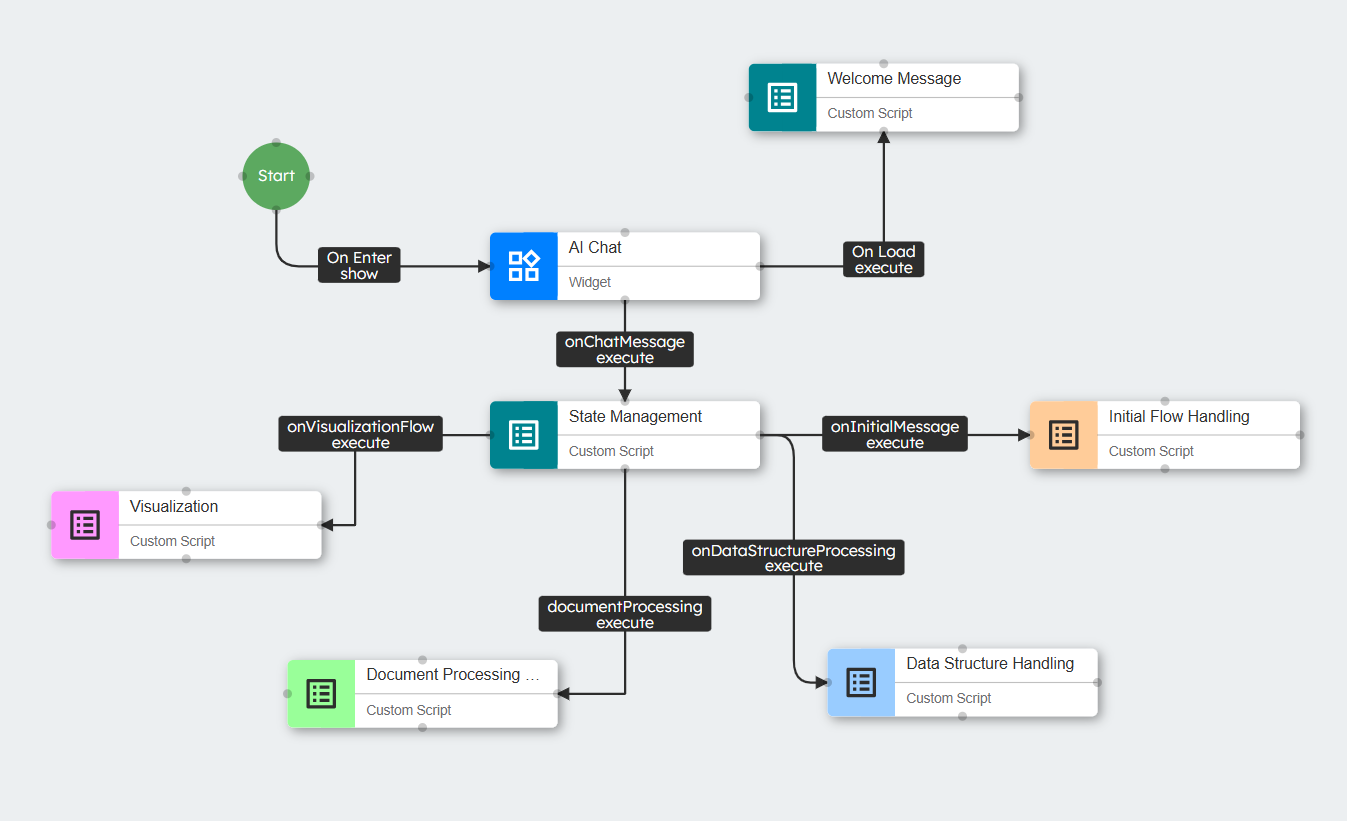
documentUploadOption: The system triggers this when the user selects the document upload option.dataStructureOption: The system triggers this when the user selects the data structure definition option.explainRequirementsOption: The system triggers this when the user requests a requirement explanation.beginProcessOption: The system triggers this when the user is ready to begin the process.
4. State Management System
4.1 State Variables
State is stored in the agent's data object:
this.agent.data.state = "initial"; // Sets initial state
4.2 State Management
The state management acts as a traffic controller, redirecting events based on the current state:
You can write this logic in a custom script or we also have a dedicated component for that called Emit Event on State
// Sample state management logiclet state = this.agent.data.state || "initial";let eventName = "";if (state === "initial") { eventName = "onInitialMessage";} elseif (state === "step1") { eventName = "onStep1Message";} elseif (state === "documentProcessing") { eventName = "onDocumentProcessing";} elseif (state === "dataStructureProcessing") { eventName = "onDataStructureProcessing";} elseif (state === "visualizationView") { eventName = "onVisualizationFlow";}// Emit the event to continue the flowthis.agent.emitEvent({ name: eventName, source: this, message: args.$event.message});4.3 State Transitions
Components implement state transitions by updating the state after completing their tasks:
// Example transition from initial to step1this.agent.data.state = "step1";
This updated state affects how the system processes the next user input, creating a contextual conversation flow.
5. Action Options System
5.1 Structure and Configuration
Action options are interactive buttons that you add to messages. These buttons trigger specific events when the user clicks them:
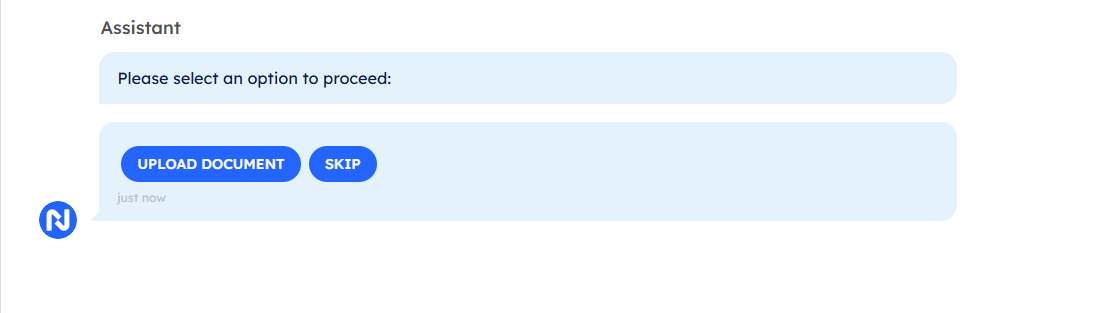
let widget = this.agent.getWidgets()['BVyR4LptEXAXJ']; // Get widgetlet chatComponent = widget.getElements({ resourceId: 'chat1' }); // Get chat componentchatComponent[0].addMessage({ text: "Please select an option to proceed:", // Message with Action Optionssender: "Assistant", size: 8, // Width of the messageavatar: "https://contineo.world/imgs/genaipro.svg", // Assistant iconactionOptions: [ { messageId: "document", // Unique ID for this buttonclearStack: true, // Clear previous options when clickedlabel: "Upload Document", // Display textresourceId: "document", // Resource identifieremitEventName: "documentUploadOption", // Event to emit when clicked.// This event name should match the one configured in the AI Chat widget // to trigger the specific flow you want to execute.styleClasses: "primary-btn-clr", // CSS stylingoutline: true, color: "blue", // Color of the buttoneventHandlers: { onclick: "onCustomButtonClick"// Click handler } }, { messageId: "skip", clearStack: true, label: "Skip", resourceId: "skip", emitEventName: "skipOption", styleClasses: "primary-btn-clr", outline: true, color: "blue", eventHandlers: { onclick: "onCustomButtonClick" } }, // More options... ]});After defining these action options, now emit these events
5.2 Event Generation Process
When a user clicks an action option button:
The system invokes the
onclickhandler (onCustomButtonClick).The handler extracts the
emitEventNamefrom the button configuration.It emits this event through the agent's event system.
The framework finds components with matching event connections.
Target components execute their associated methods.
6. Event Flow Control
6.1 Event Propagation Mechanism
Events propagate through the system as follows:
1.Event Emission: A component emits an event with a name and optional data
this.agent.emitEvent({
  name: "documentUploadOption",
  source: this,
  data: { /* Optional data */ }
});
2.Link Matching: The framework identifies links where:
Source ID matches the emitting component.
Source Port ID matches the event name.
3.Target Execution: The framework calls the target component's method:
targetElement[link.targetPortId](args);
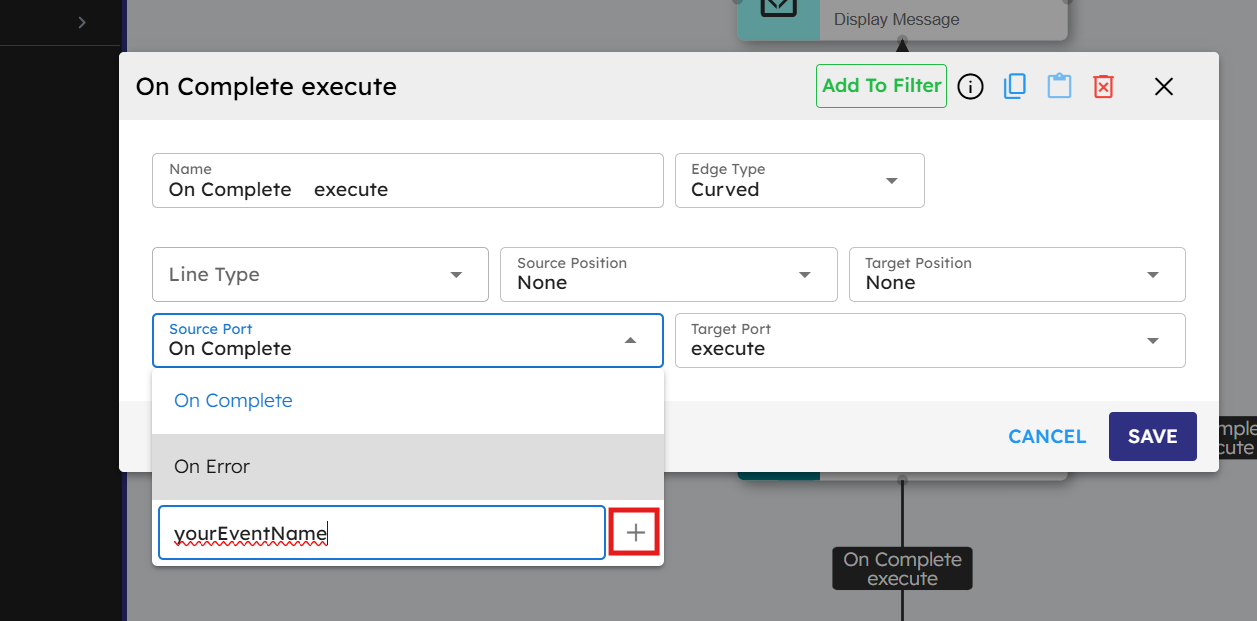
6.2 Link Configuration
Links are configured through the visual interface:
Identify the source components and events (Source Port).
Identify the target component and method (Target Port).
Specify event name (for custom events).
Configure link appearance (line type, edge type).
Example link configuration in the framework's data structure:
{"type":"standard.Link","source":{"id":"stateManager","port":""},"target":{"id":"customScript1","port":""},"sourceId":"stateManager","targetId":"customScript1","edgeType":"curved","sourcePortId":"onStep1Message","targetPortId":"execute","label":"onStep1Message → execute"}
6.3 Event Chaining
Events can be chained to create complex flows:
Component A emits Event X.
Component B receives Event X and processes the data.
Component B emits Event Y.
Component C receives Event Y and continues the flow.
This chaining creates elaborate conversation paths without complex if-else structures.
7. Practical Implementation Guide
7.1 Building a Basic Conversation Flow
Setup Initial Structure:
Add the Start node to the canvas.
Add AI Chat Widget.
Connect Start to AI Chat with
onEnter → show.
Create State Management:
Add Custom Script component for state management.
Connect AI Chat to state manager with
onChatMessage → execute.
Define State Handlers:
Add components for each conversation state.
Connect state managers to handlers with custom events.
Implement state transition logic in handlers.
Configure Action Options:
Add messages with action options for user choices.
Connect button events to appropriate handlers.
Implement response logic for each option.
7.2 Event Link Configuration Steps
Click the source component.
Drag a connection to the target component.
In the link configuration dialog:
Set Source Port (event name)
Set Target Port (usually "execute")
For custom events, type the name and click "+"
Save the configuration.
7.3 Common Event Flow Patterns
Sequential Flow
AI Chat (onLoad) → Welcome Message → First Question → Process Response → Next Question
Branching Flow
State Manager (onInitialMessage) →
 │
 ├─ If state="initial" → Initial Handler
 │
 ├─ If state="step1" → Step 1 Handler
 │
 └─ If state="documentProcessing" → Document Handler
Return Flow
Back Button (goBackOption) → Clear Messages → Reset State → Return to Options
8. Advanced Event Techniques
8.1 Complex Event Chains
For sophisticated interactions, events can be chained through multiple components:
User Input → State Manager → Domain-Specific Handler → Call GenAI Pipeline Call →
Process Result → Update UI → Present New Options
This pattern allows breaking complex logic into manageable, specialized components.
8.2 Conditional Event Routing
Condition Check components can route events based on logical evaluations:
Call GenAI Pipeline Result → Condition Check →
 │
 ├─ If condition=true → Success Handler
 │
 └─ If condition=false → Error Handler
8.3 Event-Based Error Recovery
Error handling can be implemented through dedicated error events:
try {
  // Process data
} catch (error) {
  // Emit error event for specialized handlingthis.agent.emitEvent({
    name: "onProcessingError",
    source: this,
    error: error
  });
}
8.4 UI State Management
Events can manage UI states to provide feedback and control user interactions:
1.Show/Hide Loaders:
Call GenAI Pipeline Call Start → Show Wait Loader → Call GenAI Pipeline Call → Hide Loader → Show Result
2.Enable/Disable Input:
Processing Start → Disable Input Box → Processing Complete → Enable Input Box
3.Replace Messages:
Option Selected → Replace Message (Disable Buttons) → Process Selection → Show Response
9. Conclusion
The event handling system in the NeoPilot Framework provides a powerful mechanism for building sophisticated conversational agents. By understanding the event types, state management, action options, and flow control mechanisms, developers can create dynamic, responsive experiences that adapt to user inputs and maintain contextual awareness throughout the conversation.
The visual programming model makes complex event flows accessible, while the underlying architecture ensures a clean separation of concerns and maintainable code. Mastering event handling is key to unlocking the full potential of the NeoPilot Framework for building advanced AI agents.