- Getting Started with Agent Builder
- What is the NeoPilot Agent Builder?
- Key Concepts: What You Need to Know
- Before You Begin: Requirements
- 1. Initial Setup: Getting Started
- 2. Building the Flow: Creating Your Agent
- 3. Integration Setup: Adding AI Capabilities {#integration-setup}
- 4. Practical Use Case: Building a Quiz Generator {#quiz-generation-usecase}
- What You Build
- Step 1: Creating a New Agent
- Step 2: Adding and Configuring the Chat Widget
- Step 3: Creating a Welcome Message
- Step 4: Capturing User Input
- Step 5: Creating an AI Pipeline for the Quiz Generator
- Step 6: Generating Quiz Questions with GenAI Pipeline
- Step 7: Displaying the Quiz Questions
- Testing Your Quiz Generator
- 5. Deployment and Testing: Making Your Agent Live
- 6. Best Practices: Tips for Success
- 7. Troubleshooting: Common Issues
- 8. Important Resources
- Conclusion
Getting Started with Agent Builder
This section shows you how to create Gen AI Agents with components. This process involves selecting appropriate components from the toolbox, arranging them in a logical sequence, and configuring their properties to establish data flow. Pipeline creation begins with defining input parameters, adding processing components such as Generate Text or Call Custom Function, and establishing connections between them. Components can be customized to work with different AI providers while maintaining consistent data handling throughout the workflow. This section shows you the steps to build pipelines, that leverage the platform's visual interface to create powerful AI-driven solutions.
What is the NeoPilot Agent Builder?
The NeoPilot Agent Builder is a visual tool that helps you create AI assistants (called "agents"). These agents understand user requests, manage conversations, and perform tasks by connecting to AI capabilities.
Agent Builder works as a canvas where you arrange building blocks to create a flowchart that defines how your AI assistant behaves and responds.
Why use Agent Builder? It lets you create AI assistants for business needs, such as answering customer questions, processing forms, or analyzing documents. You do not need to write complex code.
Key Concepts: What You Need to Know
Term | Description |
|---|---|
Agent | An AI assistant you create to talk with users and do tasks. Think of it as a digital employee you are training for a specific role. It engages with end users, gathers input, seeks confirmation, displays results, and works systematically toward a defined goal. In essence, it orchestrates user interactions and executes tasks as needed to achieve a goal. |
Components | It is a drag-and-drop block to create your Agent. Each block performs a specific task such as accessing data from the Vector Database and reading data from files. Reusable UI components to handle inputs, display output, and provide selection options. |
Widget | A visual element users can interact with, such as chat windows, buttons, forms, or dropdown menus. |
Pipeline | A series of components connected to carry out a task to achieve a goal defined by the Agent. In most cases, the Pipelines are called by the Agent to perform a specific task. |
Flow | The path your agent follows when responding to users. It works similar to a flowchart that determines what happens at each step. |
Events | Actions that occur during user interaction, such as when a user sends a message, clicks a button, or when a component completes its task. |
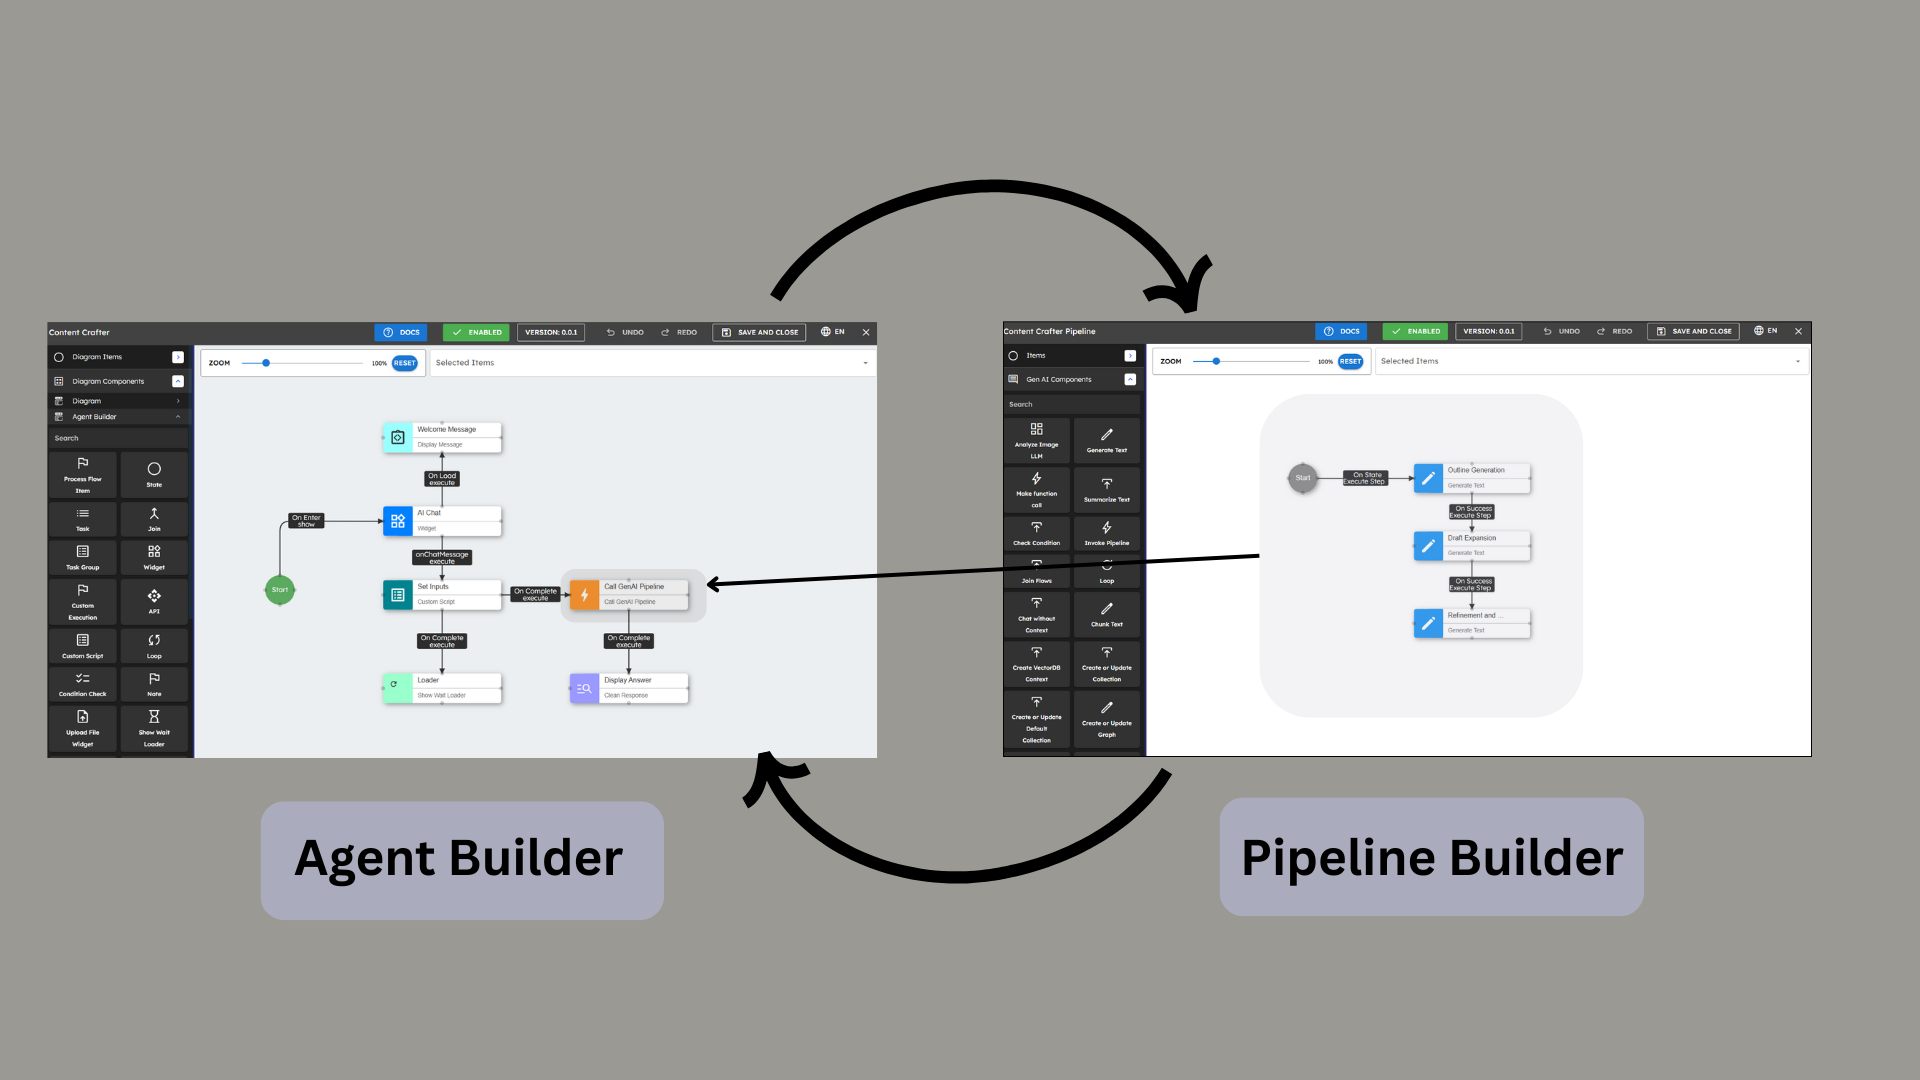
The following figure shows the relationship between the agent and the pipeline. This documentation explains all sections and components.
Before You Begin: Requirements
To create an agent with this guide, you need:
A NeoPilot account. (if you do not have one, sign up here).
Access to the Contineo WorkSpace.
An idea of what your agent must do.
Knowledge of flowcharts or process diagrams.
1. Initial Setup: Getting Started
1.1 Accessing the Agent Builder
Go to the NeoPilot homepage.
Click the application palette (the grid of dots in the top-right corner).
Select WorkSpace from the menu.
This takes you to the NeoPilot Agent Builder interface.
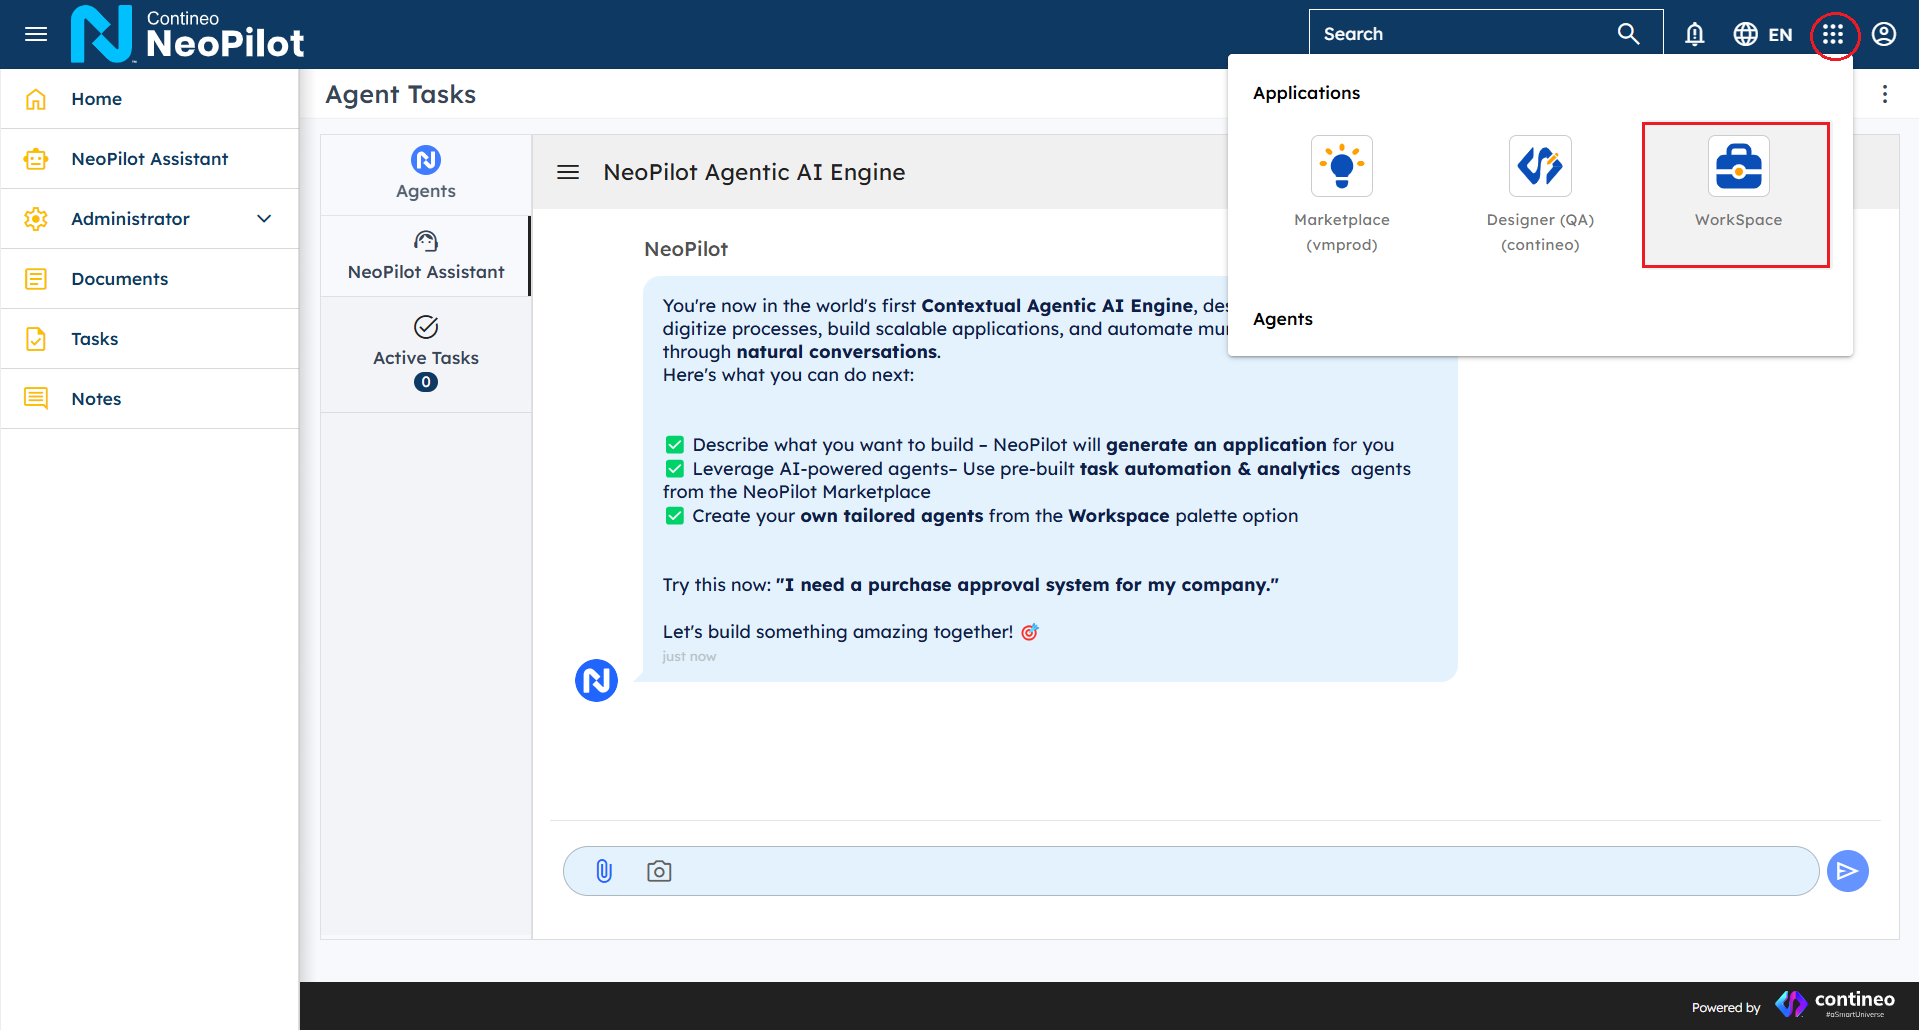 Figure 2: Accessing the Agent Builder through the application palette
Pro Tip: From this palette, you can access other sections such as Applications, Marketplace, and the Designer Studio. Likewise, if you are in any of these sections, you can use the same palette to move back or switch between them.
Agentic AI Engine: You work with and run AI agents here, These agents automate workflows and business processes. This is the runtime environment where your agents are deployed. It handles the execution of agents.
Work Space: Your centralized hub for building Agents, GenAI pipelines, and Widgets. You manage workflows, track LLM token use, organize documents, and control user access for your organization here. This is the development environment where you can build and configure your agents. It offers tools and interfaces needed during the Agent development process.
Marketplace: Where you buy ready-made agents for immediate deployment or sell your custom agents by making them available to other users.
Designer Studio: A development tool for building enterprise-grade AI applications with microservices architecture, secure API integrations, and complete source code ownership.
1.1.1 Understanding the WorkSpace Interface
When you open the WorkSpace, you see a navigation sidebar on the left with several components:
Applications: Access and manage the applications that you build with the platform.
Agents: Create and manage AI assistants that interact with users and perform tasks.
GenAI Pipelines: Build and configure AI processing workflows that run your agents.
Widgets: Access UI components that can be used to create user interfaces for your agents.
Workflow: Create process flows and automation for business logic.
Admin: Access administrative functions such as:
Users: Manage user accounts and permissions.
User Roles: Create and assign roles with access rights.
LLM Token Usage: Monitor and track your AI language model usage.
You work mainly with the Agents and GenAI Pipelines sections to build your first AI assistant.
1.2 Creating Your First Agent
In the WorkSpace interface, find the navigation sidebar on the left.
Click Agents in the sidebar.
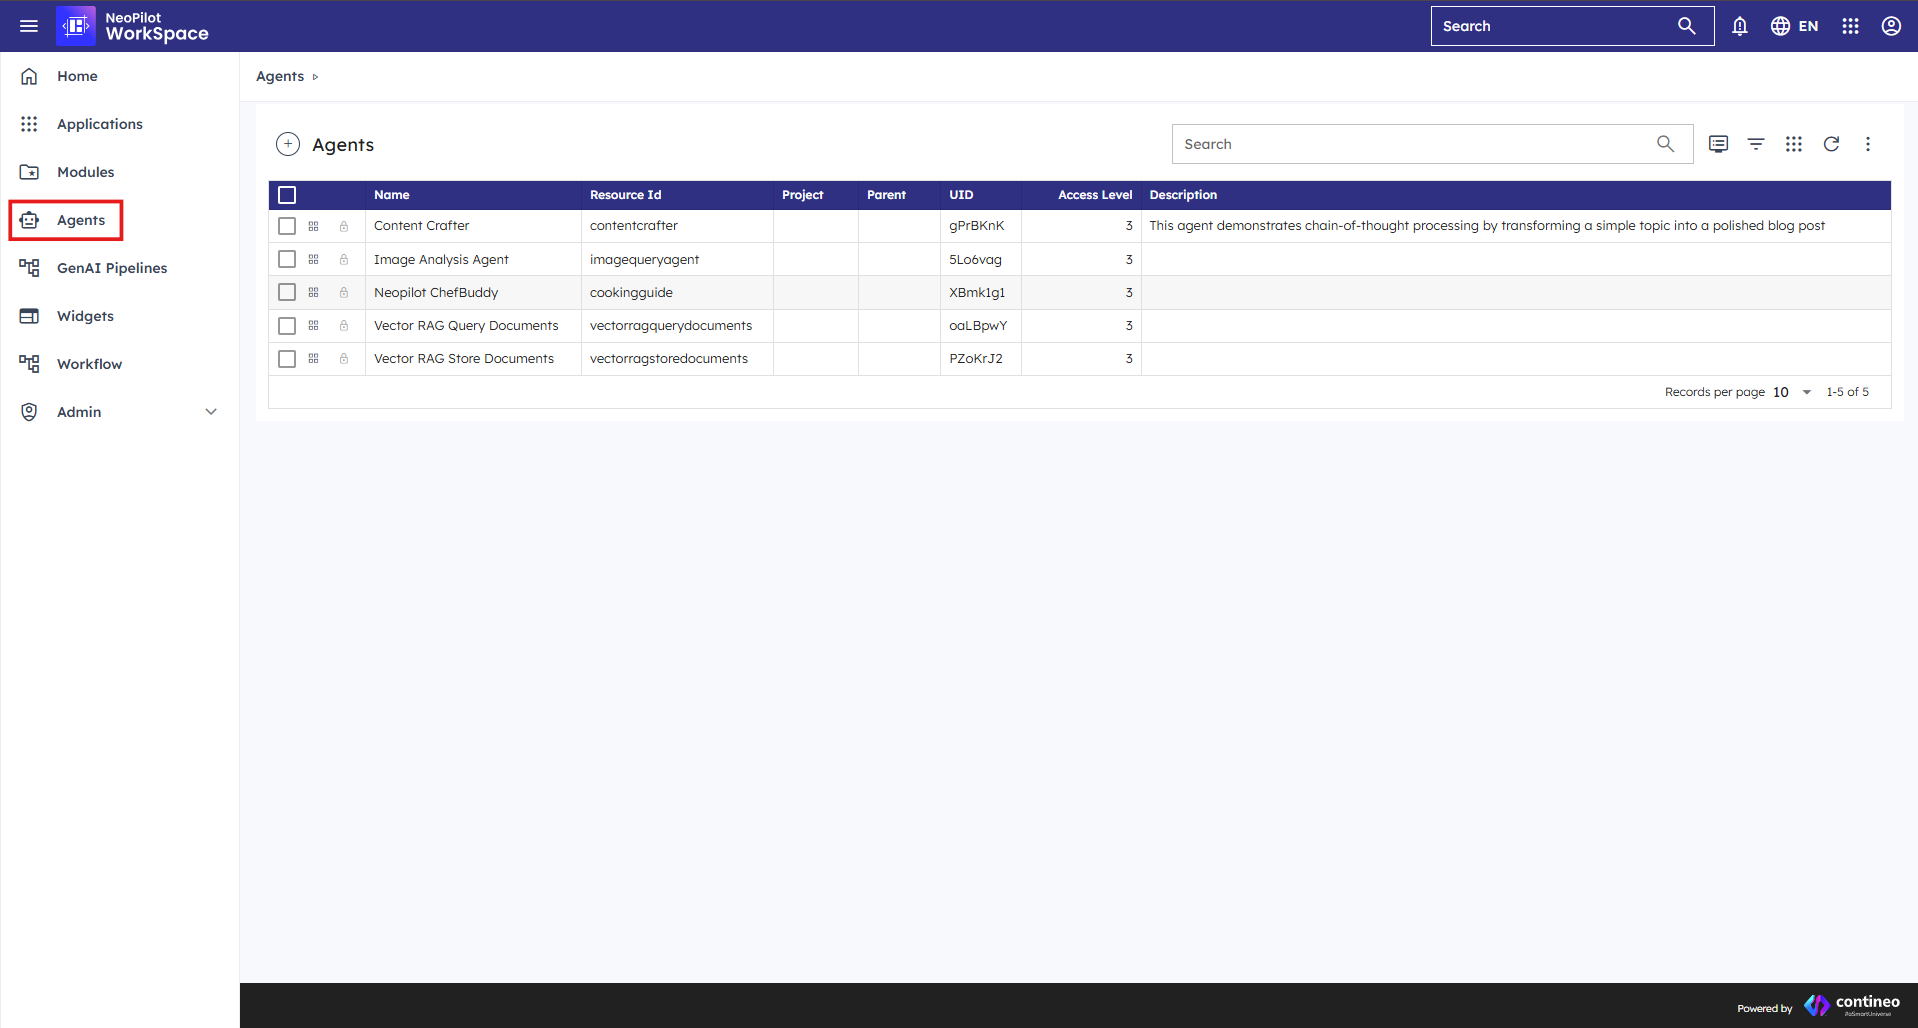 Figure 3: The WorkSpace interface with the Agents section highlighted
Click + to create a new agent.
Fill in the information:
Name: Type a clear name for your agent.
Description: Write what your agent does.
Logo URL (Optional): The system uses a default logo if you do not add one.
Click Save.
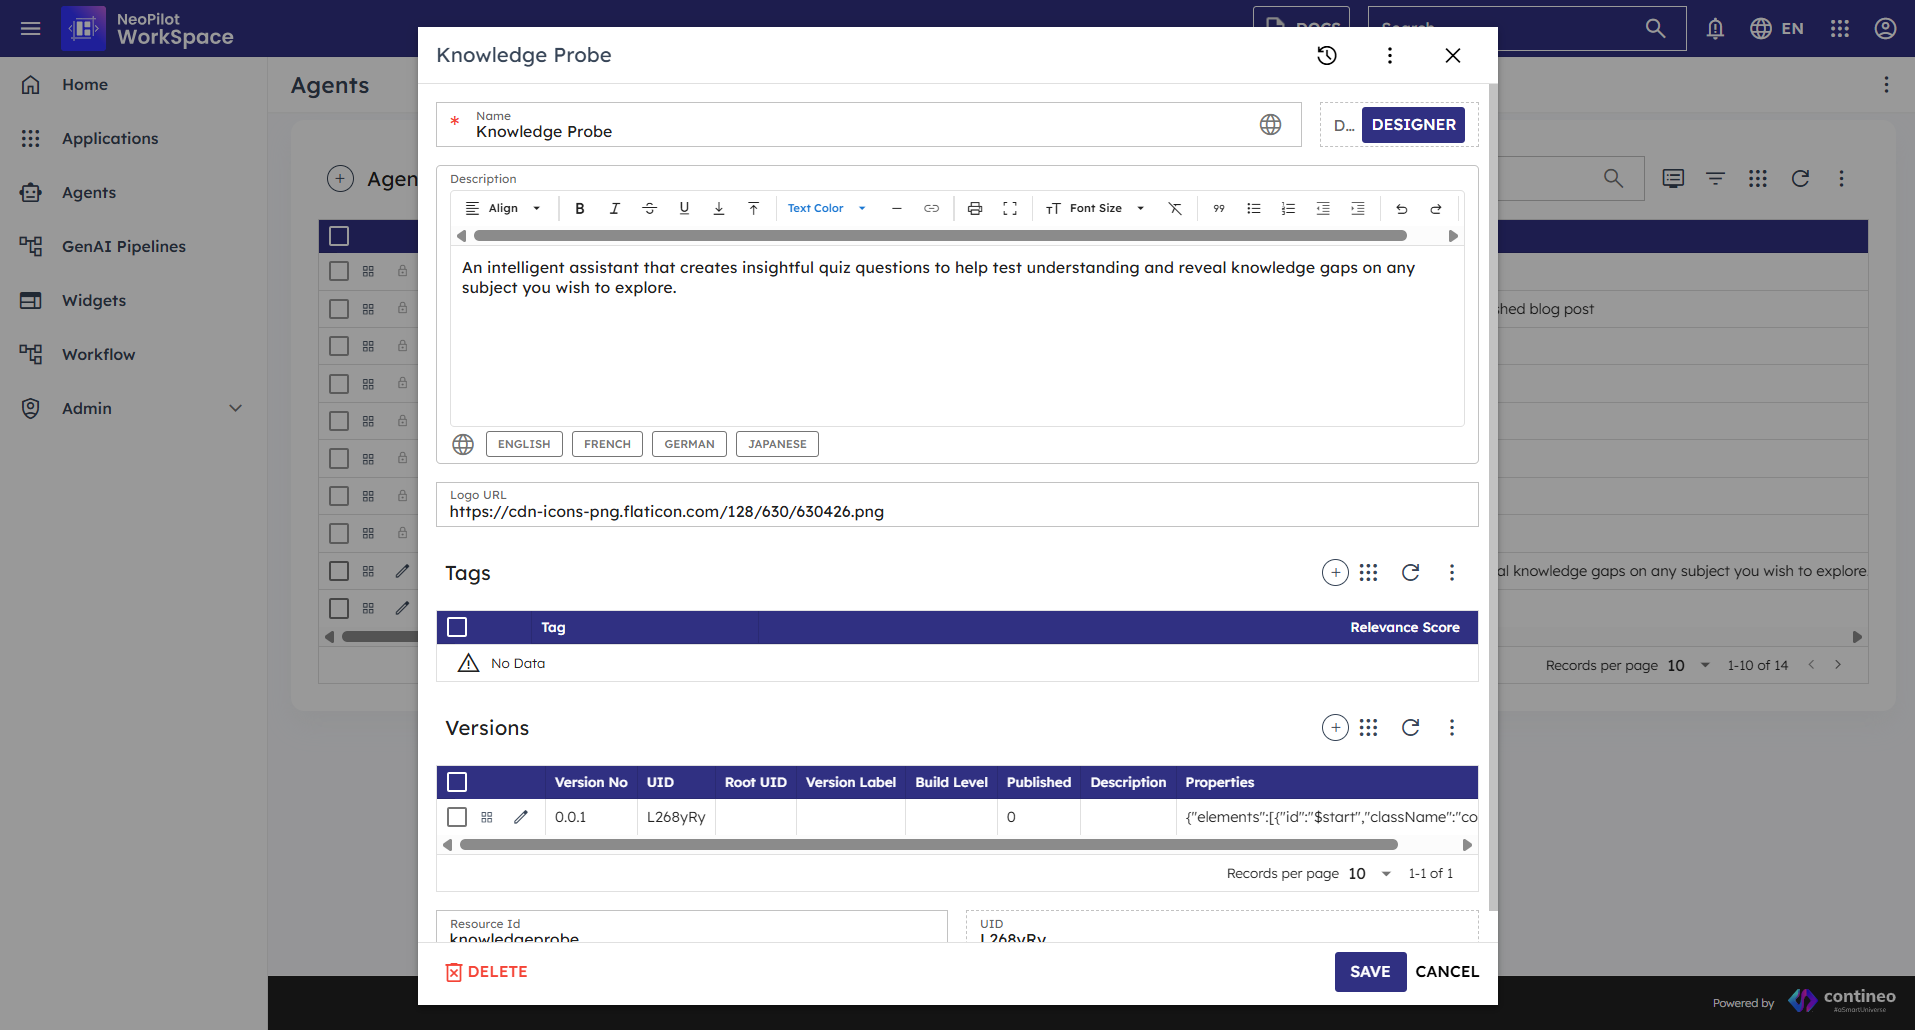 Figure 4: The Agent Configuration screen with the DESIGNER button
1.3 Adding Tags and Versioning
These options help you organize your agent and find it easily. Make these changes in the same agent introduction window shown in the figure above:
Tags: Add keywords that describe your agent's purpose (for example, "customer service" or "form processing").
Weightage: Assign importance to each tag (1 to 100). This helps with search results.
Versioning: Turn on this option to track agent changes.
What you have now: A new, empty agent ready to build. Next, open the design canvas to create your agent's flow. First, look at the sample agents to understand the process and improve your logic building.
1.4 Learning from Sample Agents
NeoPilot provides sample agents you can explore to understand how they work:
Go to Workspace by clicking navigation.
Find sample agents in the Agents section.
To examine a sample agent, click the lock icon next to it. You can view its workflow by clicking DESIGNER. When creating your agent using the + icon, you follow a similar process to configure and design it.
Click the search icon in the Versions section.
You can copy configurations from these samples to use in your agents.
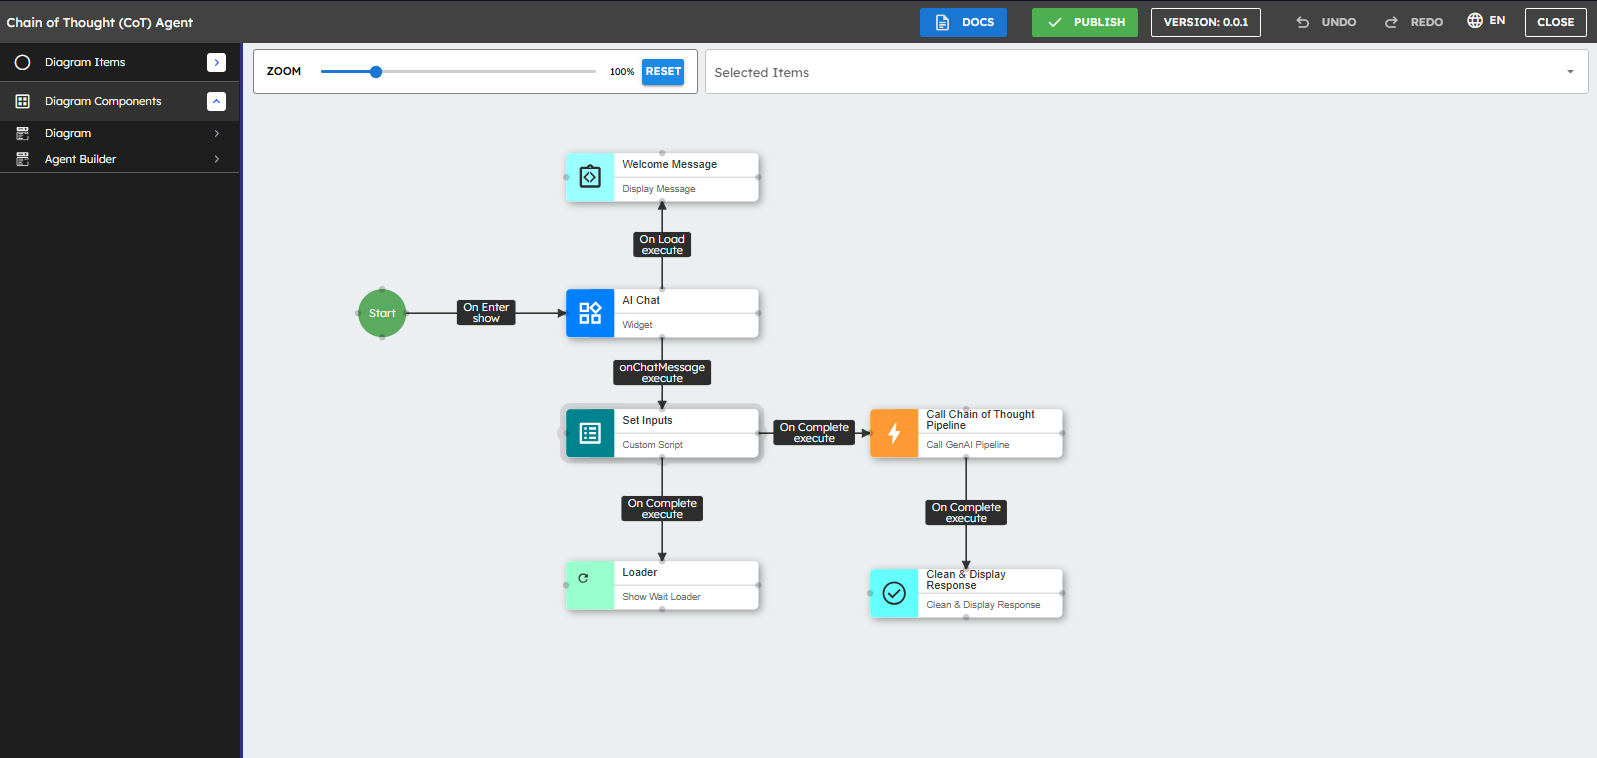
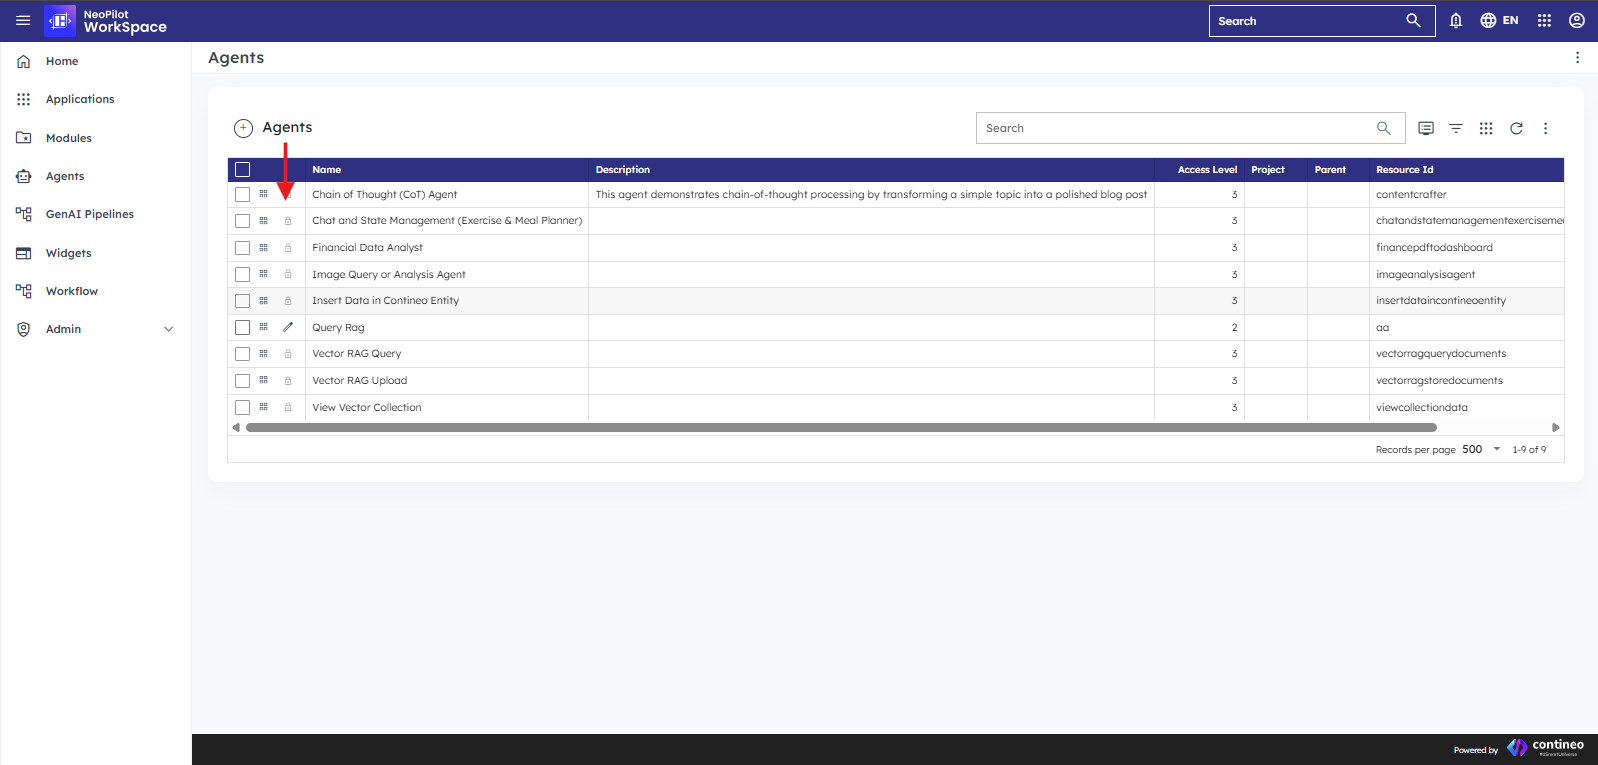 Figure 5: Accessing sample agent configurations
To check configuration, mandate fields, and custom logic written in scripts for a better understanding of the sample agent workflow double-click each component.
1.5 Running Sample Agents
Before creating your agent, it is helpful to see how the sample agents run in action. This gives you a better understanding of the user experience and functionality:
If you are not already in the NeoPilot Agentic AI Engine, click the application palette (grid of dots) in the top-right corner and select NeoPilot Agentic AI Engine.
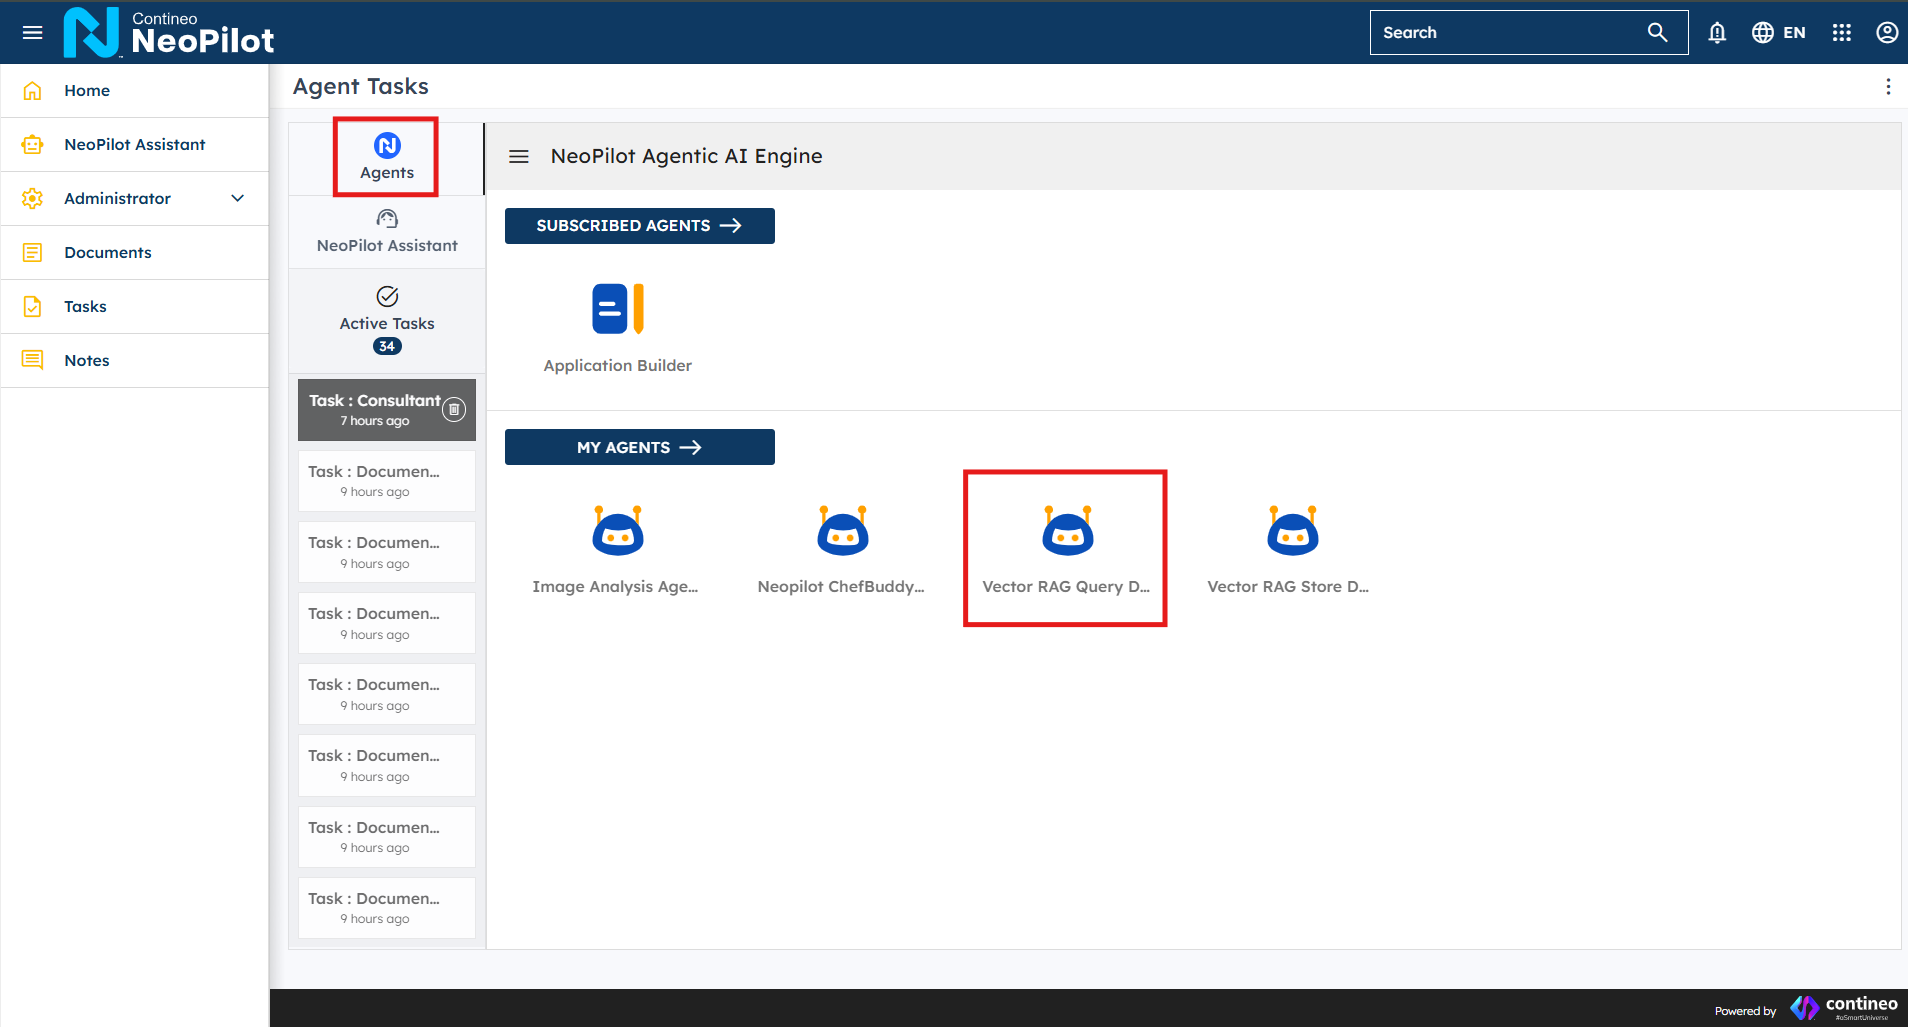
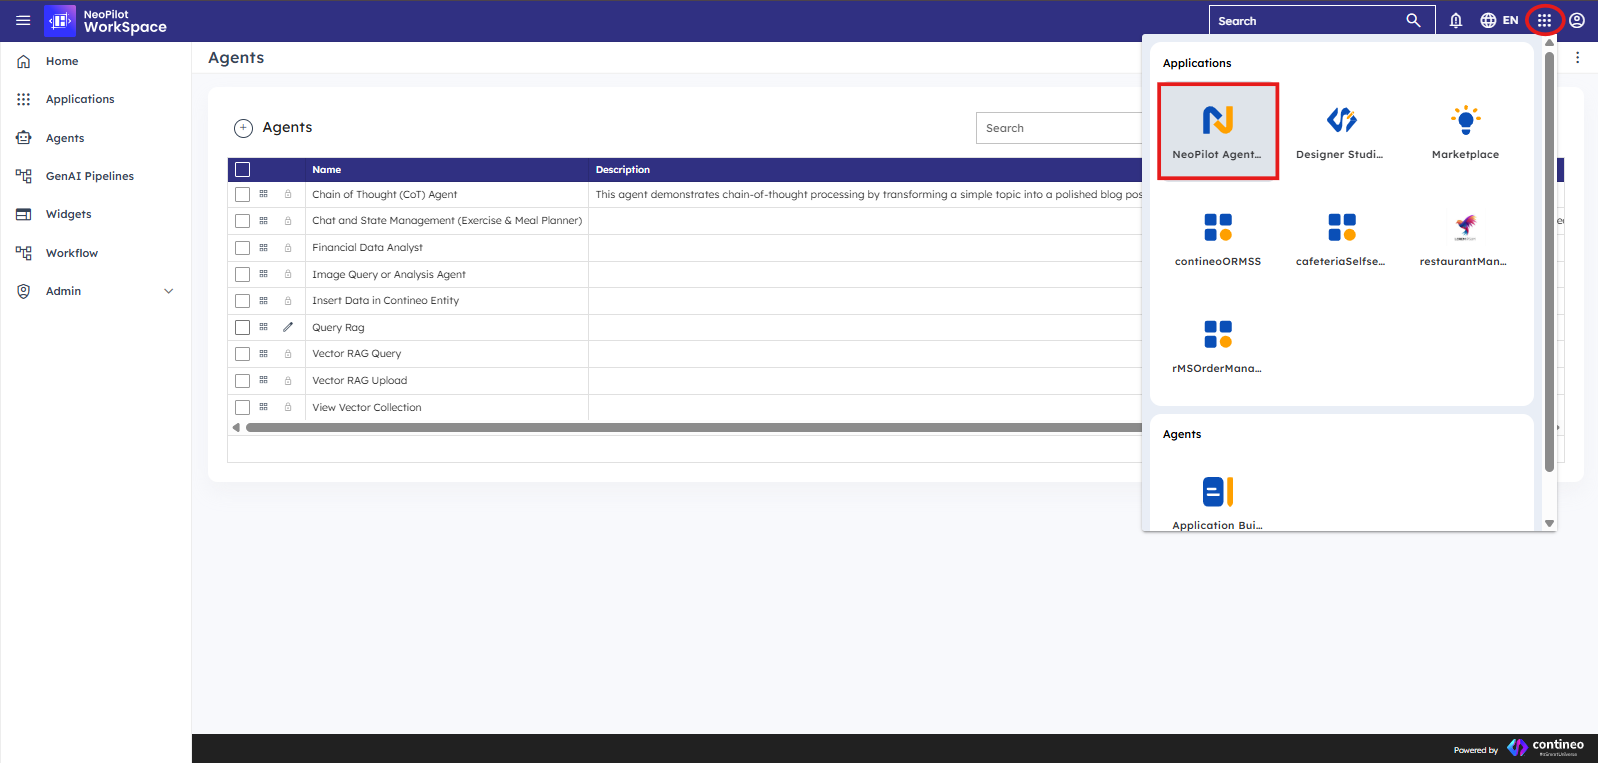 Figure 7: Navigate to NeoPilot Agentic AI Engine
From the NeoPilot homepage, click Agents in the navigation.
Look for the sample agents that are available in the section.
Click any sample agent you want to try.
The agent launches a chat interface where you can interact with it.
Try different inputs to see how the agent responds and processes information.
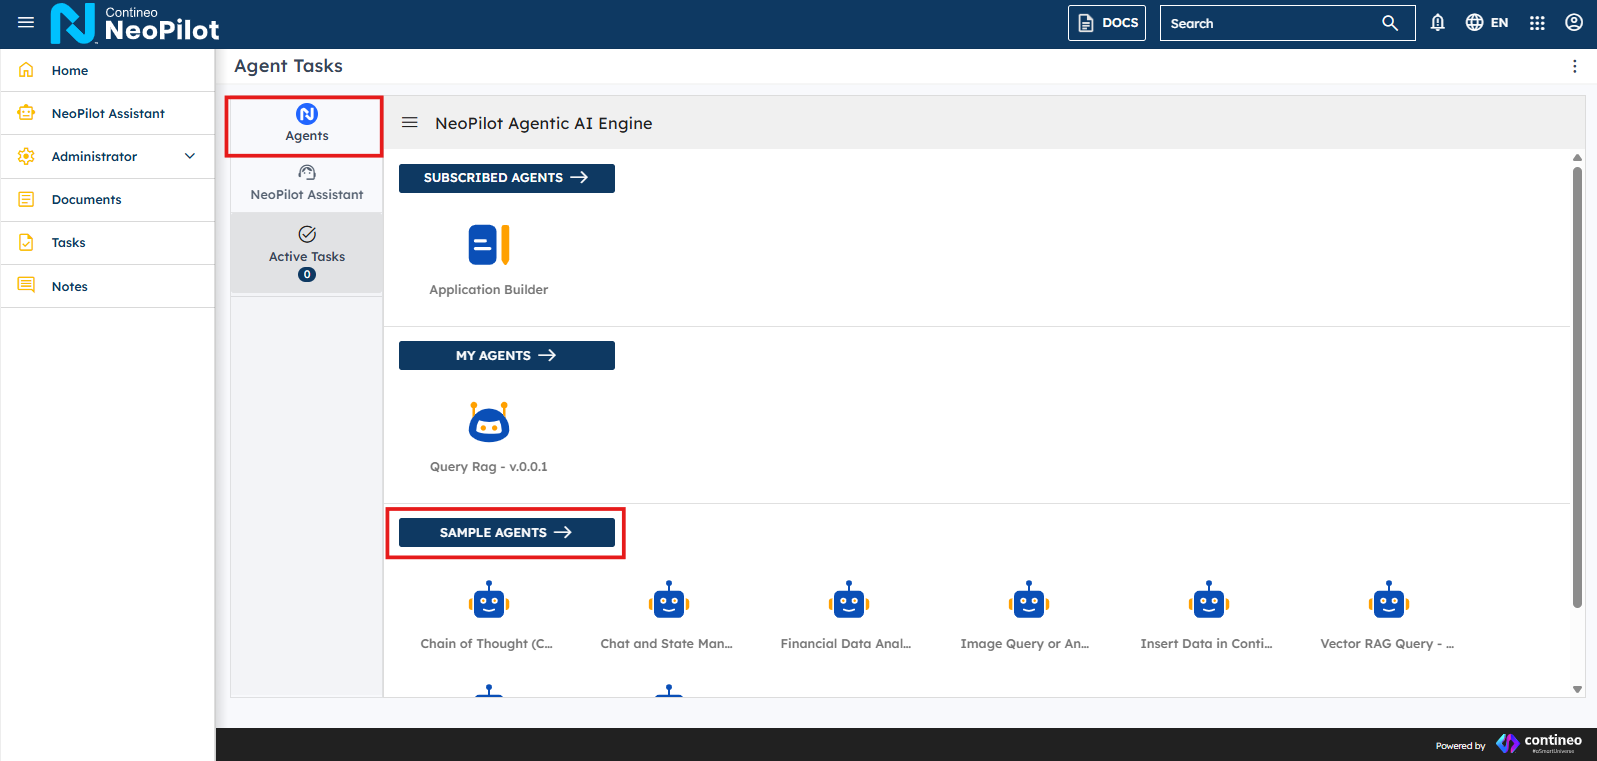 Figure 8: Finding Sample Agents in the Catalog
Pro Tip: Pay attention to both what the agent says and how it respond to different types of questions. This helps you understand the flow patterns you want to implement in your agent.
Testing sample agents helps you understand:
The types of messages and response formats that create a good user experience.
How the agent handles different user inputs.
The capabilities of the underlying AI pipelines.
Common interaction patterns that you can implement in your agents.
What you should do now: Run at least one sample agent to understand how it works from a user perspective before building your agent.
2. Building the Flow: Creating Your Agent
2.1 Opening the Design Canvas
After creating your agent, search for it by name in the Agents list.
Click Edit (pencil icon) next to your agent.
In the Agent Configuration Screen, click DESIGNER.
This opens the canvas where you build your agent's flow.
Figure 9: The Agent Configuration screen with the DESIGNER button
2.2 Understanding the Canvas
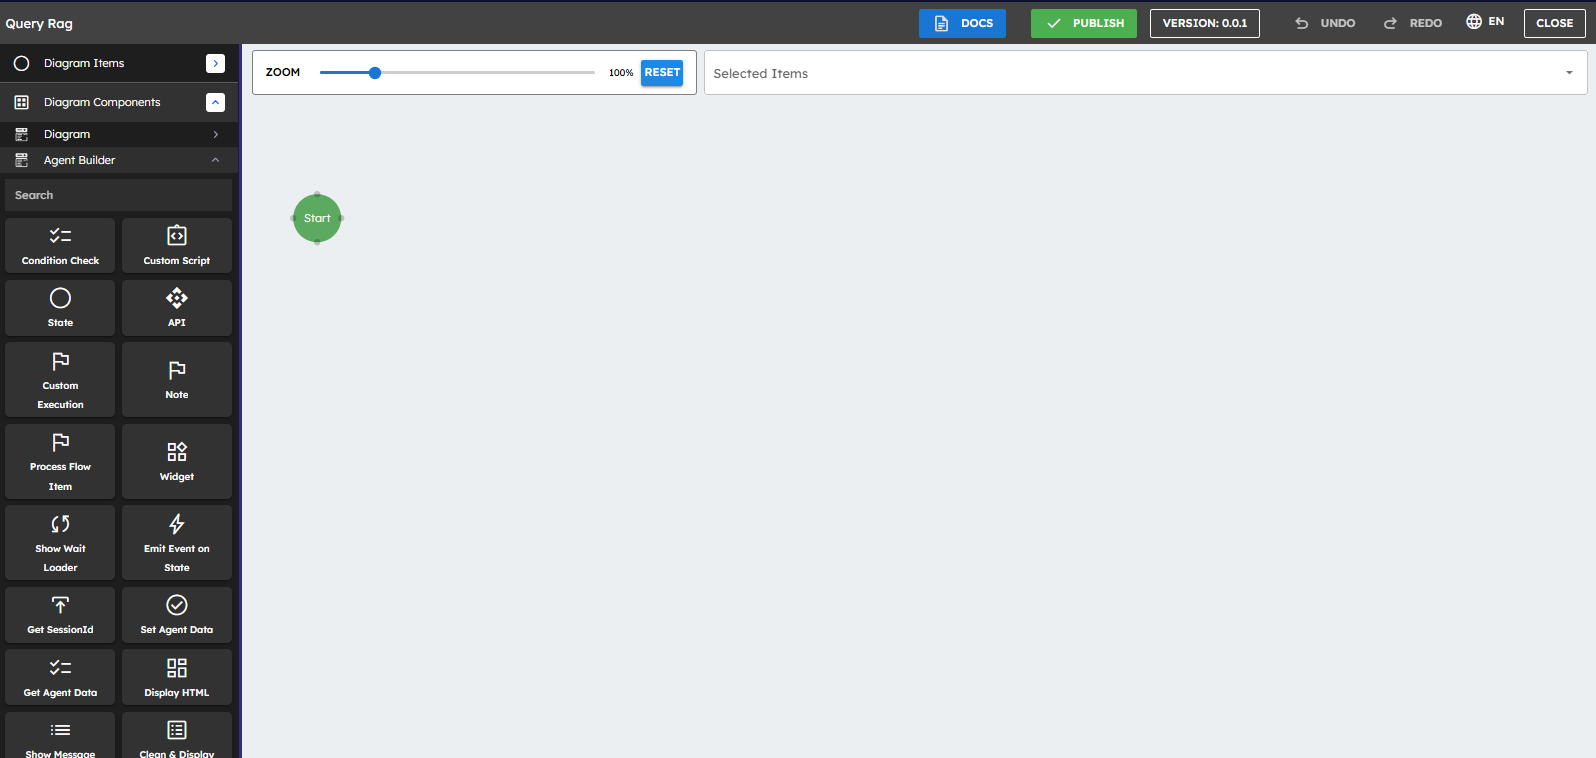
When the user hits the Designer button of a newly created agent, the user sees a canvas with a single component called Start. This is where your agent's flow begins.
The Start node is the entry point for your agent.
The left panel contains components you can add to your flow.
The canvas is where you arrange and connect components.
These events appear on the screen once the Start node is linked to other agent-building
components.
2.3 Key Events in the Start Node
The Start node has the following important events that trigger actions:
On Enter: Happens when the agent first loads - use this to show welcome messages.
On Leave: Happens when a user exits - used for cleanup tasks.
2.4 Planning Your Agent's Flow
Before adding agent-building components, take a moment to plan what your agent must do:
What should happen when a user first opens the agent?
What questions or commands does your agent respond to?
What information does your agent need to collect?
What does the conversation flow look like?
Planning Tip: Sketch your flow on paper first! Draw boxes for each step and arrows showing how they connect. This makes building much easier.
2.5 Adding the Chat Interface
To construct your agent, you need to use various Agent Building Components, each serving a specific purpose in the execution flow. The first component every agent needs is a chat interface where users can chat with your agent:
From the left panel, drag a Widget component to the canvas.
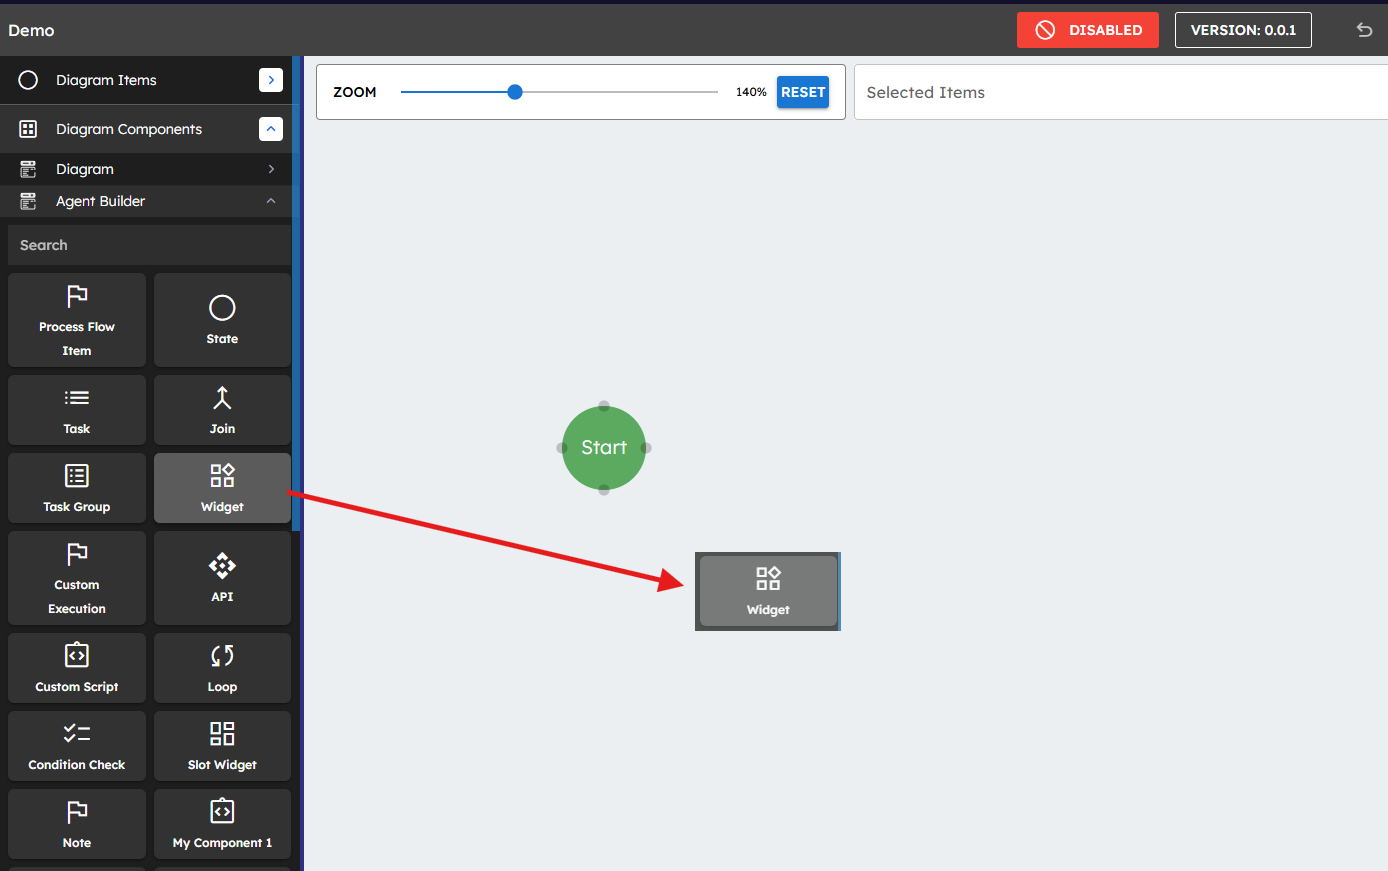 Figure 11: Drag the AI Chat Widget onto the canvas
A property panel appears where you should set the Name and select AI Chat - v.0.0.1 (ZLib.ContineoWorkspace) from the Widget dropdown. By toggling the Display Settings, you can set additional properties like icon and color.
If the widget does not appear in the dropdown, try typing the first few letters of "AI Chat" to filter the list.
This creates a chat window where users can interact with your agent.
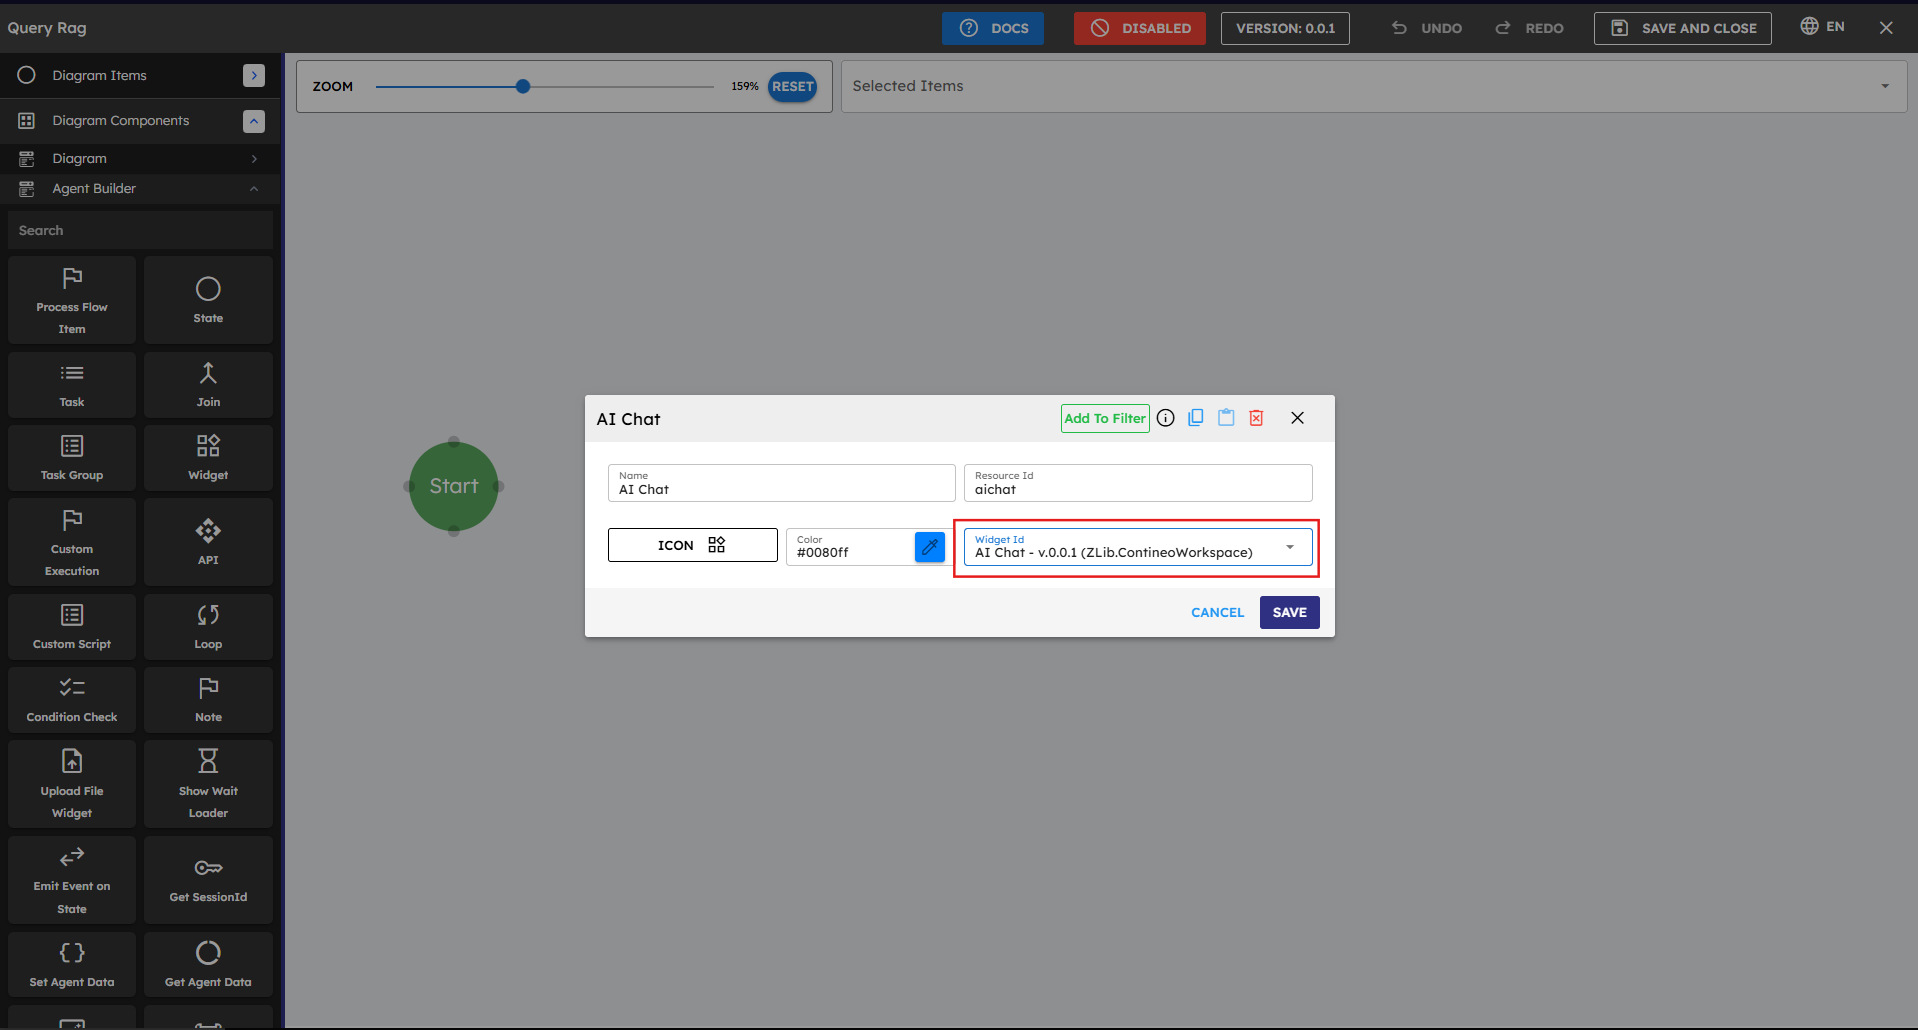 Figure 12: Configure the AI Chat Widget
Every agent must have the AI chat widget without which users can’t communicate with the agent.
2.6 Connecting Components
Now you need to connect the Start node to the AI Chat widget so it appears when your agent loads:
Hover over the Start node until you see connection points appear.
Click and drag from the connection point to your AI Chat widget or any other component you need to connect.
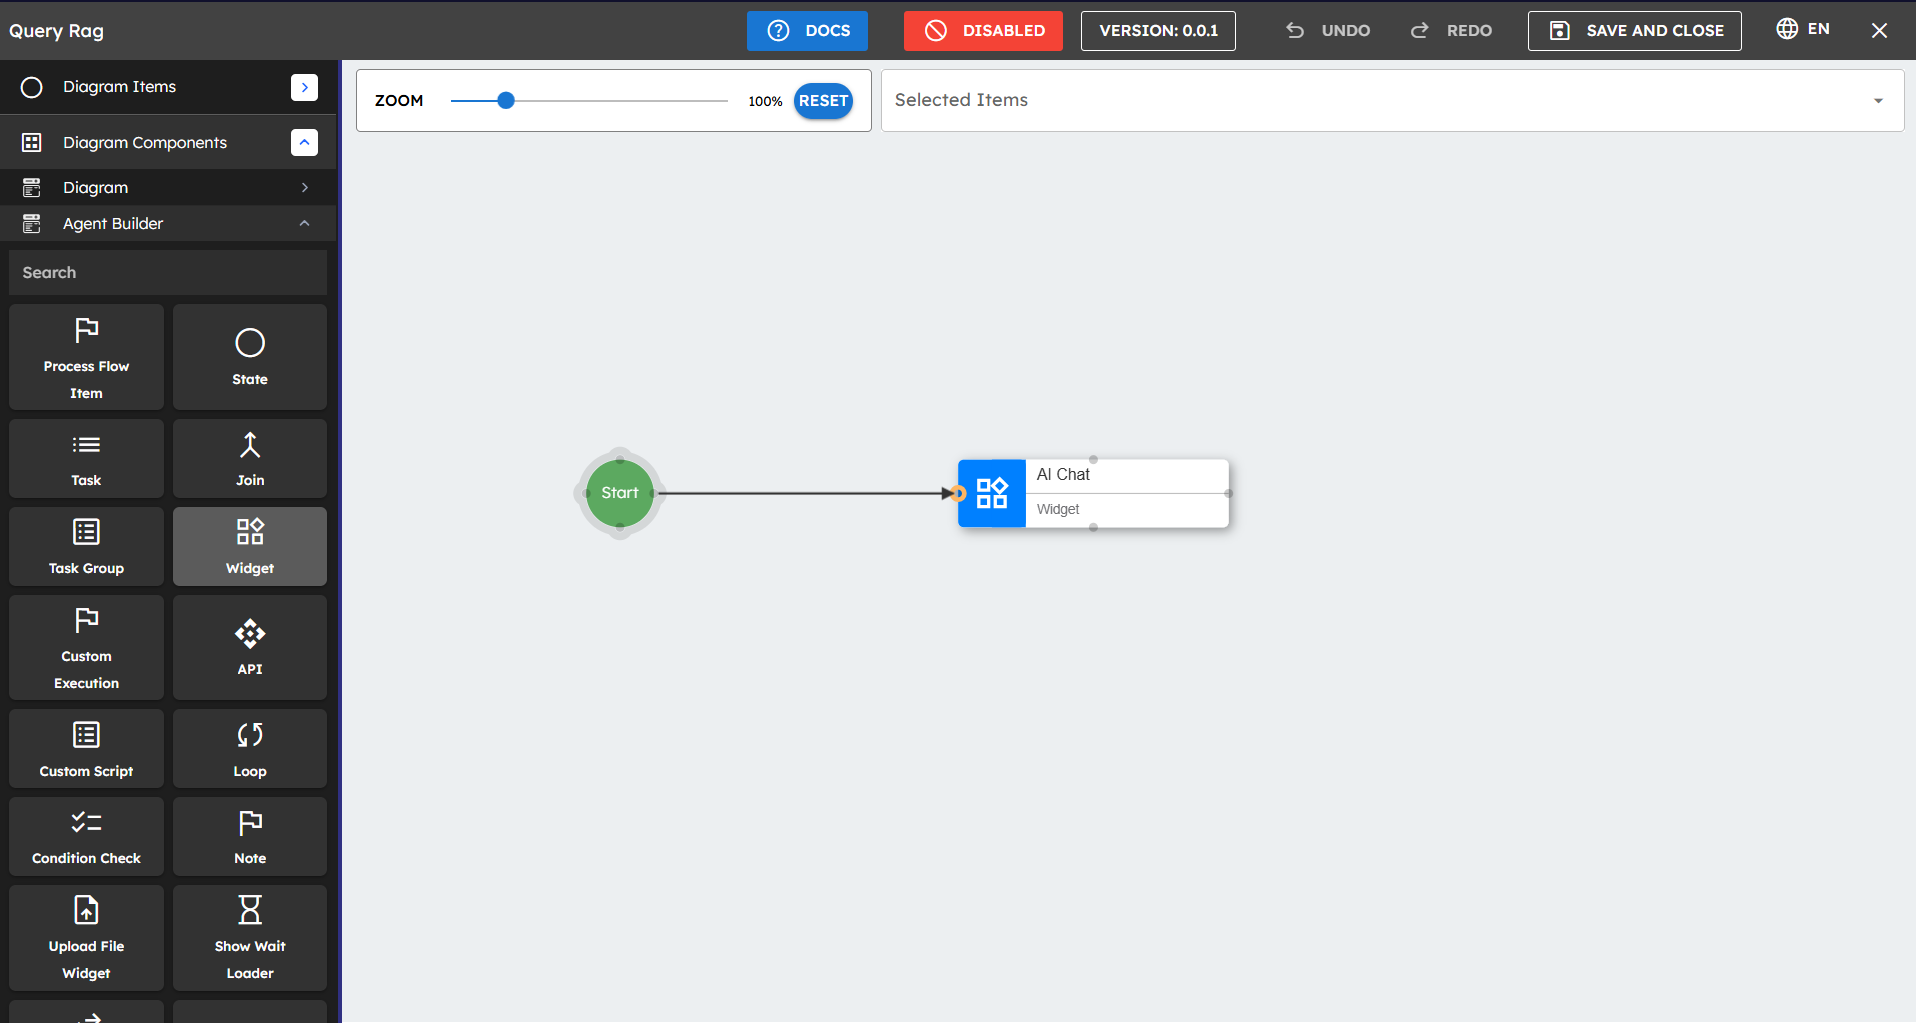 Figure 13: Creating a connection between components
When the connection popup appears:
For Source Port, select On Enter (this means the connection happens when the agent first loads).
For Target Port, select show (this tells the chat widget to display).
Click Save to create the connection.
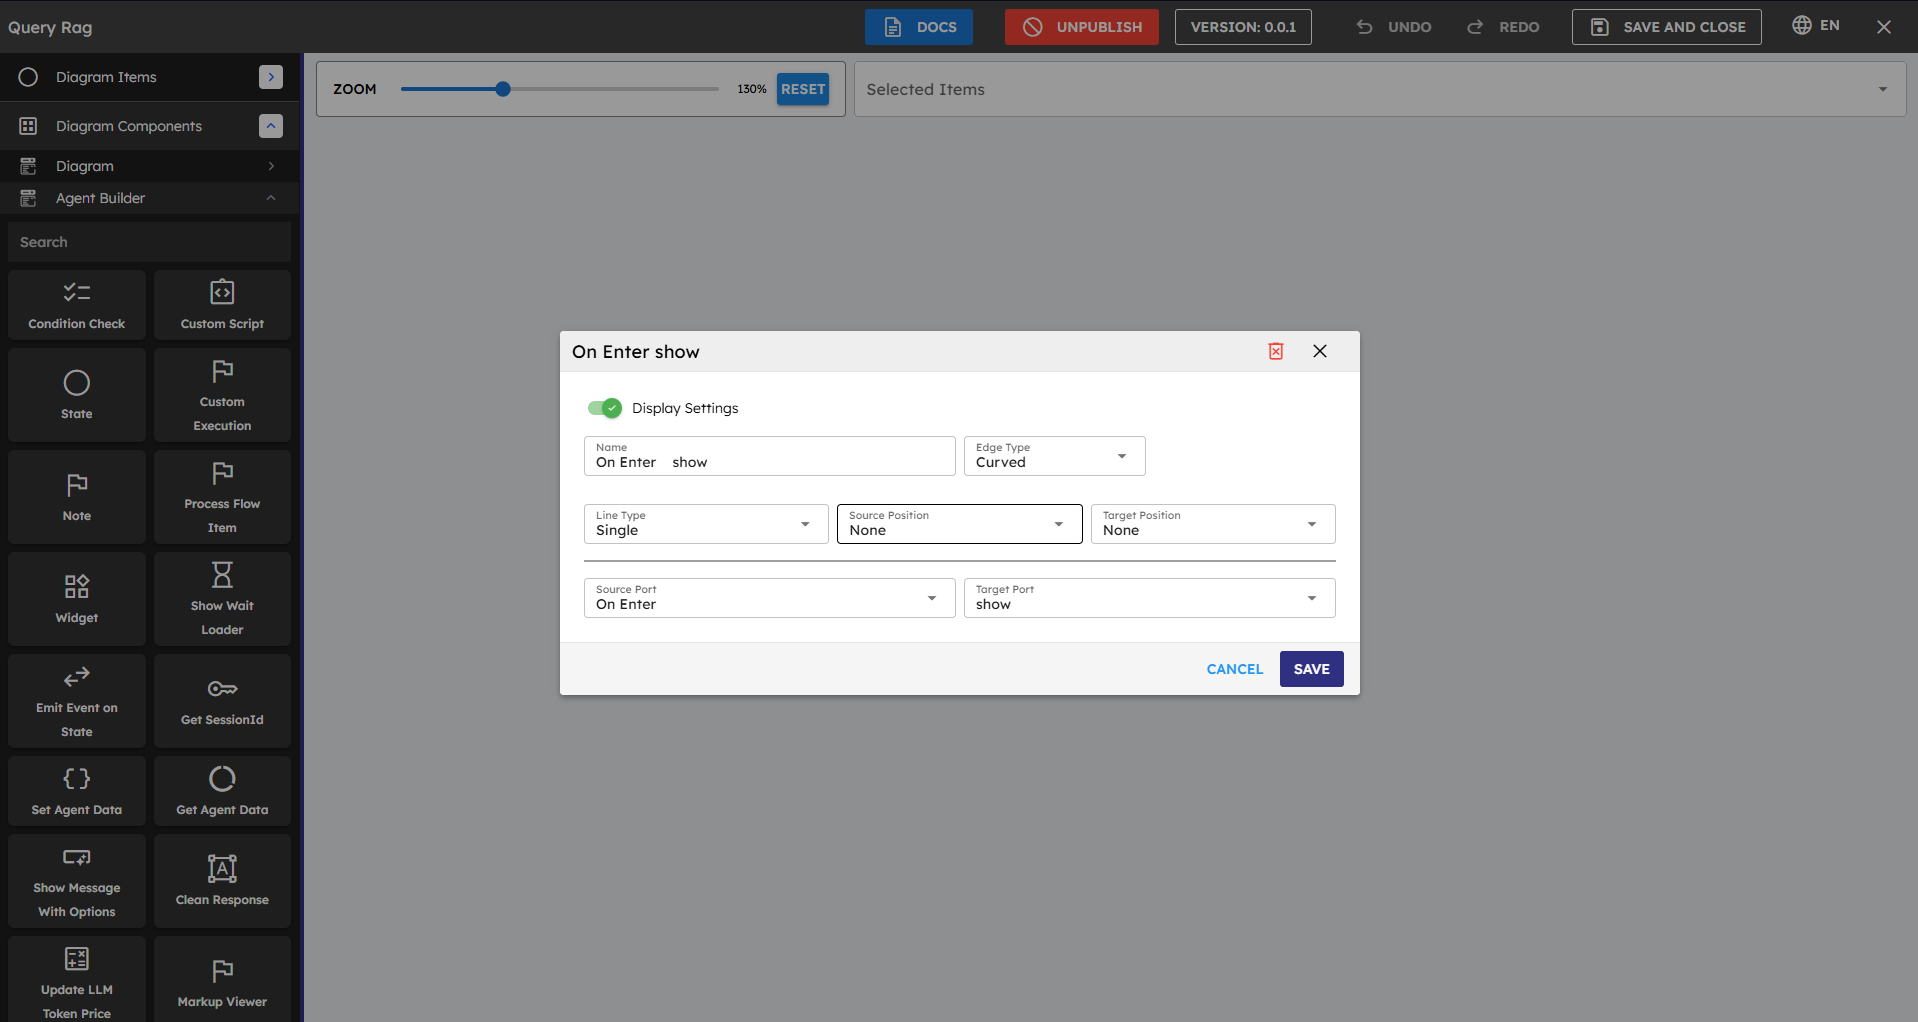 Figure 14: Configuring the connection properties
Understanding Ports: A Deeper Dive
Connections in the Agent Builder use a source-to-target system that determines both when actions occur and what those actions should be. Each component has specific source and target ports based on its functionality, and selecting the proper ports is essential for creating functional agent flows.
Source Ports: Trigger Events Source Ports are events emitted by the source component. Events vary by component type:
onComplete: Activates when a component successfully finishes its operation (like when a script completes execution or a message is displayed).
onError: Triggers when a component encounters an error, enabling error handling paths.
onLoad: Fires when a component is initially loaded into the interface.
onShow: Activates when a component becomes visible to the user.
onChatMessage: Specific to chat widgets, triggers whenever a user sends a message.
On Enter: Found in the Start node, activates when the agent first loads.
On Leave: Found in the Start node, activates when a user exits the agent.
onEvent: Custom events that can be defined for specific user interactions.
Target Ports: Resulting Actions Target Ports are methods of the target component. Methods vary by component type:
show: Makes a component visible to the user (typically used with widgets).
execute: Runs a component's primary function (most common action for processing components).
getData: Retrieves data from a component without changing its state.
setData: Updates a component's internal data values.
getElements: Retrieves UI elements from a component (used in form processing).
Custom Ports Agent Builder allows you to create custom ports to handle specific scenarios:
Custom Source Ports: You can create custom events (for example, "onButtonClick" or "onDataReceived") by clicking the + icon in the source port dropdown when creating a connection.
Custom Target Ports: Some components allow custom action definitions that appear in the target port dropdown.
Component-Specific Ports: Many components have unique ports based on their functionality (such as "onChatMessage" for chat widgets).
Connecting the right source port to the appropriate target port is like completing a sentence: "When [source port event] happens, then [target port action]." Using mismatched ports is a common cause of agent malfunctions, so double-check these connections when troubleshooting issues.
2.7 Adding More Components
You add more components to create your agent's functions. Common components are:
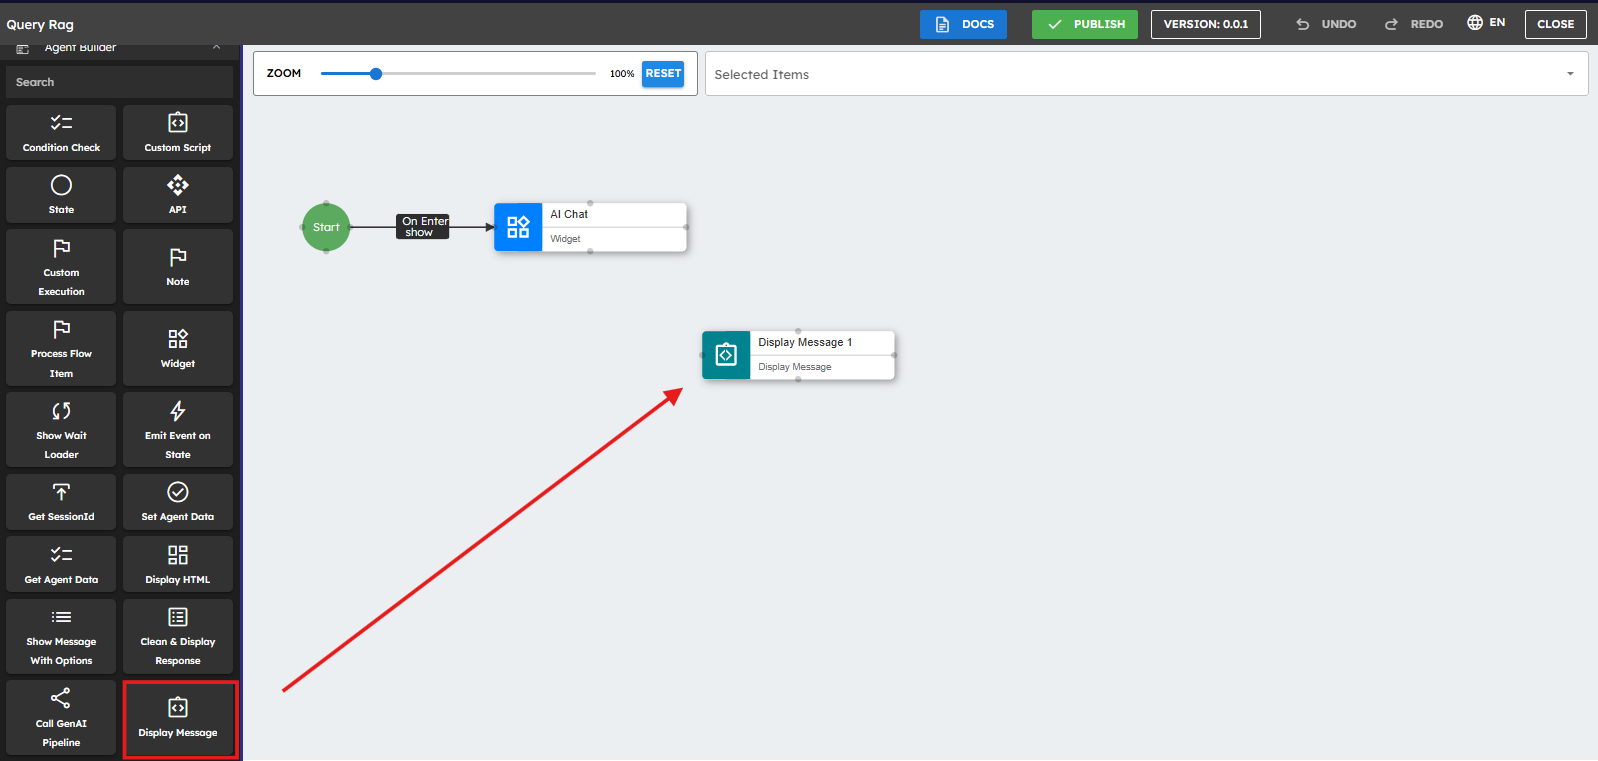
Display Message: Shows a message to the user in the chat.
Show Message with Options: Shows buttons for users to select.
Check Condition: Makes branches in your flow based on conditions.
Custom Script: This lets you add complex logic (requires JavaScript knowledge).
Show Wait Loader: This shows a loading indicator during processing.
Component Naming: Give each component a clear name (such as, "Welcome Message" instead of "Display Message 1") to make your flow easier to understand. Learn More: To learn more about each agent-building component and its functions, check out the detailed documentation.
Important: For components that show content in the chat interface (such as Display Message and Show Wait Loader), you must set the Chat Widget to AI Chat - v.0.0.1 (ZLib.ContineoWorkspace). This is the dedicated chat interface where all user-agent interactions appear. Without this setting, components may not appear correctly in the chat flow.
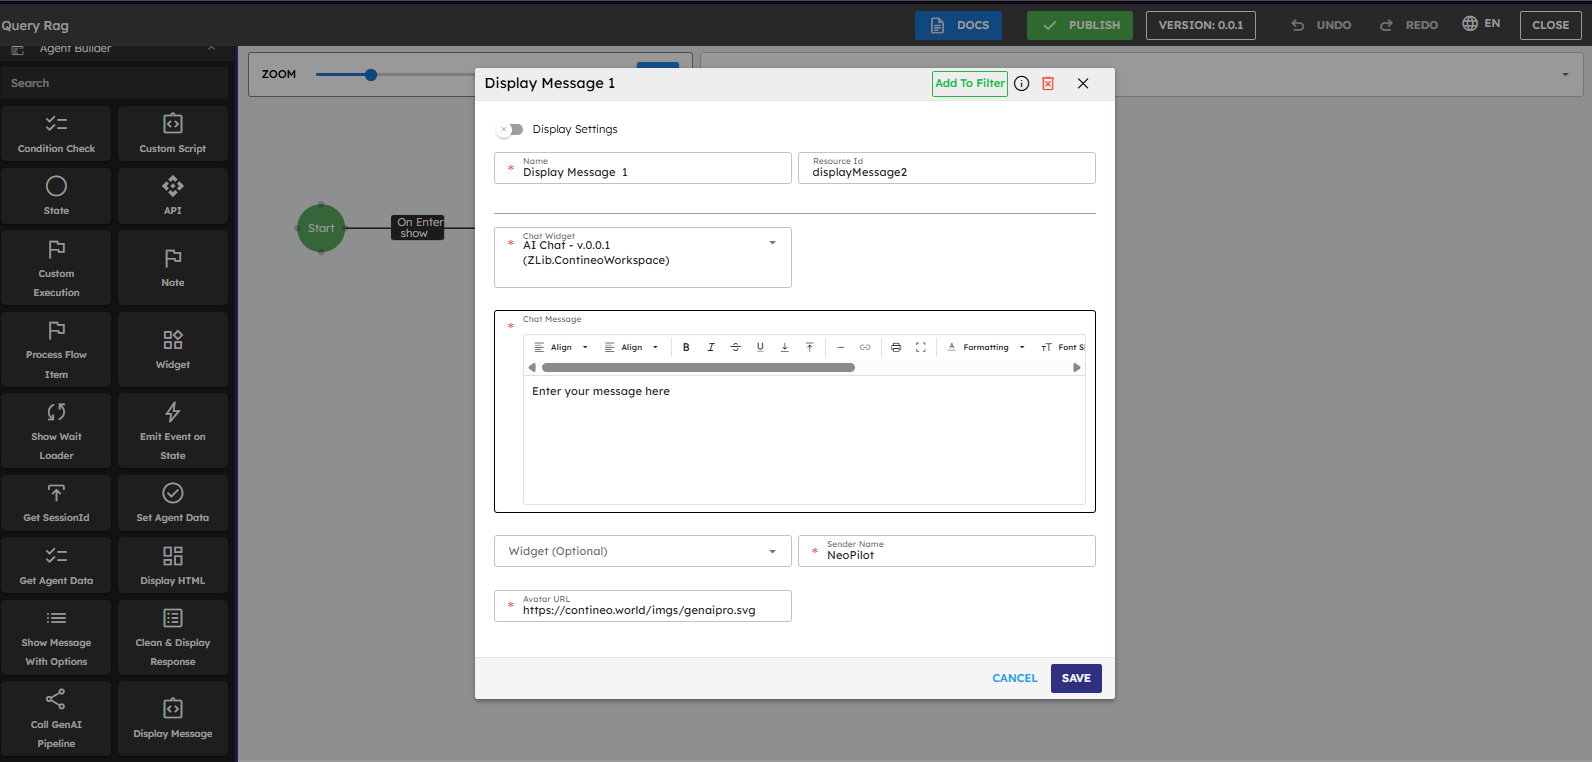
When you drag the Display Message component to the canvas, a setup popup appears, you set its properties here:
Name: A clear name for the component (required).
Chat Widget: Select AI Chat - v.0.0.1 (ZLib.ContineoWorkspace) (required).
Chat Message: Enter the message content you want to show to users (required).
Sender Name: The name that appears as the sender of the message.
Avatar URL: Optional image URL for the sender's avatar.
Fields marked with an asterisk (*) are required. You must complete them for the component to function properly. For the Display Message component, you enter welcome messages, instructions, or other text you want to show to your users here.
In the same way, drag different agent-building components to the canvas to build your agent workflow. Set their properties for each component.
2.8 Creating Common Patterns
Welcome Message Pattern
To use this pattern, follow these steps:
Add the Widget component to the canvas. Select AI Chat - v.0.0.1 (ZLib.ContineoWorkspace) from the widget property dropdown.
Connect the Start node to the AI Chat. Set "Source Port" to "On Enter" and "Target Port" to "Show".
Add a Display Message component to the canvas next to the Widget component. Enter the required inputs to the component as shown above in this document.
Connect the Widget to the Display Message. Set the connection from "On Load" to "Execute".
This sets up the message to welcome users and explain what your agent can do.
Responding to User Messages Pattern
Add components to process user input (such as Custom Script or Check Condition).
Connect the AI Chat's "onChatMessage" event to these components.
Connect the processing components to the GenAI Pipeline component to show generated responses.
Button Choices Pattern
Add a Show Message with Options component.
Set button labels in its properties.
Connect each button's event to different paths in your flow.
What you have now: A basic agent with a chat interface and components that define its behavior. Next, connect your agent to AI capabilities.
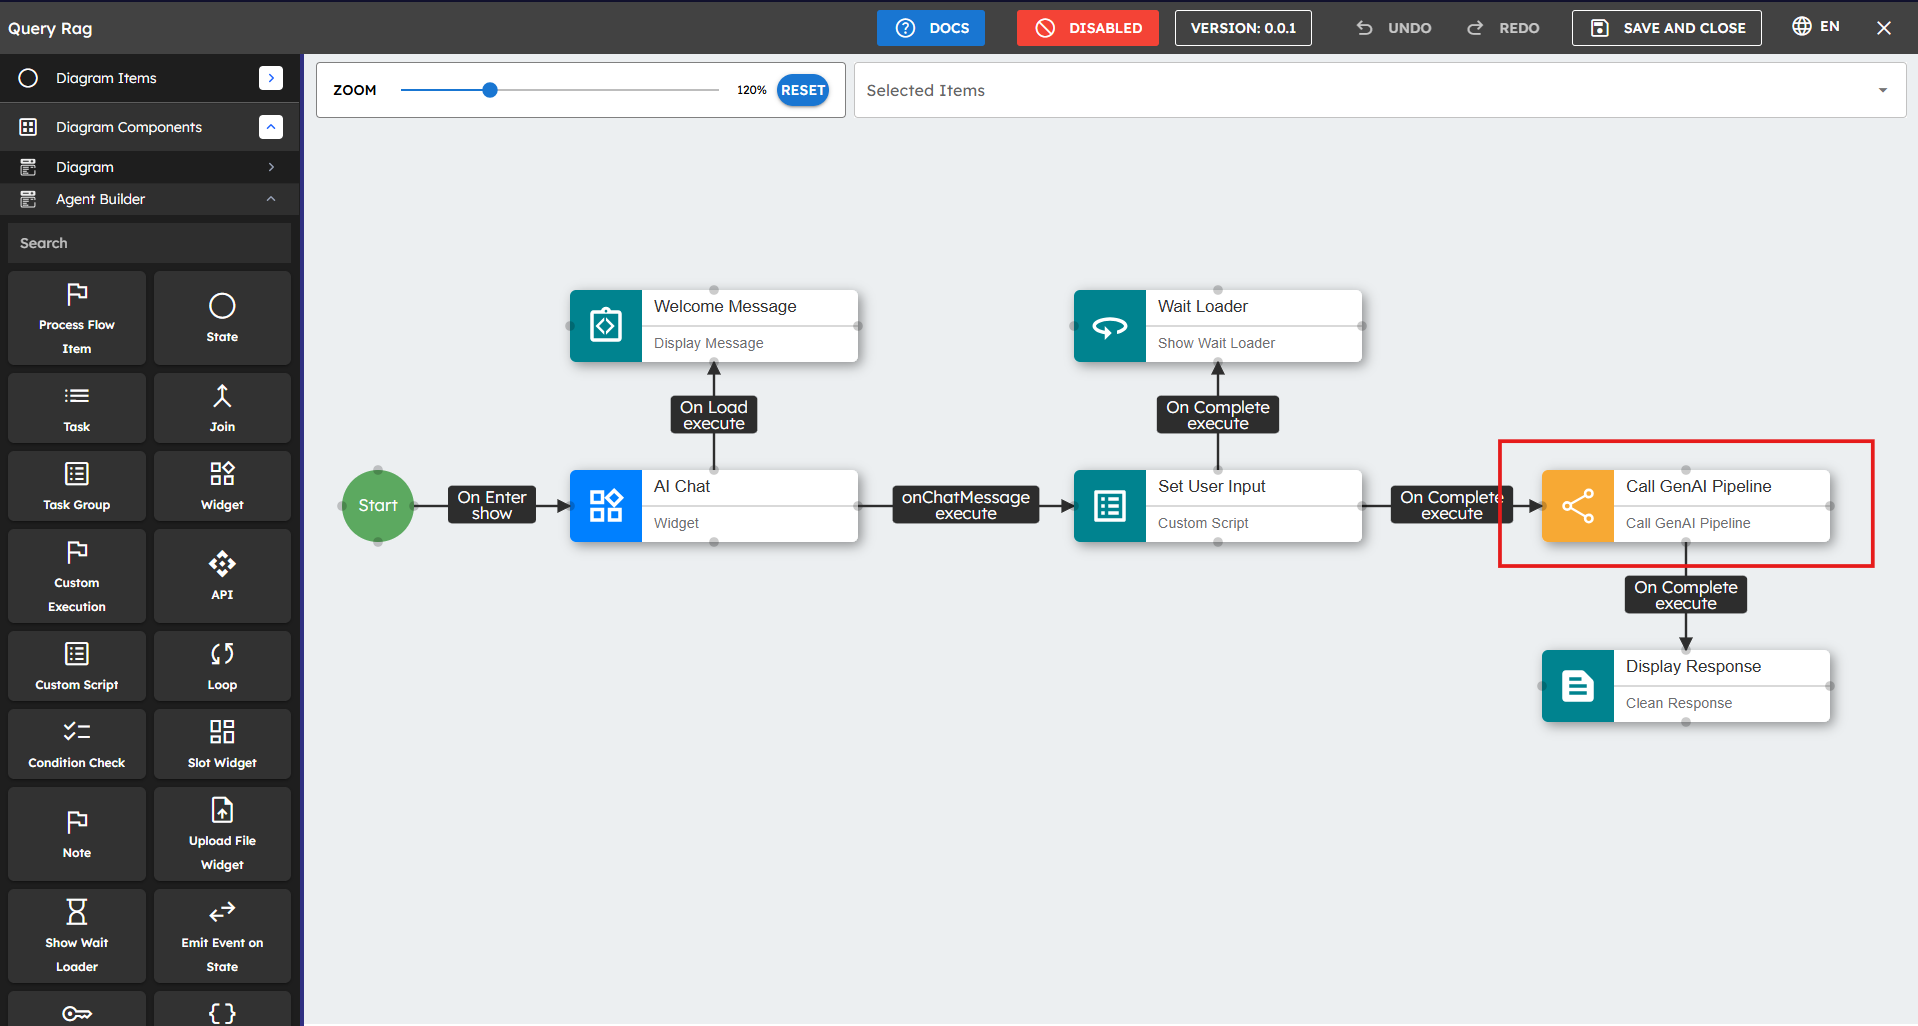
3. Integration Setup: Adding AI Capabilities {#integration-setup}
3.1 Connecting to AI Pipelines
To make your agent intelligent, connect it to AI pipelines that process data and generate responses.
Before you continue, you need access to an existing pipeline. If you have not created a pipeline, create a pipeline by following instructions at 2. Getting Started with Pipeline Builder
Add a Call GenAI Pipeline component to your canvas.
Connect it to a component that has user input (such as the AI Chat widget's "onChatMessage" event).
In the properties panel, select the correct AI model and Pipeline from the dropdown menus.
3.2 Preparing Input for Pipelines
Pipelines need correctly formatted input. You use the Custom Script component to prepare this input.
Add a Custom Script component before your Call GenAI Pipeline.
Connect your input source (such as AI Chat) to this Custom Script.
Write a script that formats the input for your pipeline.
Connect the Custom Script's "onComplete" to the Call GenAI Pipeline's "execute".
Example Script: This prepares user input and any uploaded files for the pipeline
let uploadedFiles = this.agent.data.uploadedFiles;let lastUserInput = args.$event.message;var result = { lastUserInput: lastUserInput, documentUrlsList: uploadedFiles};return result;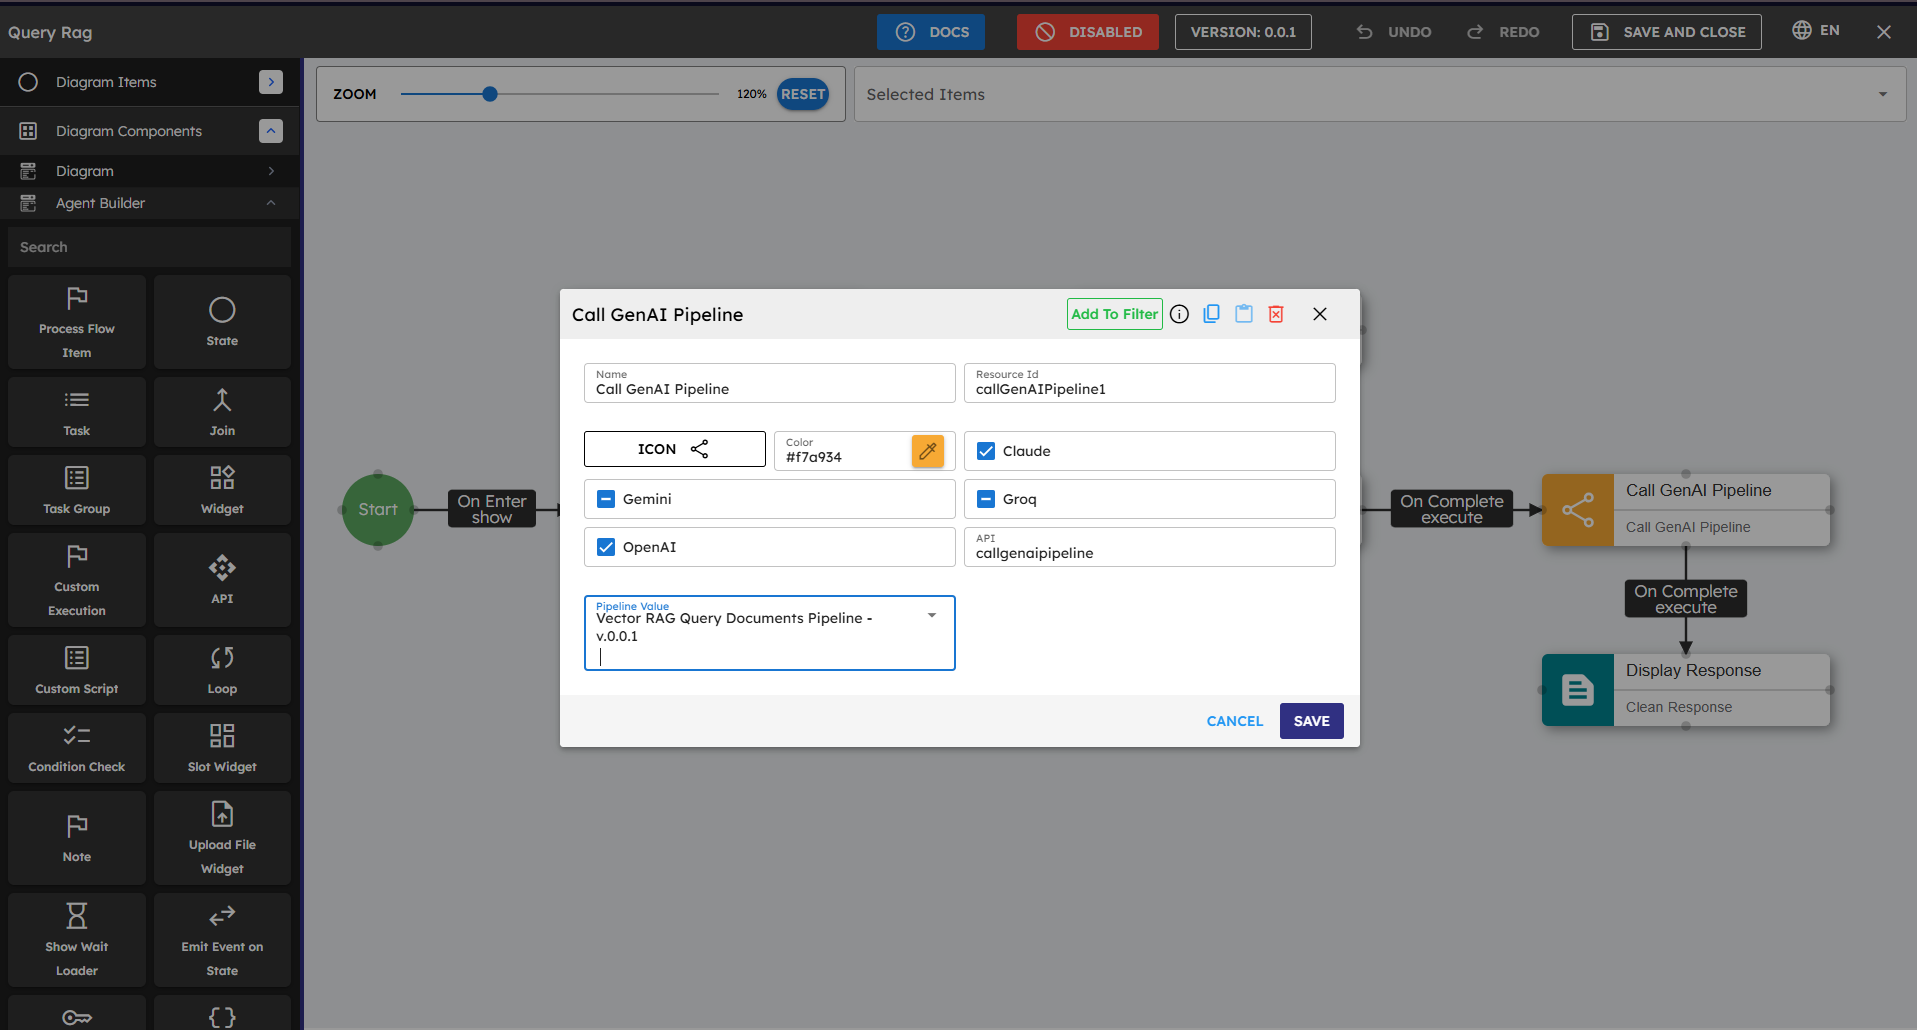
3.3 Handling Pipeline Results
After the pipeline processes the data, you show the display the results to the user:
Add a Display Message or Custom Script component after your Call GenAI Pipeline.
Connect the Call GenAI Pipeline's "onComplete" to this component.
Set it to access and show the pipeline results.
3.4 Error Handling
Always add error handling to manage situations when things do not go as planned.
Connect the onError port of important components to the error-handling components.
Add Display Message components with clear error messages.
Consider adding fallback paths when services are unavailable.
What you have now: An agent that processes user input through AI pipelines and shows intelligent responses. The next step is to test and deploy your agent.
4. Practical Use Case: Building a Quiz Generator {#quiz-generation-usecase}
You now understand the basics of agent building. Let's walk through a complete use case to see how everything fits together. In this example,you create a Quiz Generator agent that asks users for a topic and creates 10 quiz questions based on that topic.
What You Build
An agent that:
Welcomes the user and asks for a topic.
Gets the user's topic input.
Processes it with a GenAI Pipeline.
Shows 10 quiz questions about the requested topic.
Step 1: Creating a New Agent
Go to WorkSpace and click Agents in the sidebar.
Click + to create a new agent.
Enter the required information:
Name: Quiz Generator
Description: An agent that creates quiz questions about any topic.
Logo URL: (Optional) – If you do not add one, the system uses a default logo.
Click Save. Then click DESIGNER to open the canvas.
Step 2: Adding and Configuring the Chat Widget
Drag a Widget component from the left panel to the canvas.
In the properties panel, name it "Quiz Chat". Select AI Chat - v.0.0.1 (ZLib.ContineoWorkspace) from the dropdown.
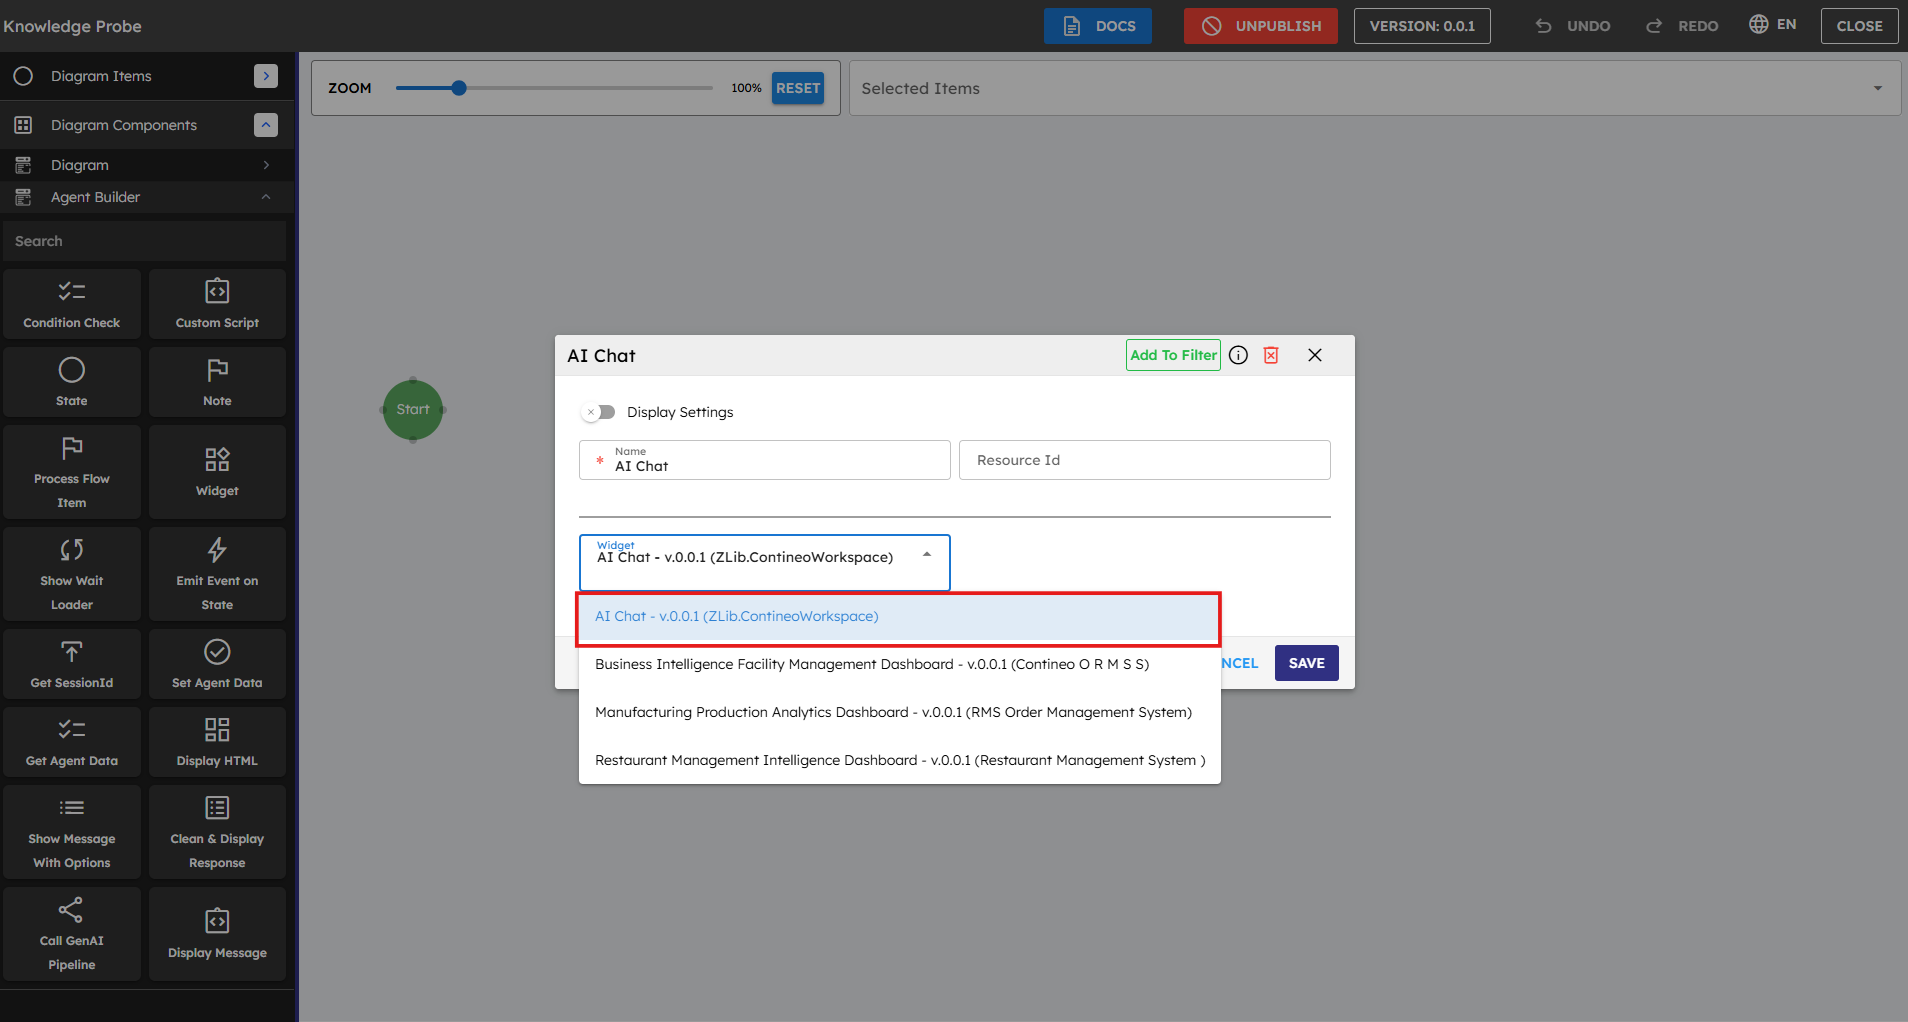 Figure 20: Adding and configuring the Chat Widget
Connect the Start node to the Quiz Chat widget. Drag from the Start node:
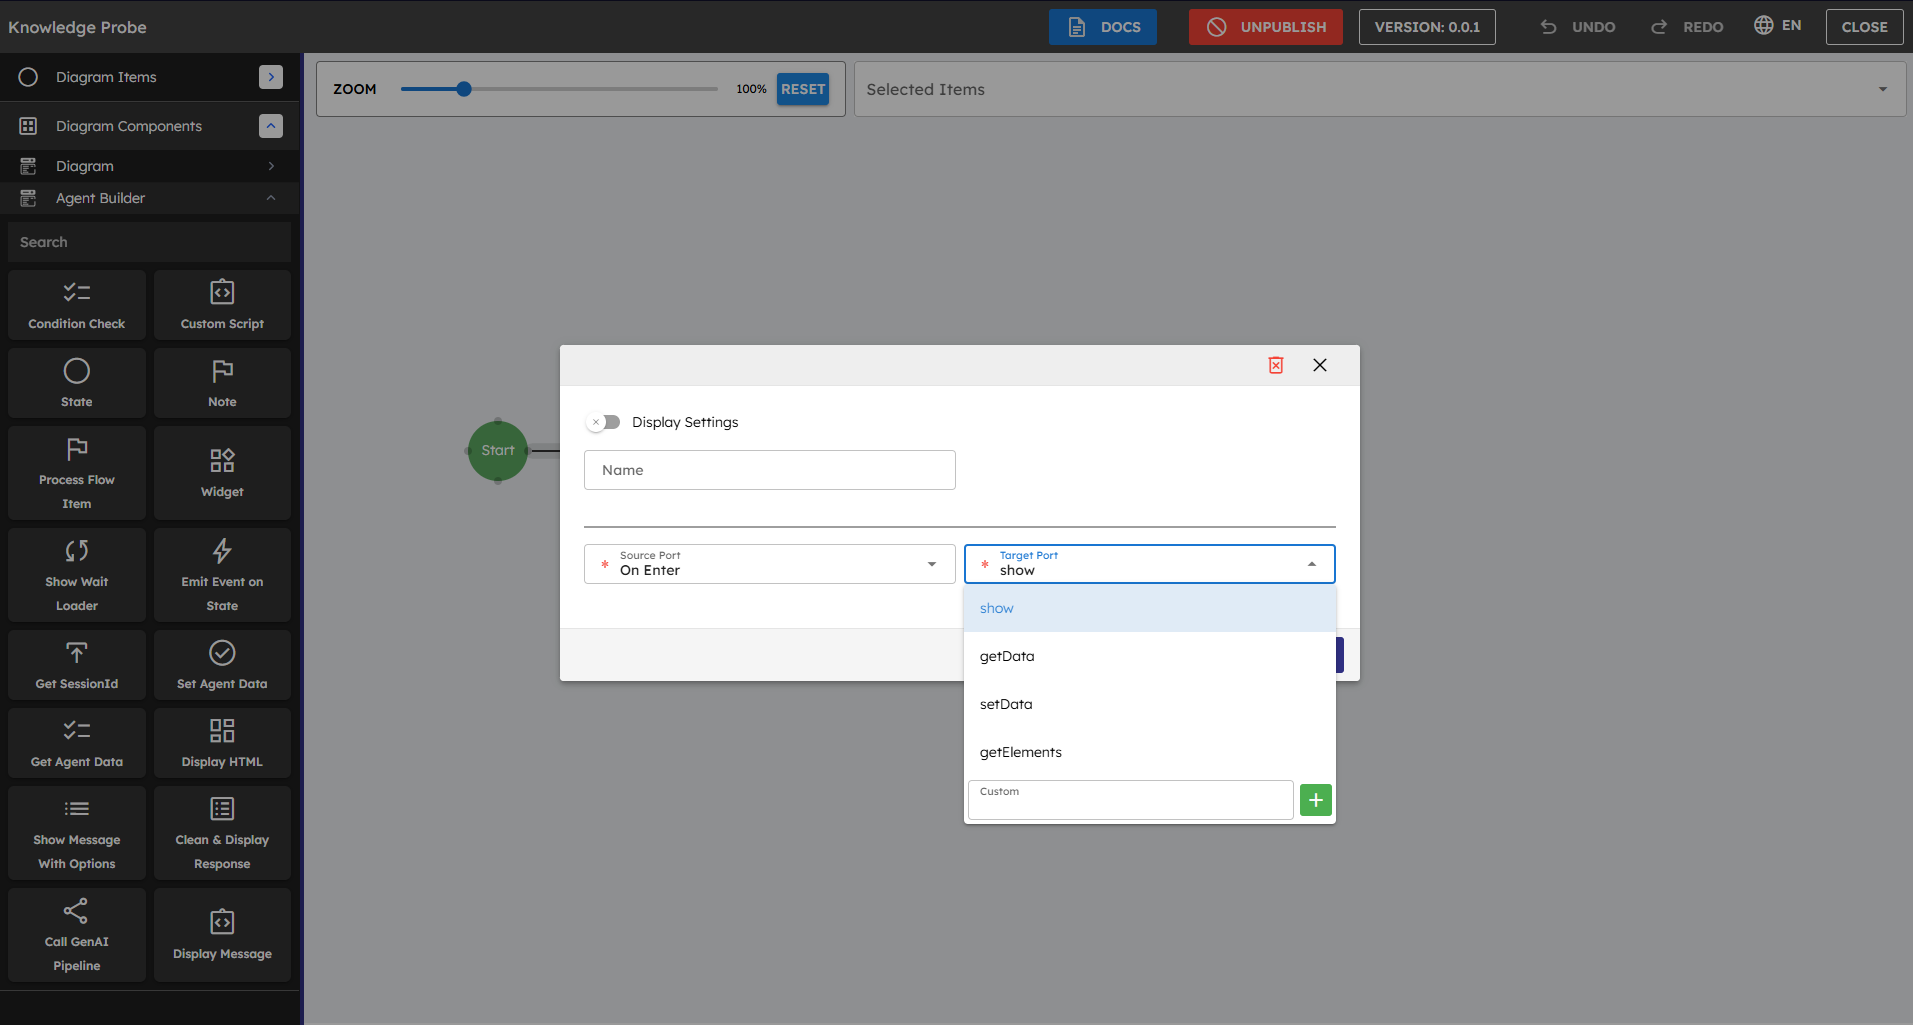 Figure 21: Connecting the Start node to Chat Widget
Set Source Port to "On Enter"
Set Target Port to "show"
Step 3: Creating a Welcome Message
Drag a Display Message component onto the canvas.
In the properties panel:
Name it "Welcome Message"
Set Chat Widget to "AI Chat - v.0.0.1 (ZLib.ContineoWorkspace)"
Set Chat Message to "Welcome to the Quiz Generator! Enter a topic you want questions about."
Set Sender Name to "Quiz Bot"
Set Avatar URL to "https://contineo.world/imgs/genaipro.svg"
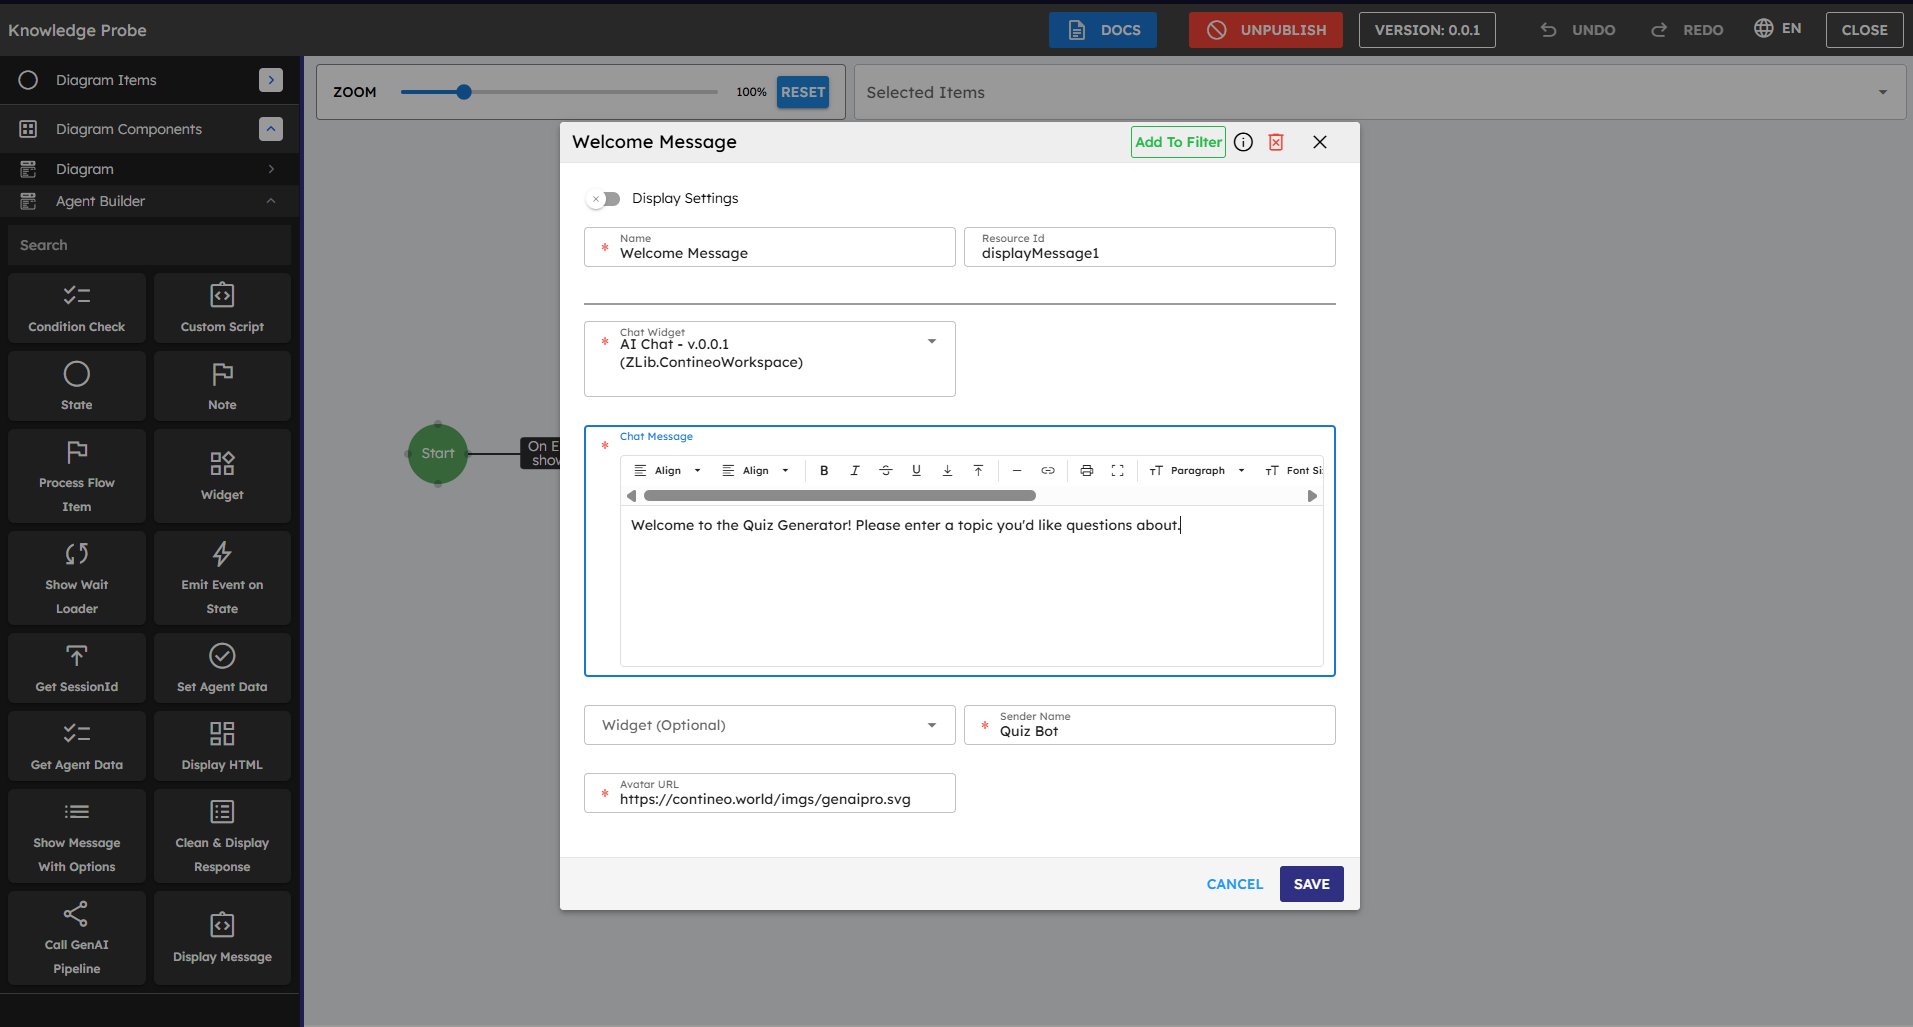 Figure 22: Configuring the Welcome Message
Connect the Quiz Chat widget to the Welcome Message:
Set Source Port to "onComplete"
Set Target Port to "execute"
Pro Tip: A good welcome message explains what the agent does and what the user must do next. This sets expectations and improves the user experience.
Step 4: Capturing User Input
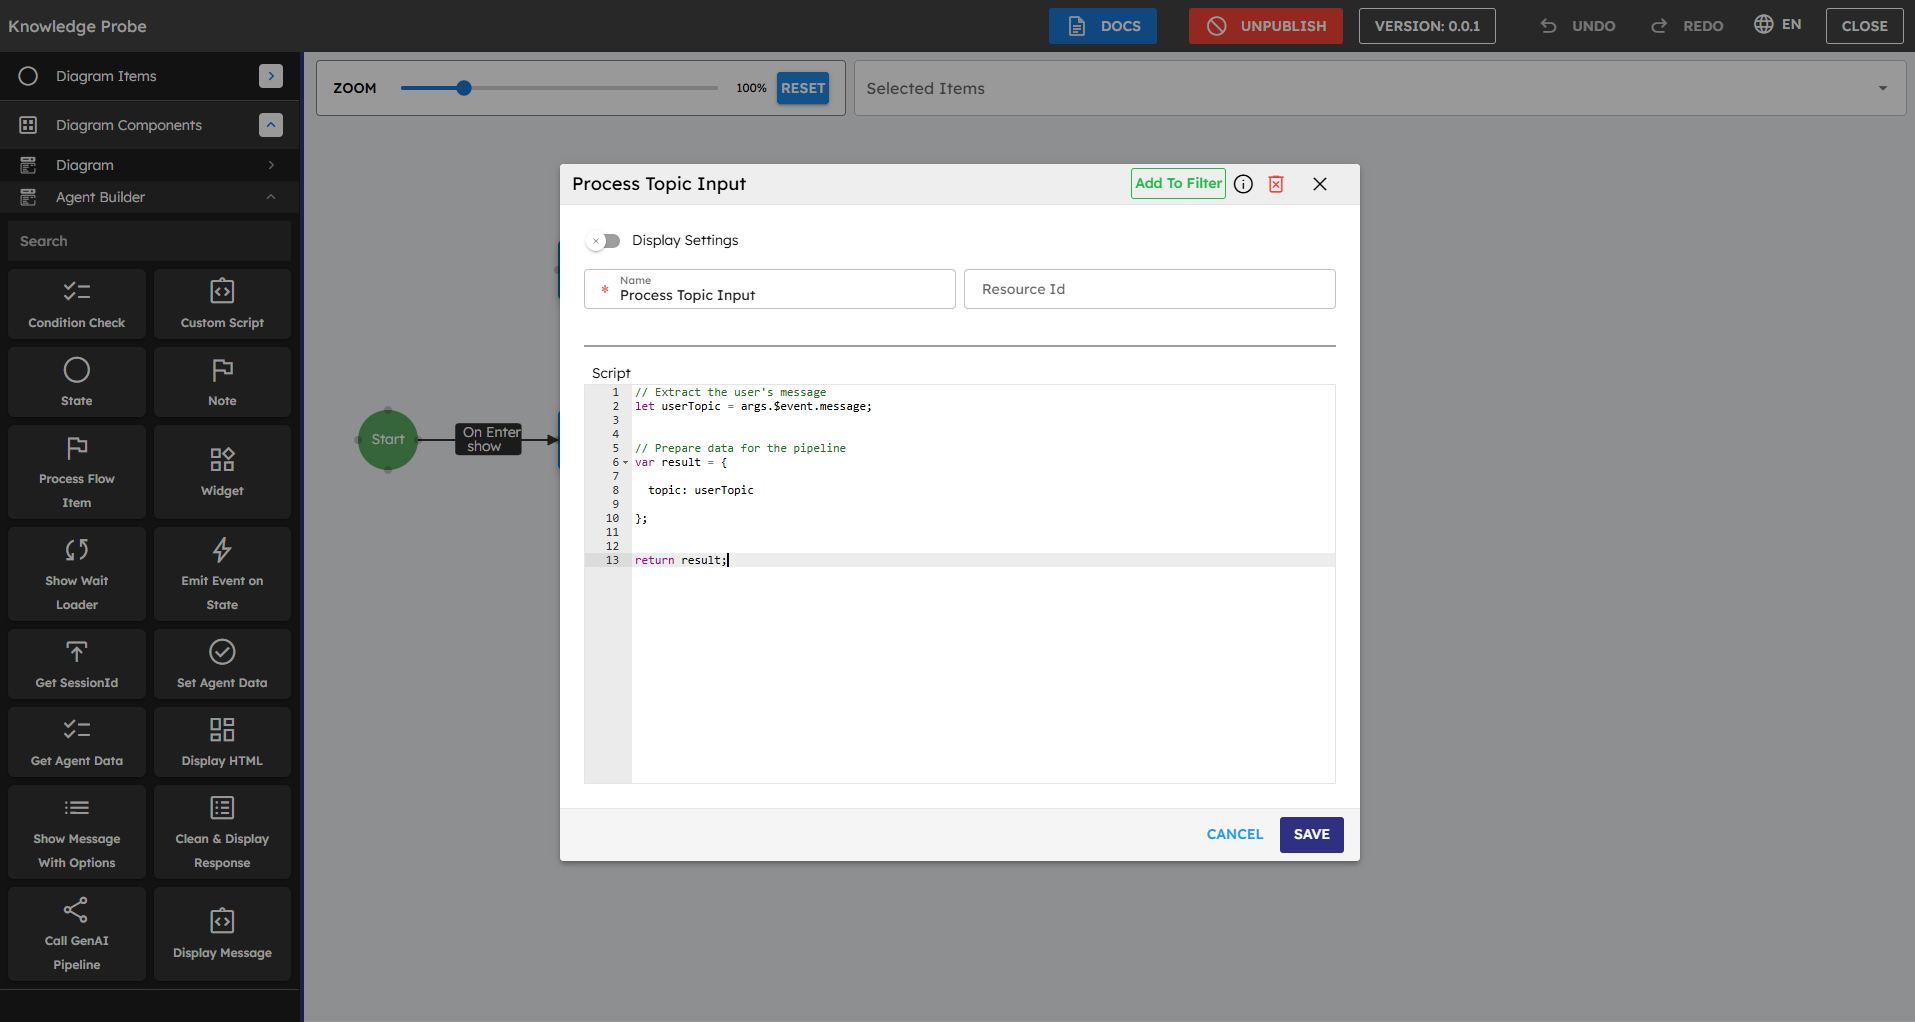
Drag a Custom Script component onto the canvas. Name it "Process Topic Input"
Connect the Quiz Chat widget to this script:
Set Source Port to "onChatMessage"
Set Target Port to "execute"
In the script editor, enter this code to capture the user's topic:
User Topic Script:
// Extract the user's messagelet userTopic = args.$event.message;
// Prepare data for the pipelinevar result = {
  topic: userTopic
};
return result;
Step 5: Creating an AI Pipeline for the Quiz Generator
Before you connect your agent to a pipeline, you must create the pipeline. Stop building the agent now. Go to the GenAI Pipelines section to create the quiz generation pipeline. After you complete this, return to your agent and continue connecting everything.
Go to GenAI Pipelines in the WorkSpace sidebar.
Click + to create a new pipeline.
Enter Name and Description:
Name: "Quiz Generator Pipeline"
Description: "Creates interactive HTML quiz questions about any topic"
Click Save. Then click DESIGNER to open the pipeline canvas.
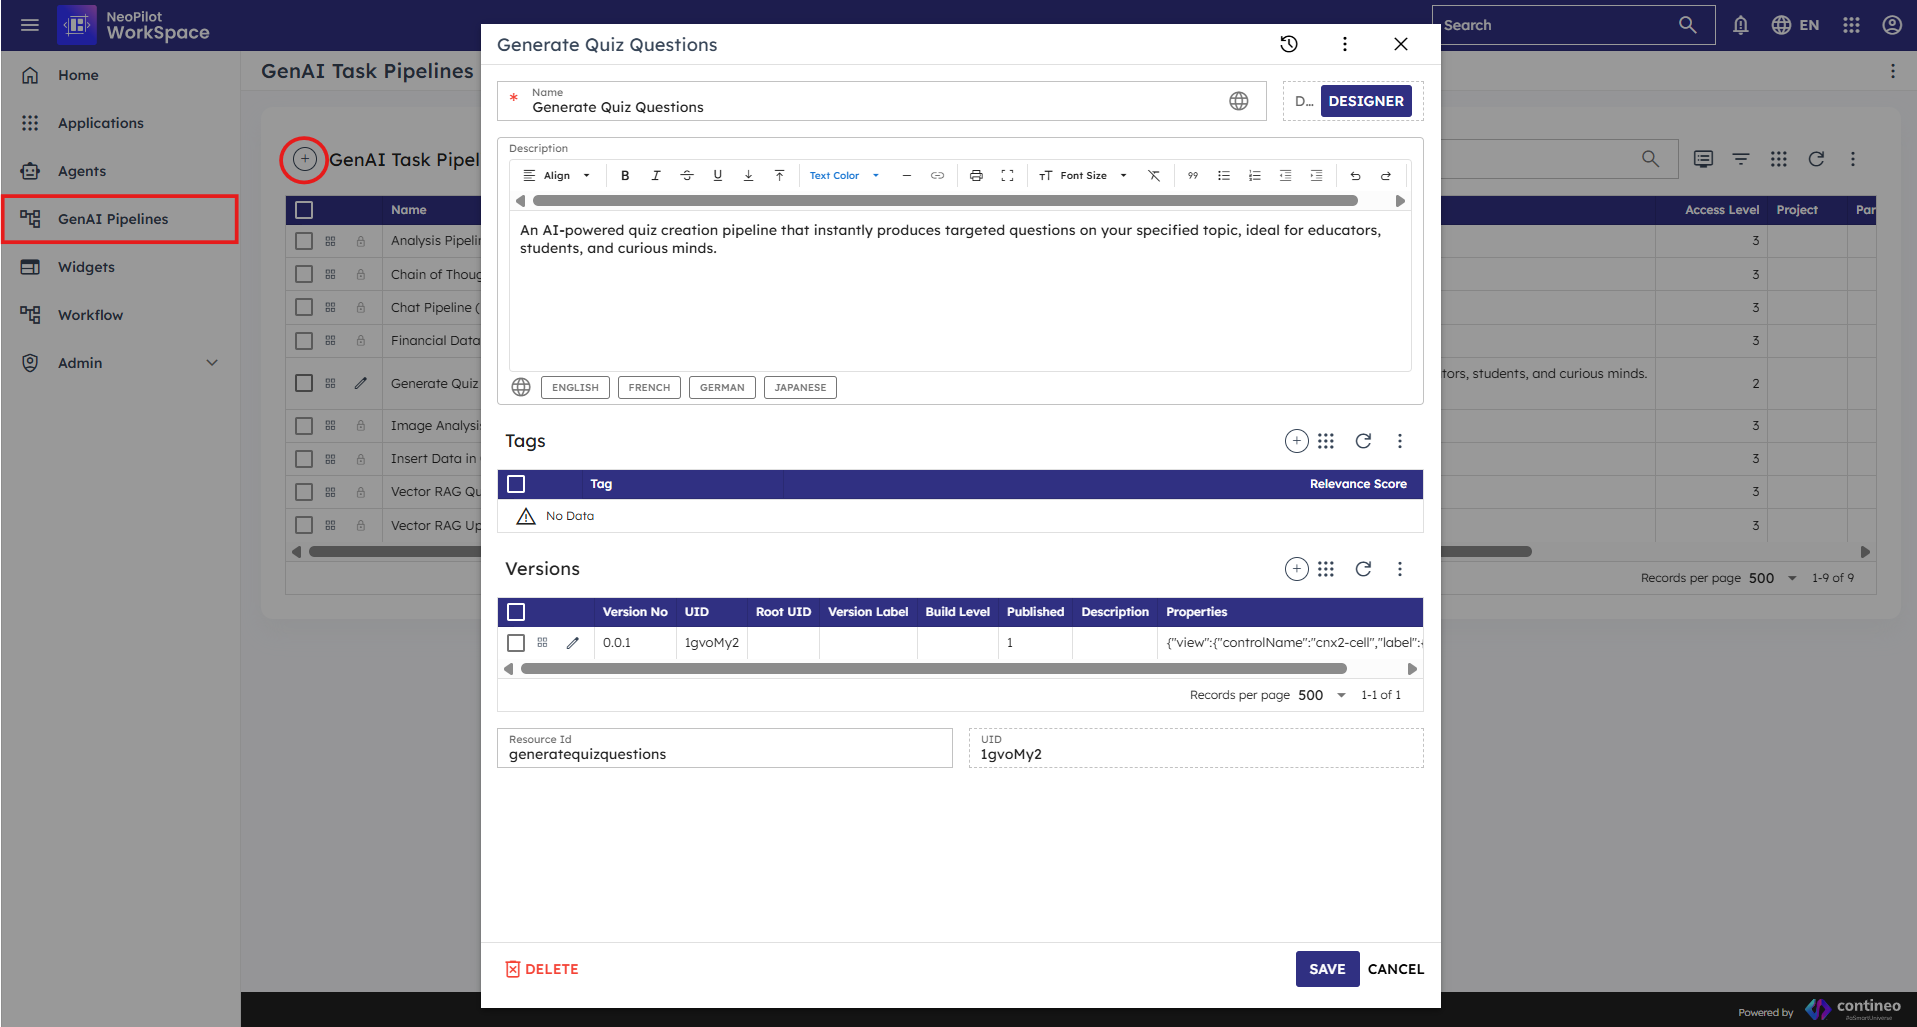 Figure 24: Creating a new pipeline
Drag the Generate Text component onto the pipeline canvas.
Connect the Start node to the Generate Text component:
Source Port: "On Start"
Target Port: "execute"
Set Up the Generate Text component:
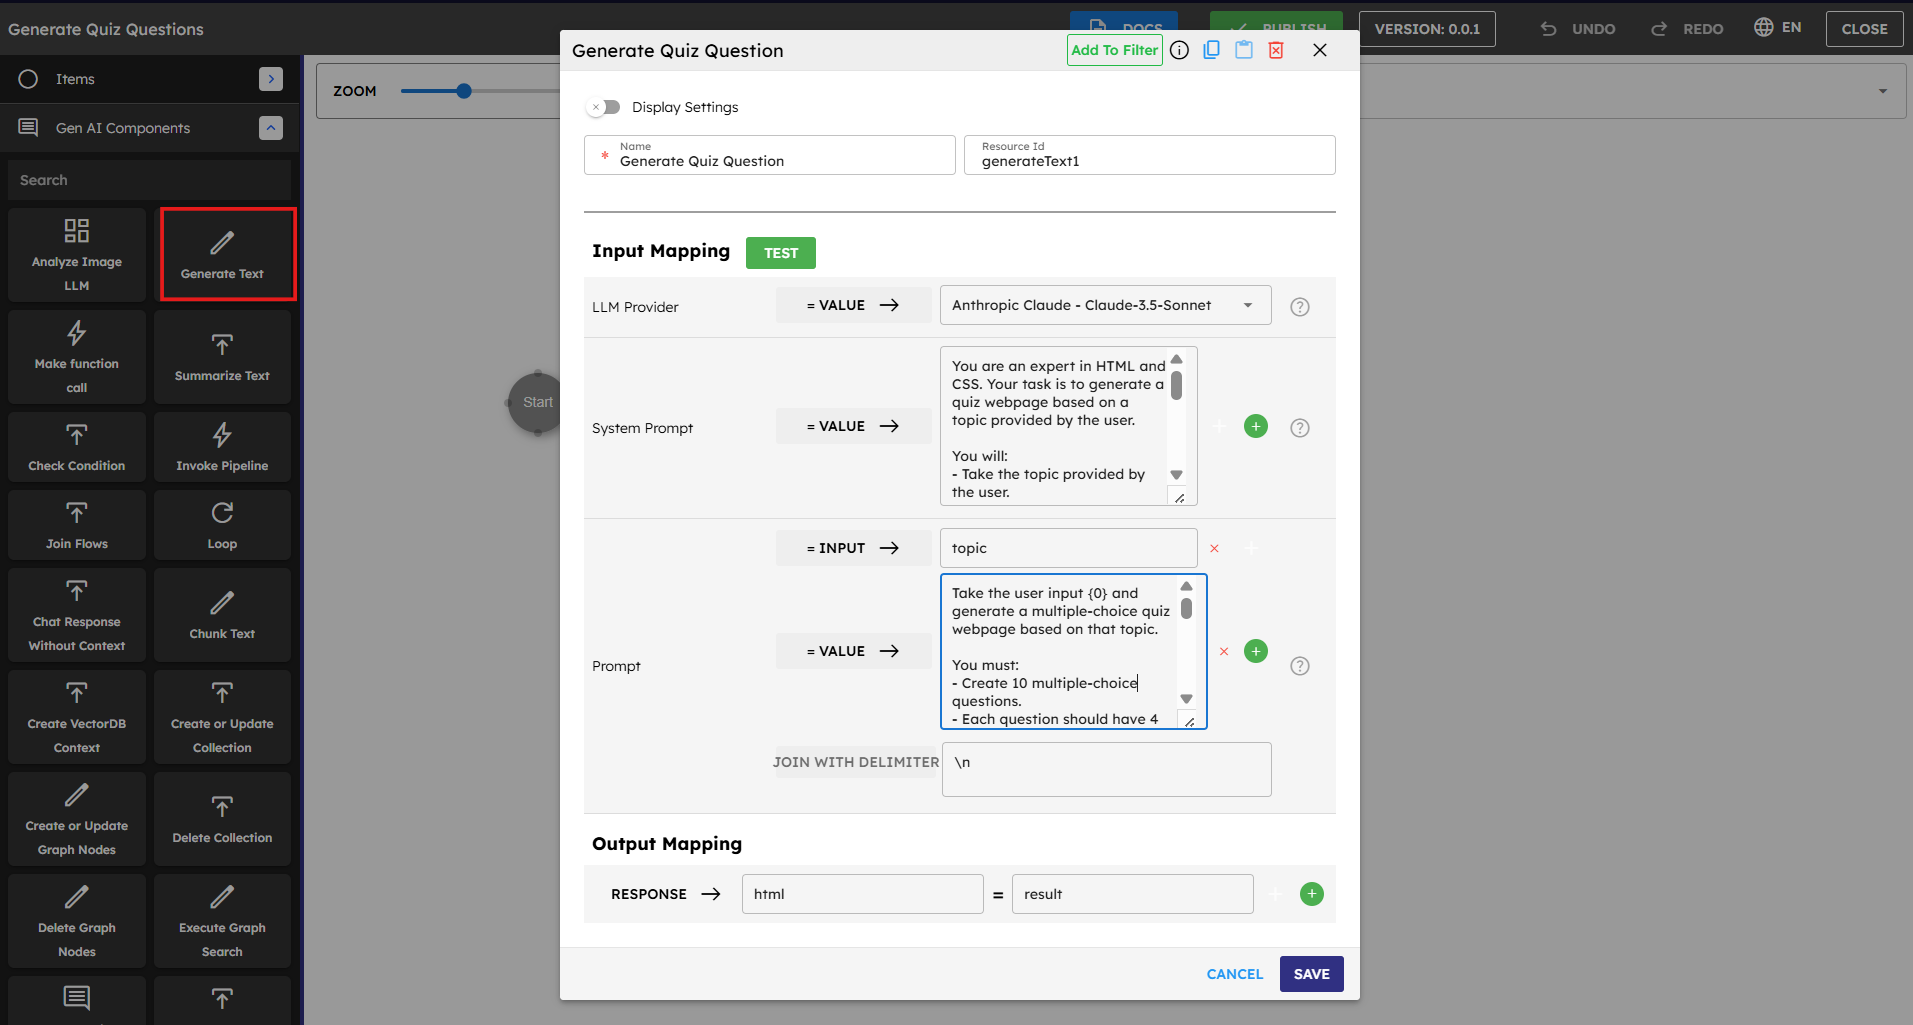 Figure 25: Generate Text Configuration
Input Mapping Setup: The Input Mapping section shows where you define what content goes to the AI model and how it processes the content.
Detailed Input Mapping Configuration Of Generate Text Component:
Set LLM Provider:
Type: VALUE
Value: Anthropic Claude - Claude-3.5-Sonnet (or another model you choose)
Set System Prompt:
Type: VALUE
Enter this text:
*You are an expert in HTML and CSS. Your task is to generate a quiz webpage based on a topic provided by the user. You should:
Take the topic provided by the user.
Create 10 multiple-choice questions related to that topic.
Each question must have 4 answer options, only one of which is correct.
Generate the full HTML code for a webpage that displays the quiz.
Include all CSS styling inside a
<style>tag within the HTML (no external files). Output only the final HTML code — do not include explanations, comments, or any additional text. Just return the HTML content.*
Set Prompt Input variable:
Type: INPUT
Value: topic (this must match the variable name you use in the agent)
Set Prompt:
Type: VALUE
Enter this text:
*Take the user input {0} and generate a multiple-choice quiz webpage based on that topic.You must:- Create 10 multiple-choice questions.- Each question should have 4 options with only 1 correct answer.- Use a visually appealing CSS color scheme (modern, accessible, and not just black/white).- Include a "Submit Quiz" button at the end of the quiz.- On clicking the button, calculate and display the user's score out of 10 without reloading the page.Output only the following format:<!DOCTYPE html><htmllang="en"><head><metacharset="UTF-8"><title>Quiz on {0}</title><style>body {font-family: 'Segoe UI', sans-serif;background-color: #f6f8fa;margin: 0;padding: 20px;}.quiz-container {max-width: 800px;margin: auto;background-color: #ffffff;padding: 30px;border-radius: 12px;box-shadow: 06px20pxrgba(0, 0, 0, 0.1);border: 1px solid #e1e4e8;}/* Additional styling here */</style></head><body><divclass="quiz-container">/* Quiz questions and structure here */<buttononclick="submitQuiz()">Submit Quiz</button><divid="result"></div></div><script>/* Quiz functionality here */</script></body></html>Only return this structure. Do not escape the HTML, and do not include any explanations.*Set Join with Delimiter:
Value: \n (newline character)
Important: Make sure the input parameter name "topic" matches exactly what you use in your agent's Custom Script component when you pass data to the pipeline.
Output Mapping Configuration
Set Response Output:
From: html
To: result
This mapping makes the HTML content from the AI available in the "result" variable. Your agent can access this variable.
Click SAVE to save your component setup.
Click PUBLISH at the top of the screen to publish your pipeline.
Click SAVE AND CLOSE to return to the WorkSpace.
Pipeline Complete: Your Quiz Generator Pipeline is ready to use in your agent! This pipeline takes a topic as input and creates an interactive HTML quiz with 10 multiple-choice questions about that topic. How the Pipeline Works: This pipeline instructs the AI to:
Create 10 multiple-choice questions about the user's topic.
Structure them in an attractive, appealing HTML page.
Add JavaScript functionality to score the quiz.
Return only the HTML content (your agent display this content)
Step 6: Generating Quiz Questions with GenAI Pipeline
Drag Call GenAI Pipeline component onto the canvas.
Name it "Generate Quiz Questions".
In the properties panel:
Select the correct AI Model (such as "Claude").
Select your Generate Quiz Questions Pipeline from the dropdown.
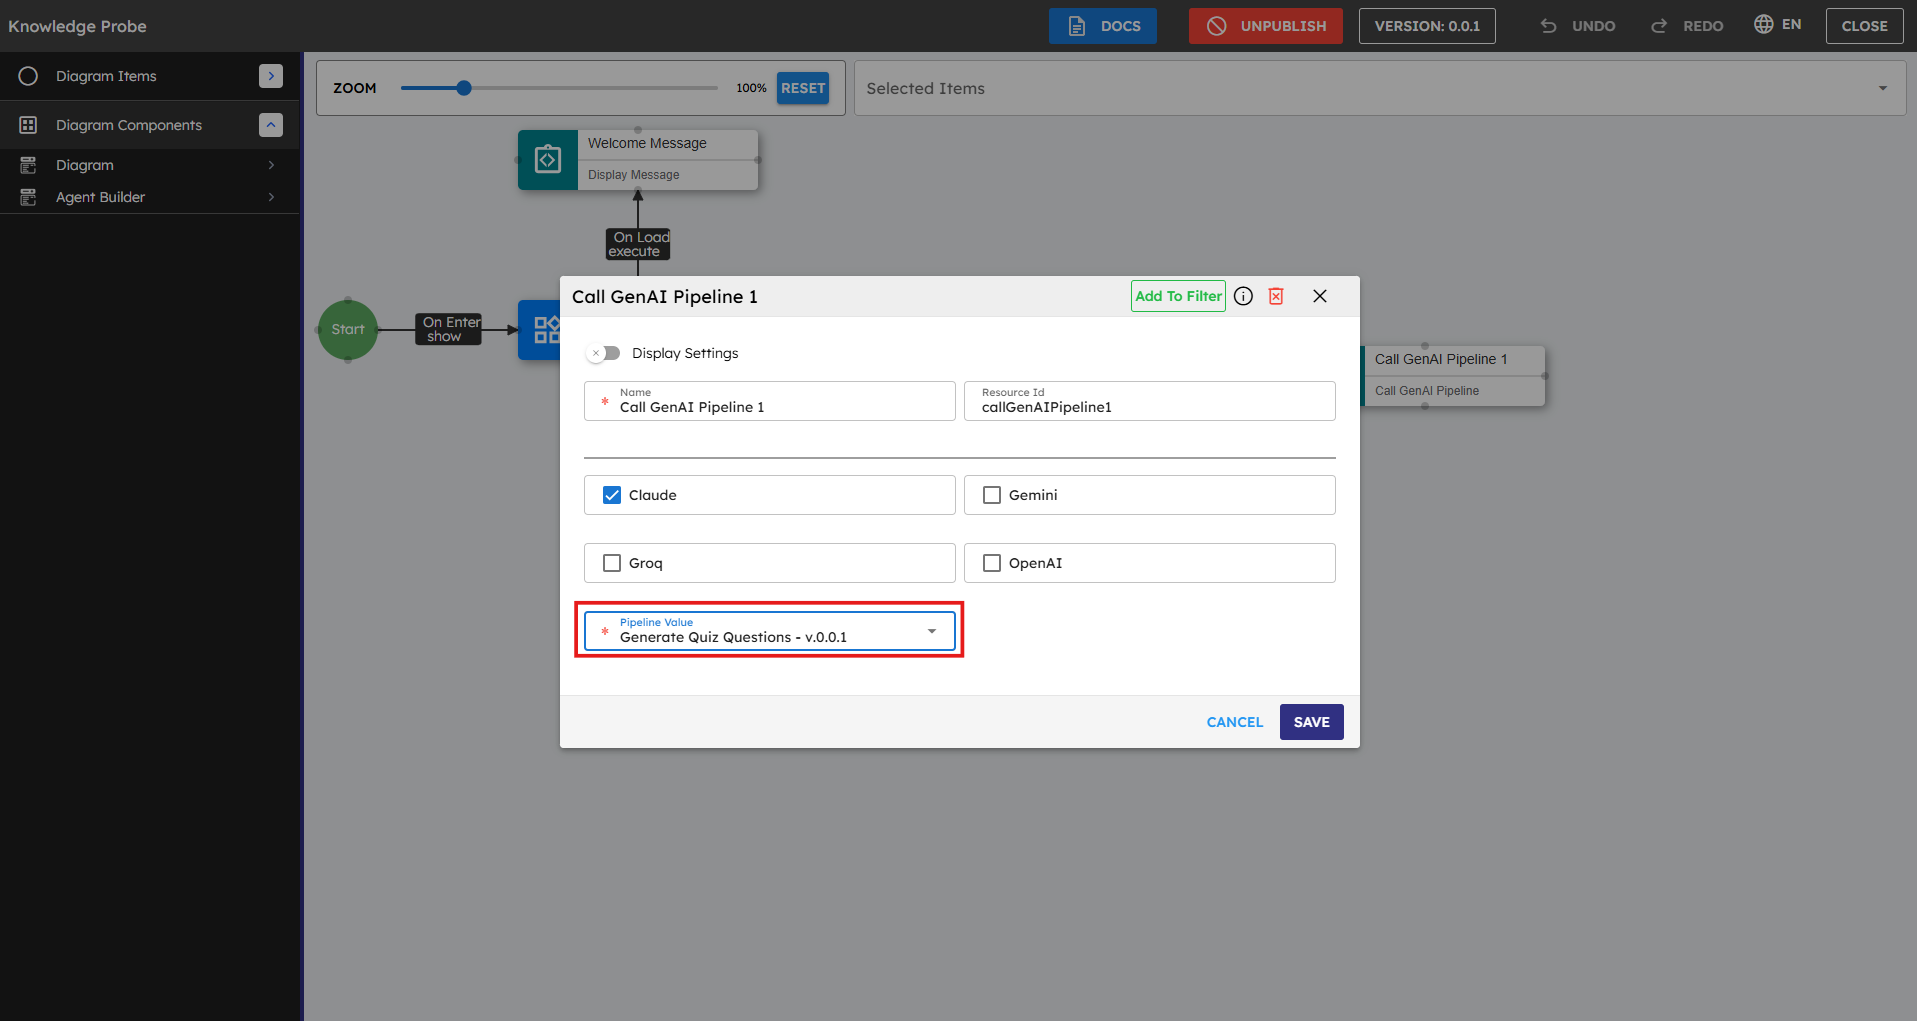 Figure 26: Configure Call GenAI Pipeline
Connect the Process Topic Input script to this pipeline:
Set Source Port to "onComplete"
Set Target Port to "execute"
Important: Make sure you create a Quiz Generation Pipeline before attempting this step. Design the pipeline to take a topic as input and return formatted quiz questions as output
Step 7: Displaying the Quiz Questions
You have successfully created your Quiz Generator Pipeline. Return to your agent in the Agent Builder and connect it to this pipeline. Your agent can now use the AI capabilities you set up to create quiz questions based on user input.
Drag the Display HTML component onto the canvas.
Name it "Display Quiz".
Connect the Generate Quiz Questions pipeline to this component:
Set Source Port to "onComplete"
Set Target Port to "execute"
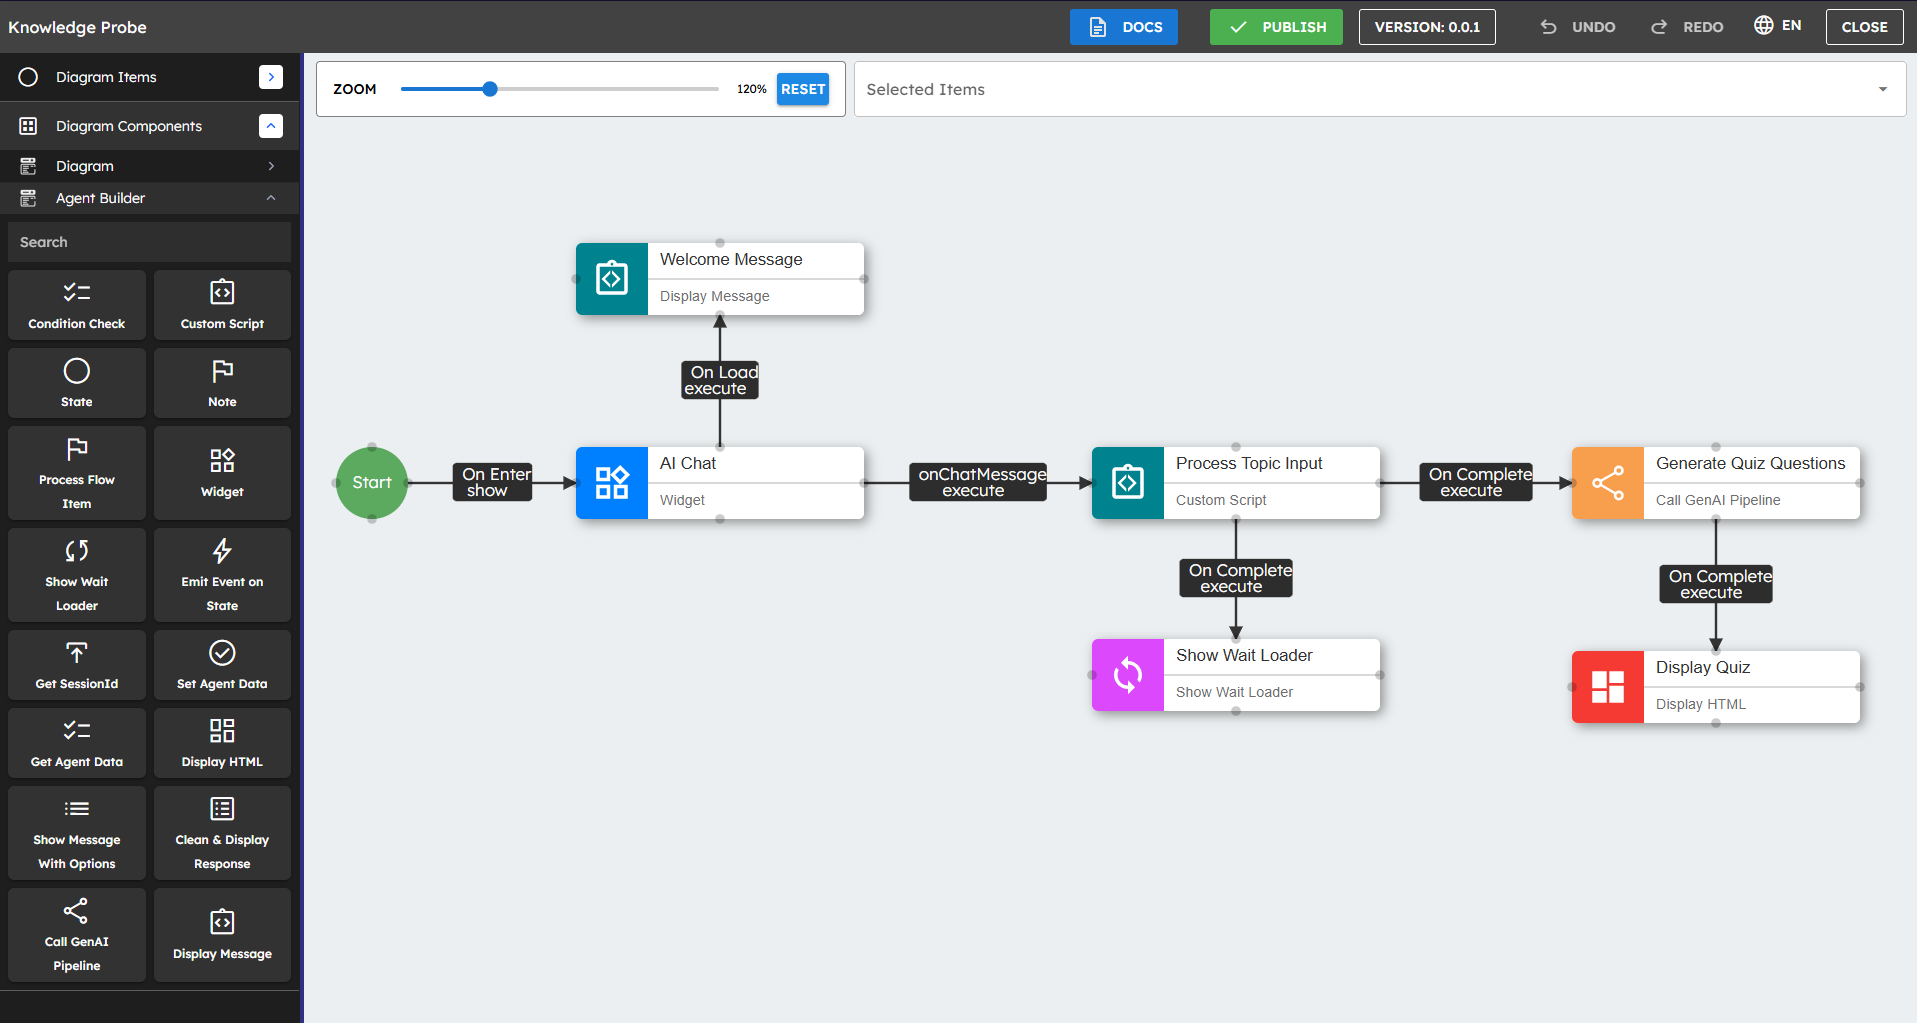
When using the Display HTML component, ensure your pipeline response contains HTML content at the specific path: result.text.data[0].result.html
{"result":{"text":{"data":[{"result":{"html":"<div>Your HTML content here</div>"}}]}}}You have finished creating the agent. It looks like the figure below:
Testing Your Quiz Generator
To test your Quiz Generator agent:
Click Publish (previously labeled as unpublished) at the top of the canvas.
Click Close. Then click Save.
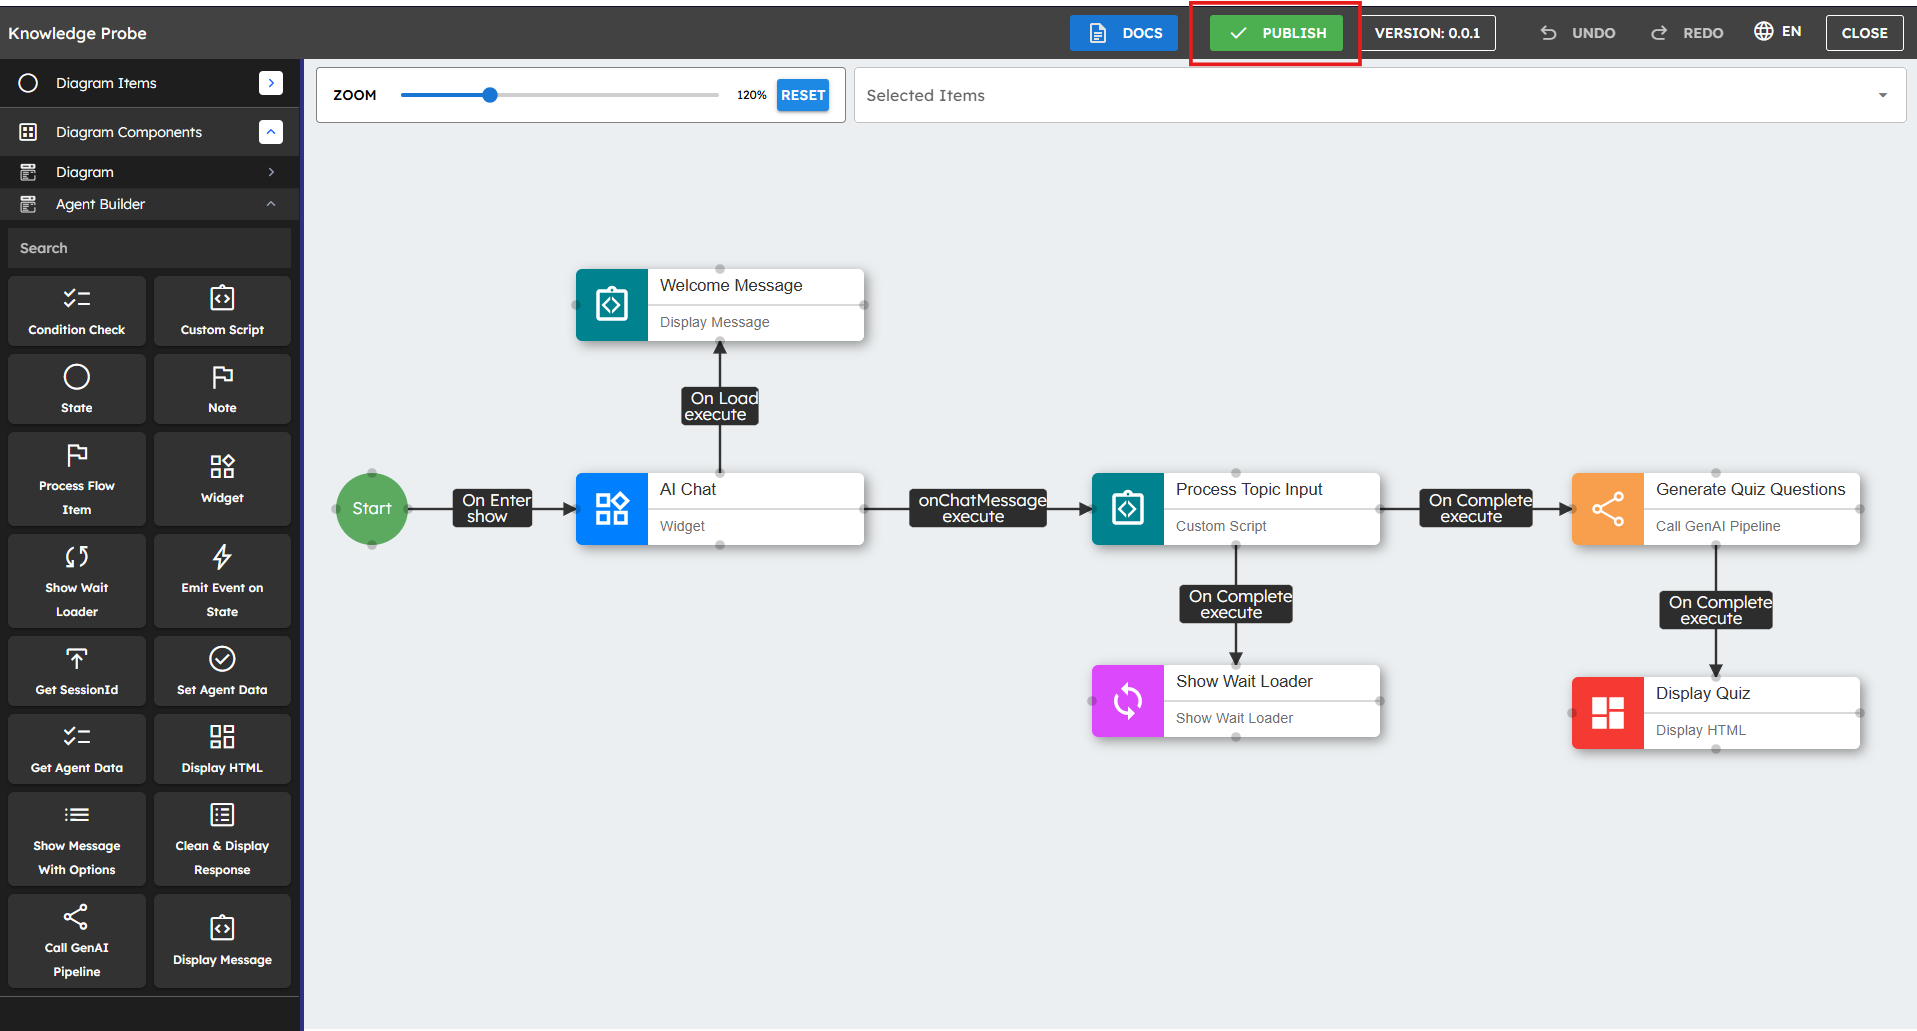 Figure 28: Publishing the Quiz Generator agent
Go to the NeoPilot homepage. Find your agent under the MY AGENTS section.
Click the agent to launch it.
When asked, enter a topic such as "Ancient Egypt" or "JavaScript Programming"
The agent creates and shows 10 quiz questions about your chosen topic.
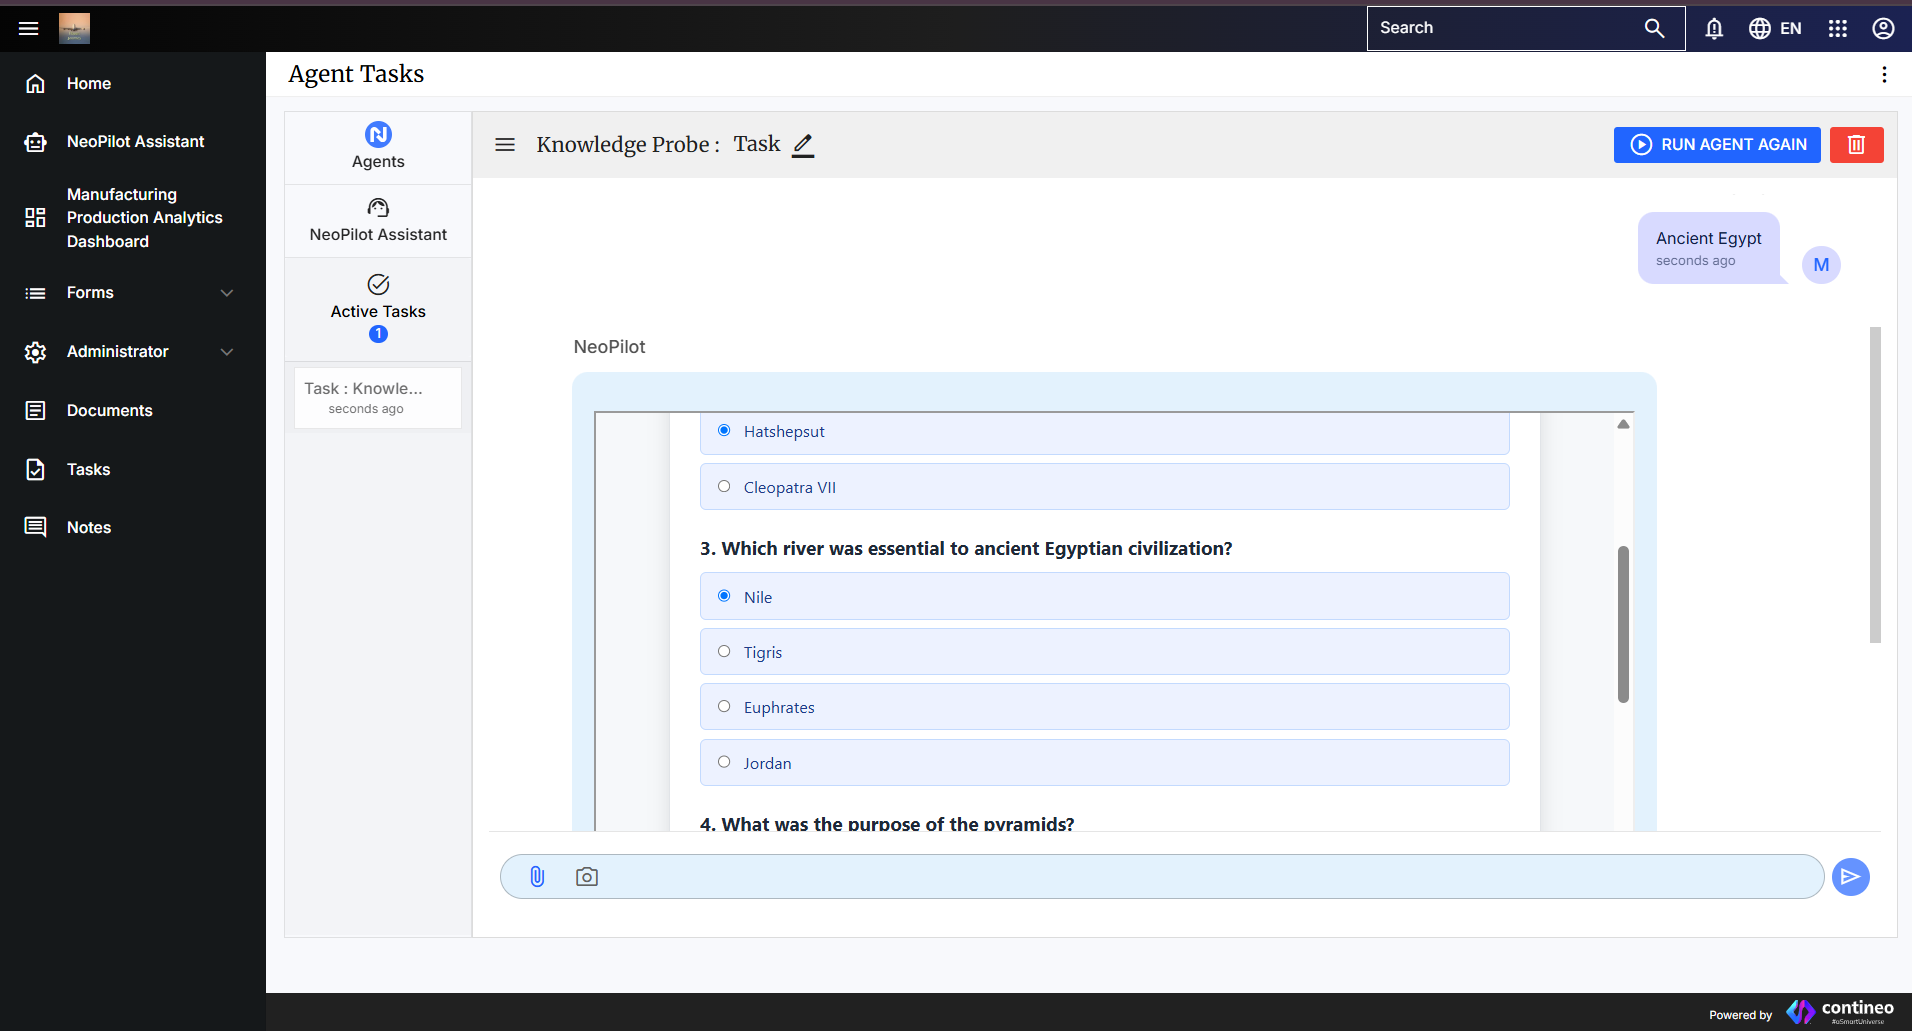 Figure 29: Example of a generated quiz
Extending Your Agent: To improve this agent, add features such as:
Let users choose the number of questions.
Let users select question difficulty levels.
Add multiple-choice answers to the questions.
Let users save or export the quiz.
5. Deployment and Testing: Making Your Agent Live
5.1 Testing Your Agent
Before you publish, test your agent to make sure it works correctly:
Check all connections to make sure they flow in order.
Make sure all important paths have error handling.
Check that you fill in all required fields in component properties.
Test different user inputs to see how your agent responds.
5.2 Publishing Your Agent
When you are satisfied with your agent, publish it to make it available for use:
Click 'Publish' at the top of the canvas (previously labeled as unpublished).
Click Close. Then click Save to return to the Workspace.
 Figure 30: Publish button location
5.3 Accessing Your Published Agent
After you publish, you can find and use your agent:
Go to the NeoPilot application's home page.
Click the Agents tab.
Find your agent under the MY AGENTS section.
Click your agent to start using it.
What you have now: A published agent that users can use. When you gain feedback, return to the Agent Builder to make improvements.
6. Best Practices: Tips for Success
6.1 Design for User Experience
Make your agent's purpose clear to users from the start.
Use simple, conversational language in messages.
Keep interactions focused on specific goals.
Give clear error messages when problems occur.
Use visual elements (such as buttons) for common choices.
6.2 Organize Your Flow
Put related components together on the canvas.
Use clear names for all components.
Add Note components to explain difficult sections.
Make a left-to-right or top-to-bottom flow for easy reading.
Break difficult processes into smaller sections you can manage.
6.3 Optimize Performance
Start pipelines only when you need them.
Store and reuse information instead of asking many times.
Show loading indicators during long operations.
Test with different inputs to make sure the agent works correctly.
6.4 Security Considerations
Never show sensitive information in chat messages.
Check all user inputs before you process them.
Be careful about what data you store and how long you keep it.
Test your agent completely before you share it with users.
7. Troubleshooting: Common Issues
7.1 Agent Not Responding
Problem: Your agent does not respond to user messages.
Possible Solutions:
Check that you connect and set up the AI Chat widget correctly.
Check that connect the "onChatMessage" event to response components.
Make sure Custom Scripts return values correctly.
7.2 Pipeline Errors
Problem: Your pipeline calls fail or give errors.
Possible Solutions:
Check that you select the correct pipeline in the properties
Check that the input format matches what the pipeline needs.
Check that you publish the pipeline and that it works independently.
Add error handling to show clear messages to users.
7.3 Components Not Executing
Problem: Some components in your flow do not run.
Possible Solutions:
Check all connections between components.
Check that you use the correct source and target ports.
Find conditional branches that may skip components.
Add logging in Custom Scripts to track execution.
7.4 Getting Additional Help
If you have problems not covered here:
Study the sample agents for examples of workflows.
Read the documentation for specific components.
Contact support through your NeoPilot account
8. Important Resources
Quick Access Links: These resources give detailed information about specific NeoPilot components and features.
Agent Building Components - Complete documentation of all available agent building blocks.
Advanced Concepts - Learn about advanced agent development methods and patterns.
GenAI Pipeline Builder - Guide to creating AI pipelines that run your agents.
Pipeline Builder Components - Catalog of components available for pipeline building.
UI Builder (Custom Widget Building) - Learn how to create custom UI widgets for your agents.
FAQ Sheet - Find quick answers to common questions about NeoPilot Agent Builder, troubleshooting tips, and best practices to help you create better agents.
Conclusion
Congratulations! You now know how to create your intelligent agents using NeoPilot's Agent Builder. Remember that building good agents is a step-by-step process. Start simple, test completely, and add more features as you become comfortable with the platform.
As you learn more about Agent Builder, you can create stronger AI assistants that handle difficult tasks and give real value to your users.